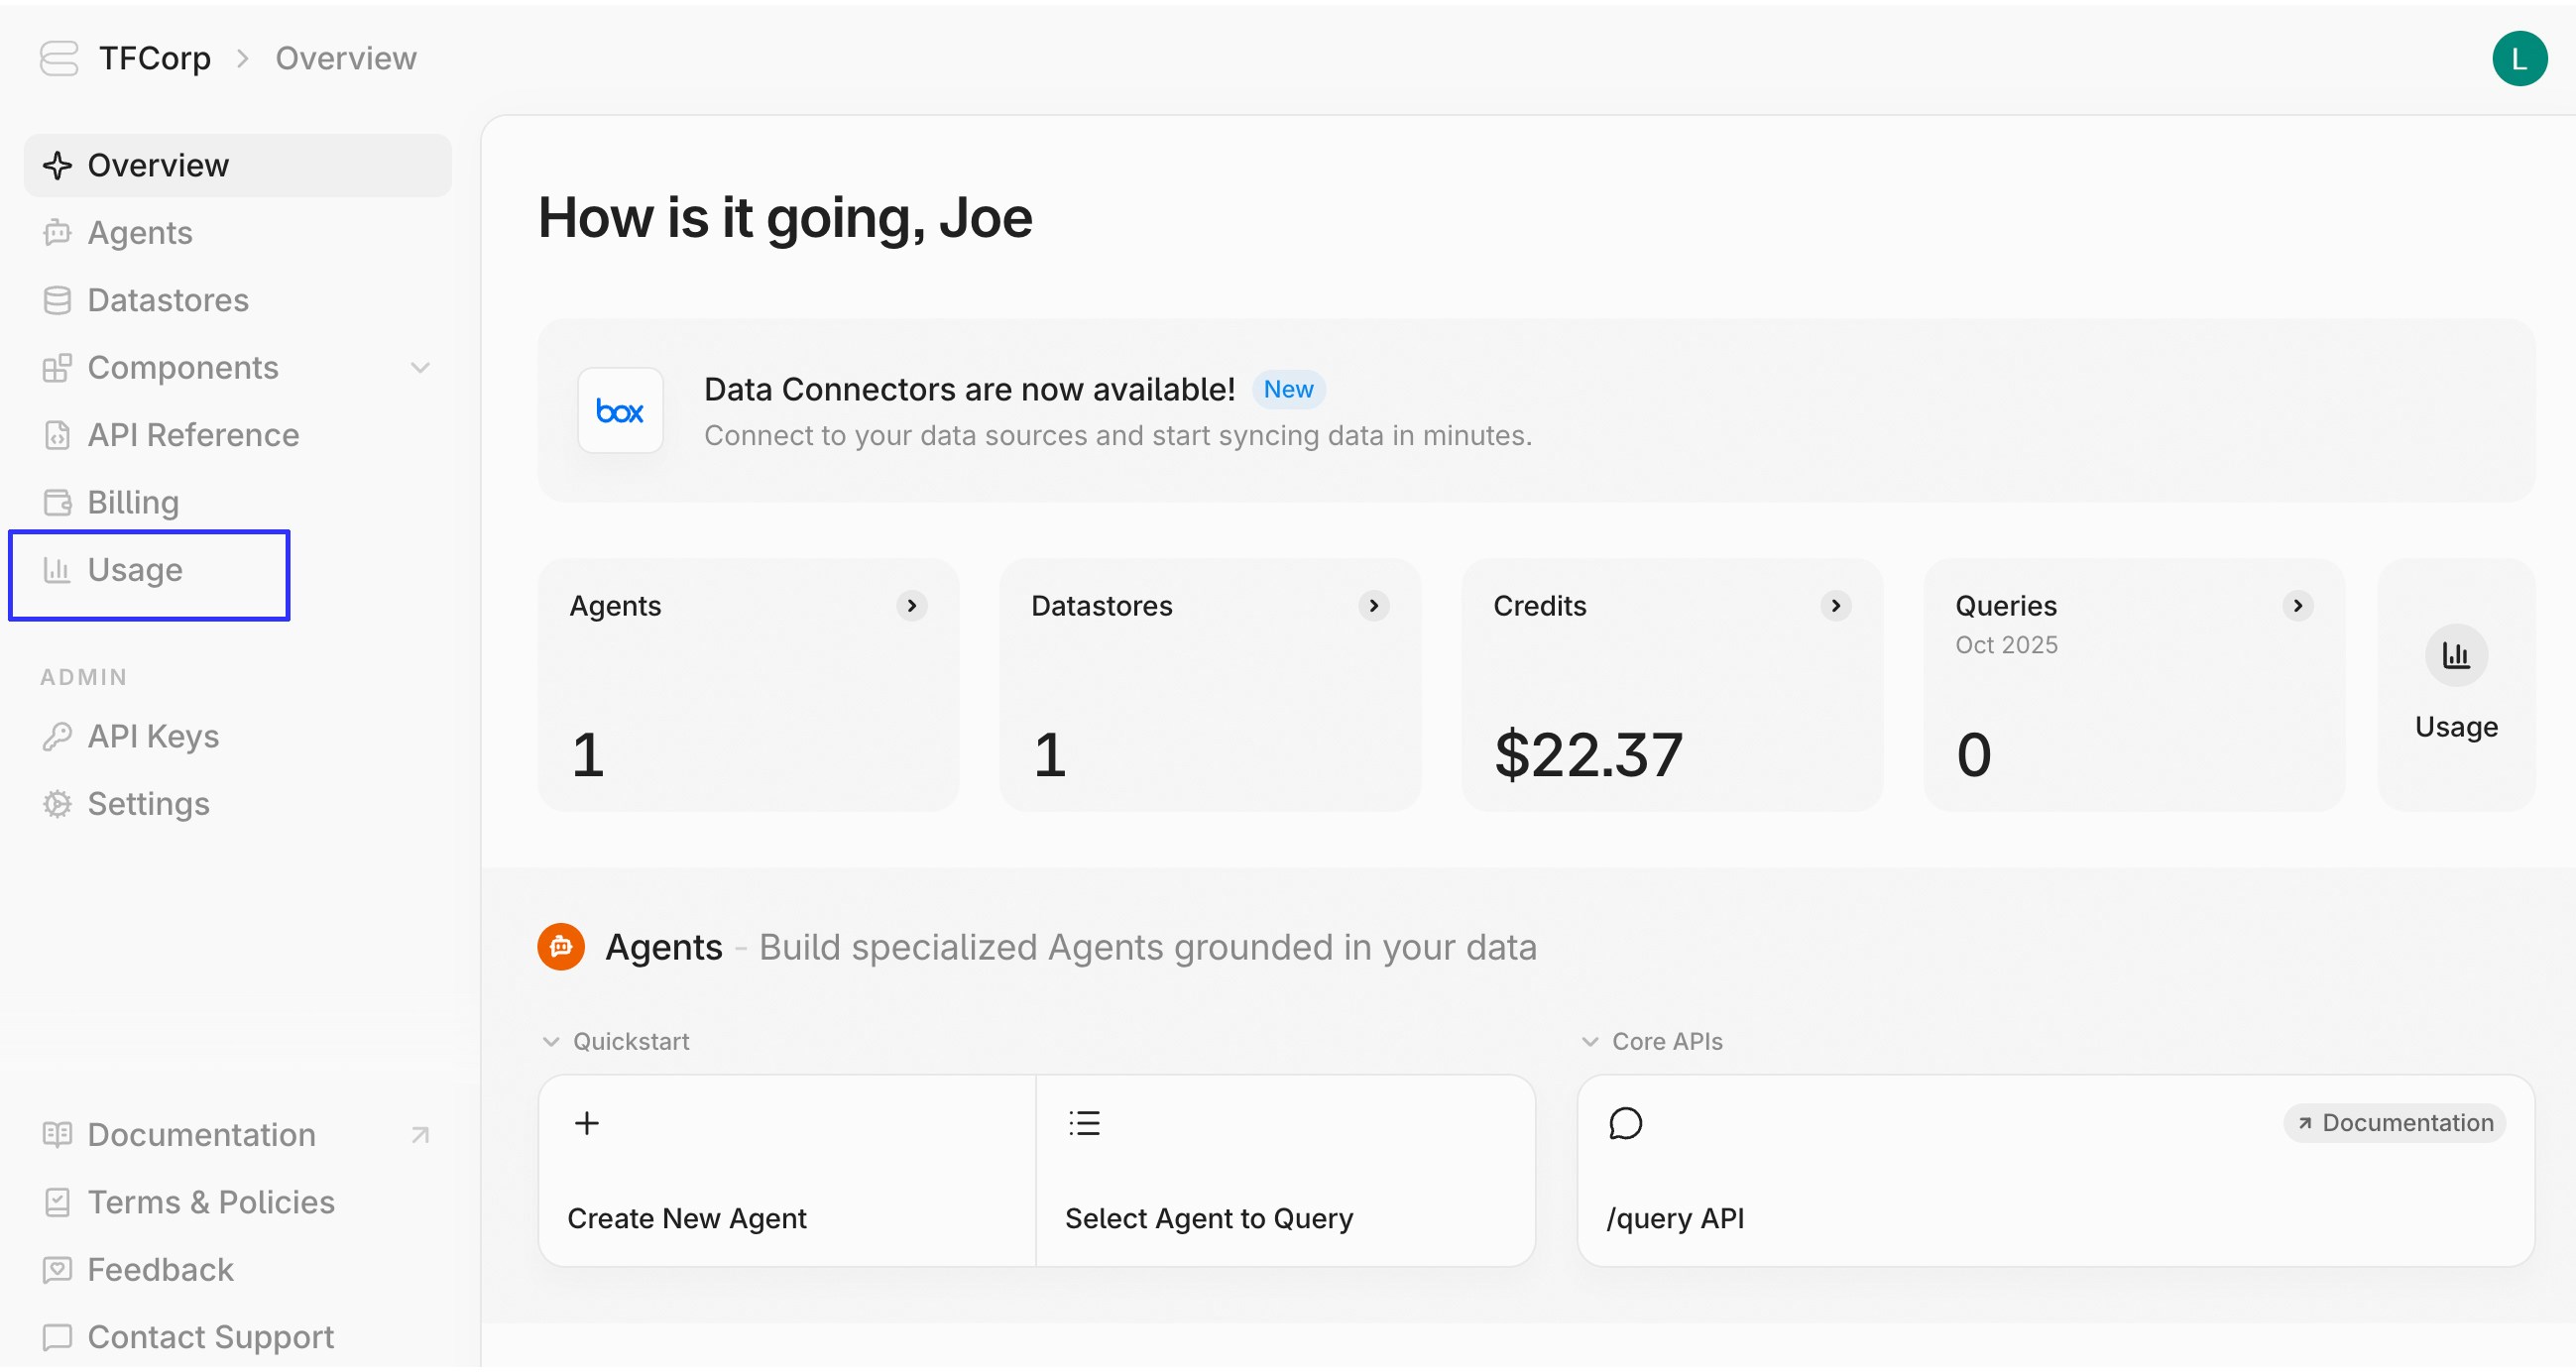
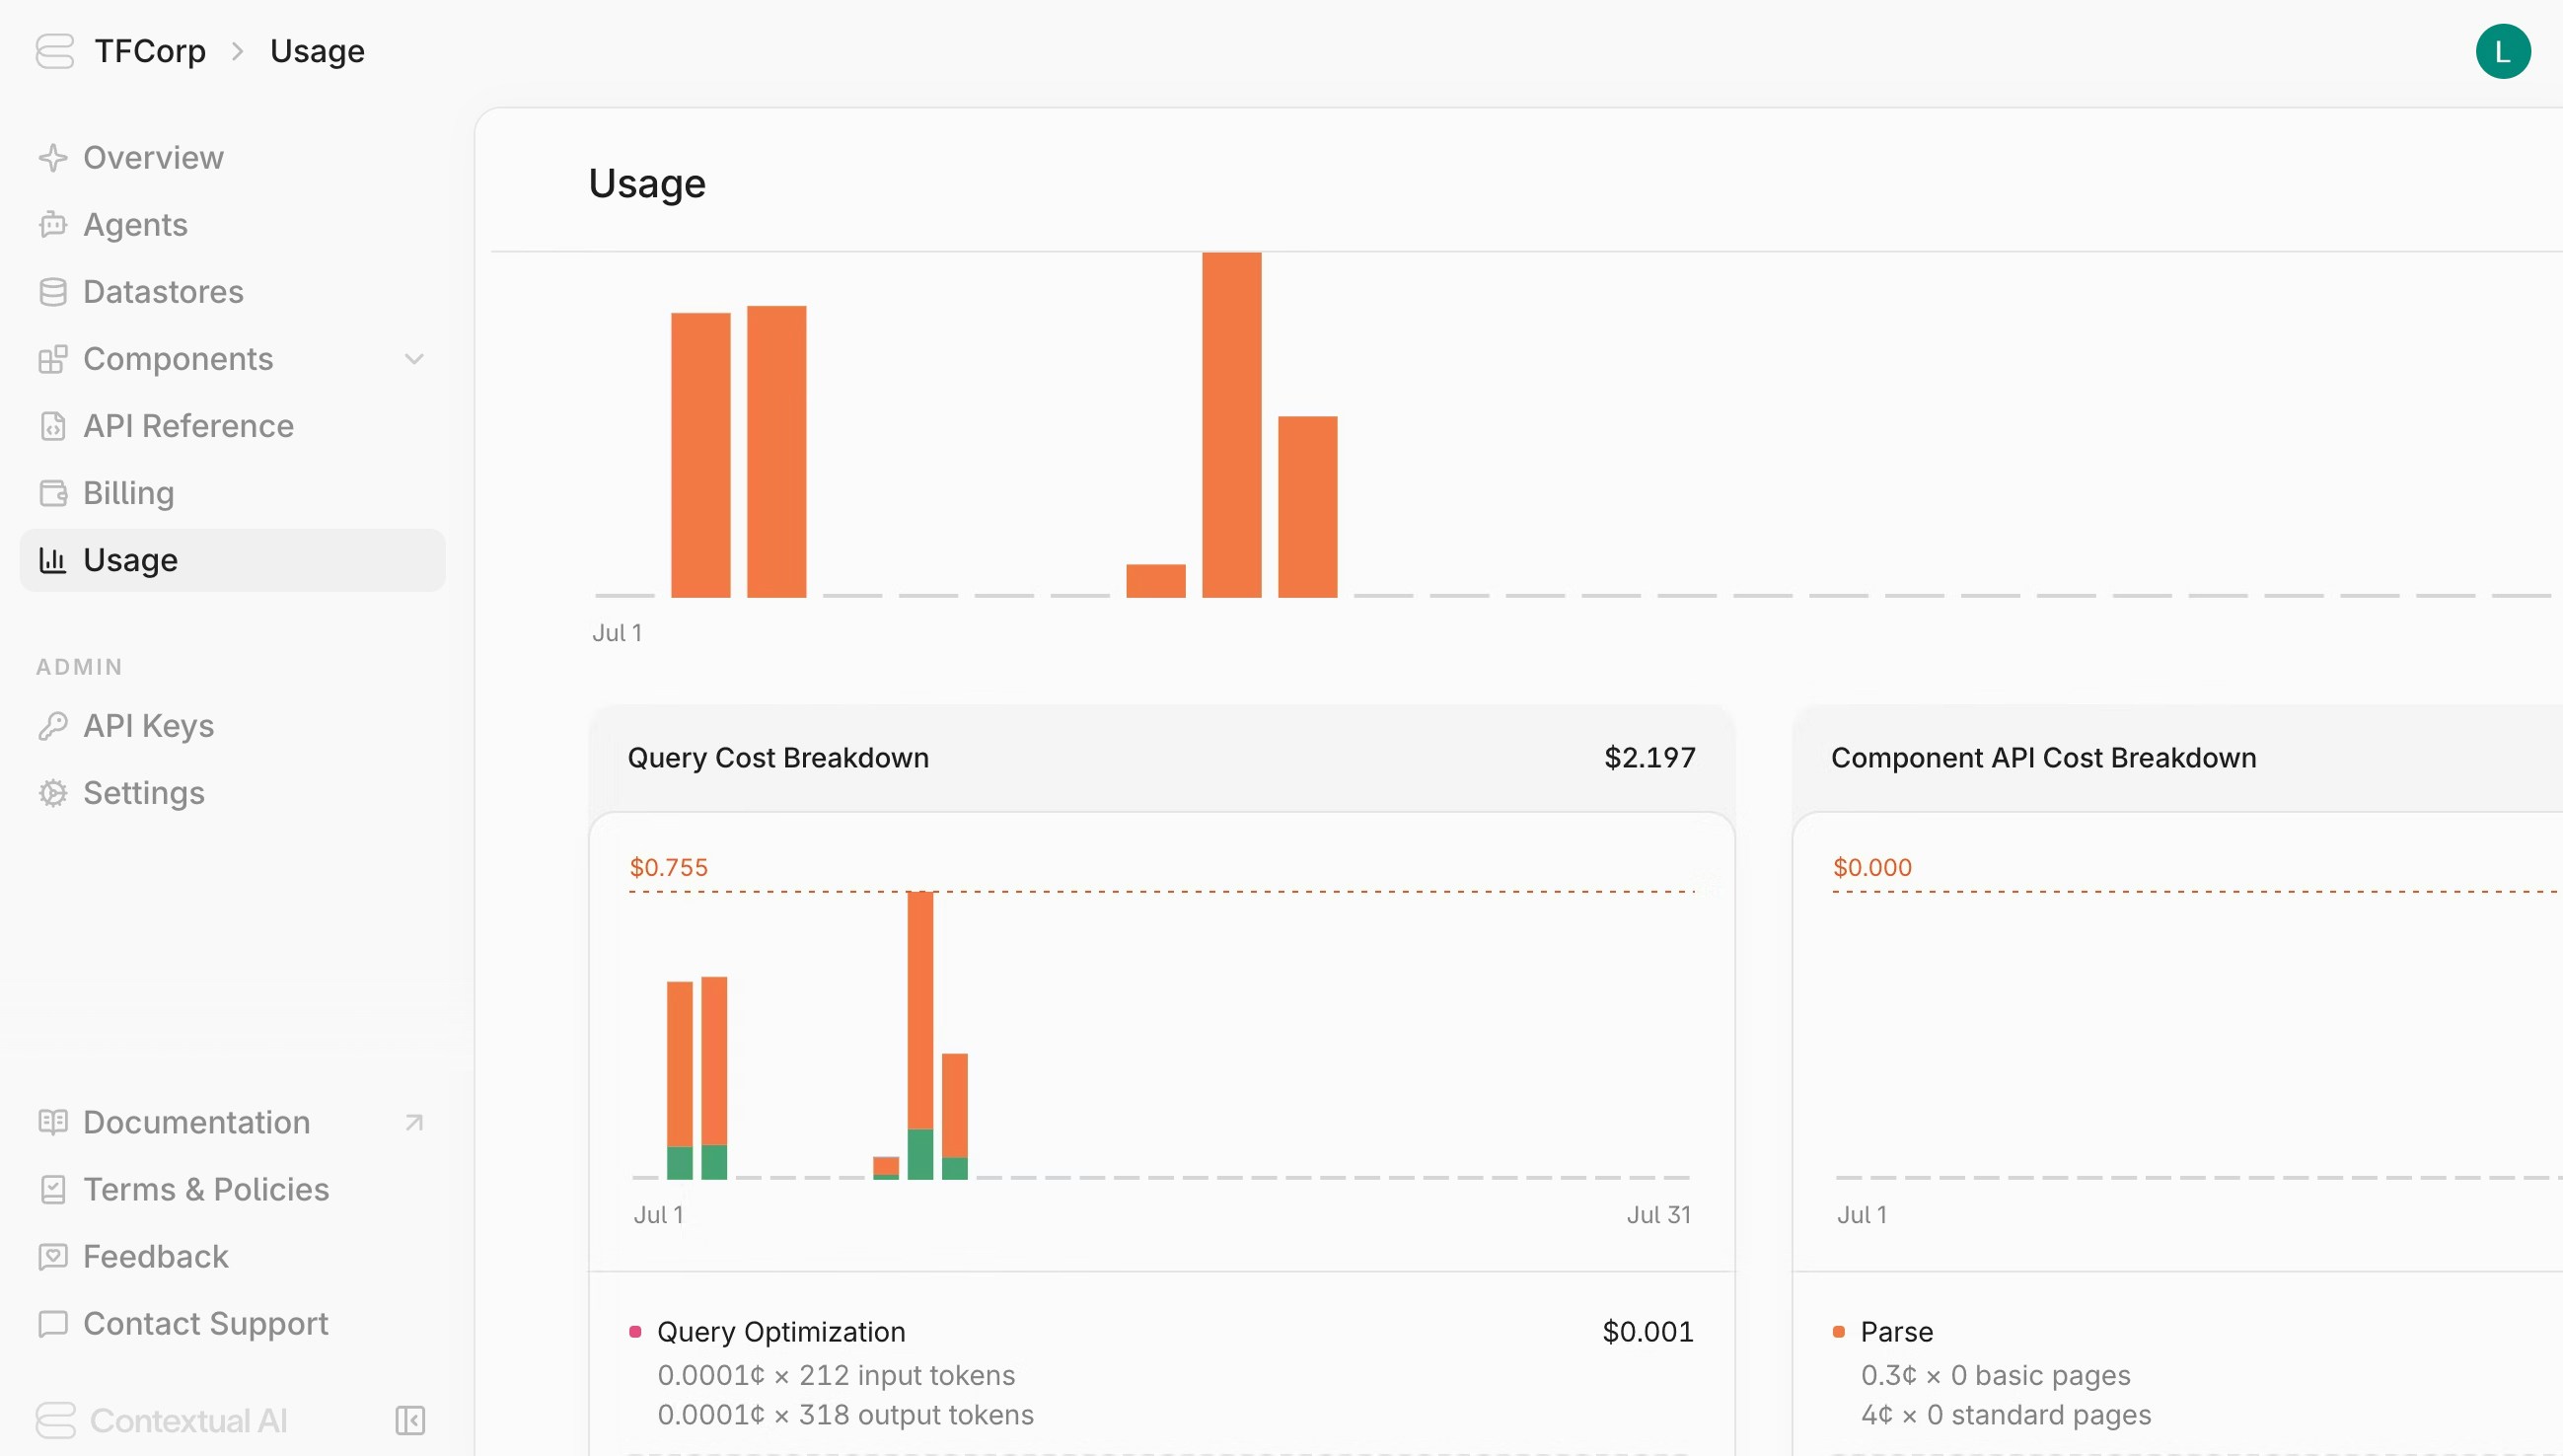
 The usage page shows a month-by-month breakdown of your usage and spend across the various charged components and endpoints.
 ### Adding & Managing Payment Methods
In order to top-up credits, you must have a valid payment method linked to your Contextual AI workspace. To link a payment method:
1. Navigate to the **Billing** page in your workspace
2. Click on **Payment Methods** in the **Learn More** section
3. Click the **+New** button in the upper right of the page
4. Fill out the card or bank information in the form, then click **Next**
5. Fill out your billing address, then click **Save Payment Method**
### Adding & Managing Payment Methods
In order to top-up credits, you must have a valid payment method linked to your Contextual AI workspace. To link a payment method:
1. Navigate to the **Billing** page in your workspace
2. Click on **Payment Methods** in the **Learn More** section
3. Click the **+New** button in the upper right of the page
4. Fill out the card or bank information in the form, then click **Next**
5. Fill out your billing address, then click **Save Payment Method**
 To remove an existing stored payment method:
1. Locate it in the list of payment methods
2. Click the menu icon
3. Click **Remove Payment Method**
To remove an existing stored payment method:
1. Locate it in the list of payment methods
2. Click the menu icon
3. Click **Remove Payment Method**
 ### Credit Top-Up
To continue using Contextual AI once your credits are depleted, you must add credits to your account. To top-up your credits:
1. Navigate to the **Billing** page in your workspace
2. Add a valid credit card under **Payment Methods,** if you havent already
3. Click **Add Credits** and fill out the corresponding form
4. Click **Next** and confirm the payment
### Credit Top-Up
To continue using Contextual AI once your credits are depleted, you must add credits to your account. To top-up your credits:
1. Navigate to the **Billing** page in your workspace
2. Add a valid credit card under **Payment Methods,** if you havent already
3. Click **Add Credits** and fill out the corresponding form
4. Click **Next** and confirm the payment
 # RBAC
Source: https://contextualai-new-home-nav.mintlify.app/admin-setup/rbac
Define custom roles and permission bundles across agents, datastores, and more
*********Contextual AI is excited to introduce Role-Based Access Control (RBAC) in Preview. RBAC is exclusive to customers on our Provisioned Throughput plan. Please contact your account team for more information.*********
Admins can now define custom roles with tailored permission bundles across key objects — including Agents, Datastores, Billing, and other administrative features. Permissions can be scoped to specific Agents or Datastores, enabling finer-grained governance so every team member has the right level of access for their role.
**Groups** make access management even simpler: add multiple users to a Group, then assign that Group to a Role.
## Roles
### Navigating to the Roles Page
First, click `Settings` under `Admin` in the side-panel.
# RBAC
Source: https://contextualai-new-home-nav.mintlify.app/admin-setup/rbac
Define custom roles and permission bundles across agents, datastores, and more
*********Contextual AI is excited to introduce Role-Based Access Control (RBAC) in Preview. RBAC is exclusive to customers on our Provisioned Throughput plan. Please contact your account team for more information.*********
Admins can now define custom roles with tailored permission bundles across key objects — including Agents, Datastores, Billing, and other administrative features. Permissions can be scoped to specific Agents or Datastores, enabling finer-grained governance so every team member has the right level of access for their role.
**Groups** make access management even simpler: add multiple users to a Group, then assign that Group to a Role.
## Roles
### Navigating to the Roles Page
First, click `Settings` under `Admin` in the side-panel.
 Next, click `Roles` under `Access Control`.
 ### Default Roles
Your tenant comes with three default roles:
* `Admin`: Default role with full access to agents, datastores, and workspace settings.
* `User`: Default role that every new user is automatically assigned to. This role **does not** come with any access to agents or datastores.
* `Power User`: Default role that grants read access to all agents and datastores.
By default, all new users are given the `User` role. They won't be able to access agents or datastores until they’re assigned a Role with higher-level permissions.
### Default Roles
Your tenant comes with three default roles:
* `Admin`: Default role with full access to agents, datastores, and workspace settings.
* `User`: Default role that every new user is automatically assigned to. This role **does not** come with any access to agents or datastores.
* `Power User`: Default role that grants read access to all agents and datastores.
By default, all new users are given the `User` role. They won't be able to access agents or datastores until they’re assigned a Role with higher-level permissions.
 ### Creating a Custom Role
You can create custom roles to meet your governance needs. Here are examples of custom roles you can create:
* **Billing Admin** – Access to billing and usage features
* **Data Ingestor** – Manage and ingest documents within specific Datastores
* **Agent User** – Query and interact with designated Agents
* **Agent Admin** – Maintain and optimize designated Agents
First, click "New Role" in the **Roles** page.
### Creating a Custom Role
You can create custom roles to meet your governance needs. Here are examples of custom roles you can create:
* **Billing Admin** – Access to billing and usage features
* **Data Ingestor** – Manage and ingest documents within specific Datastores
* **Agent User** – Query and interact with designated Agents
* **Agent Admin** – Maintain and optimize designated Agents
First, click "New Role" in the **Roles** page.
 Second, input a Role Name and Description. Click "Create role".
 ### Configuring Role Permissions
After creating a Role, you will be automatically directed to the Role page. The first tab is for you to configure permissions. Click “Add Permission” to associate a permission with the Role.
### Configuring Role Permissions
After creating a Role, you will be automatically directed to the Role page. The first tab is for you to configure permissions. Click “Add Permission” to associate a permission with the Role.
 You will need to select what type of object you want to grant access to. You have three options:
* `Agents`: Select this to give permissions on an agent
* `Datastores`: Select this to give permissions on a Datastore
* `Admin Tools`: Select this to give access to admin functions like billing and [annotating feedback](https://docs.contextual.ai/user-guides/feedback).
You will need to select what type of object you want to grant access to. You have three options:
* `Agents`: Select this to give permissions on an agent
* `Datastores`: Select this to give permissions on a Datastore
* `Admin Tools`: Select this to give access to admin functions like billing and [annotating feedback](https://docs.contextual.ai/user-guides/feedback).
 You can then configure permissions relevant to the object type you selected.
#### Configuring Agent Permissions
On the left, you’ll see a **list of available permissions**. Each defines what actions the Role can take.
* `Query Agents`: This permission will let assigned users query the agent.
* `Manage Agents`: This permission will let assigned users query the agent and edit its configs. It is a superset of `Query Agents`.
* `Create Agents`: This permission will let assigned users create an agent.
On the **right**, you’ll see the **objects** these permissions apply to.
* For `Query Agents` and `Manage Agents`, you can select specific agents or select `All Agents`.
* The`Create Agents` permission will apply globally.
You can then configure permissions relevant to the object type you selected.
#### Configuring Agent Permissions
On the left, you’ll see a **list of available permissions**. Each defines what actions the Role can take.
* `Query Agents`: This permission will let assigned users query the agent.
* `Manage Agents`: This permission will let assigned users query the agent and edit its configs. It is a superset of `Query Agents`.
* `Create Agents`: This permission will let assigned users create an agent.
On the **right**, you’ll see the **objects** these permissions apply to.
* For `Query Agents` and `Manage Agents`, you can select specific agents or select `All Agents`.
* The`Create Agents` permission will apply globally.
 #### Configuring Datastore Permissions
On the left, you’ll see a **list of available permissions**. Each defines what actions the Role can take.
* `Read Documents`: This permission will let assigned users see the datastore and read documents inside.
* `Manage Documents`: This permission will let assigned users read documents, as well as upload/delete them. It is a superset of `Read Documents`.
* `Manage Datastores`: This permission will let assigned users manage documents, as well as edit the datastore configs. It is a superset of `Manage Documents`.
* `Create Datastores`: This permission will let assigned users create a datastore.
On the **right**, you’ll see the **objects** these permissions apply to.
* For `Read Documents` , `Manage Documents` and `Manage Datastores`, you can select specific datastores or select `All Datastores`.
* The`Create Datastores` permission will apply globally.
#### Configuring Datastore Permissions
On the left, you’ll see a **list of available permissions**. Each defines what actions the Role can take.
* `Read Documents`: This permission will let assigned users see the datastore and read documents inside.
* `Manage Documents`: This permission will let assigned users read documents, as well as upload/delete them. It is a superset of `Read Documents`.
* `Manage Datastores`: This permission will let assigned users manage documents, as well as edit the datastore configs. It is a superset of `Manage Documents`.
* `Create Datastores`: This permission will let assigned users create a datastore.
On the **right**, you’ll see the **objects** these permissions apply to.
* For `Read Documents` , `Manage Documents` and `Manage Datastores`, you can select specific datastores or select `All Datastores`.
* The`Create Datastores` permission will apply globally.
 Note that if a user is granted **Query Agents** permission on an **Agent** but does **not** have **Read Documents** access to its linked Datastores, they will still be able to query data from those Datastores through the agent.
#### Configuring Admin Permissions
On the left, you’ll see a **list of available permissions**. Each defines what actions the Role can take.
* `Create Agents`: This permission will let assigned users create an agent.
* `Create Datastores`: This permission will let assigned users create a datastore.
* `Manage Billing & Usage`: This permission will let assigned users view and configure the `Billing` page.
* `Manage Feedback Annotation`: This permission will let assigned users [view and annotate agent-level feedback](https://docs.contextual.ai/user-guides/feedback).
All these permissions apply globally.
Note that if a user is granted **Query Agents** permission on an **Agent** but does **not** have **Read Documents** access to its linked Datastores, they will still be able to query data from those Datastores through the agent.
#### Configuring Admin Permissions
On the left, you’ll see a **list of available permissions**. Each defines what actions the Role can take.
* `Create Agents`: This permission will let assigned users create an agent.
* `Create Datastores`: This permission will let assigned users create a datastore.
* `Manage Billing & Usage`: This permission will let assigned users view and configure the `Billing` page.
* `Manage Feedback Annotation`: This permission will let assigned users [view and annotate agent-level feedback](https://docs.contextual.ai/user-guides/feedback).
All these permissions apply globally.
 ### Review your Permissions
Review all the permissions that you have provisioned for the Role. You can add more permissions or remove existing ones by clicking on the three dots beside each permission and clicking "Remove".
### Review your Permissions
Review all the permissions that you have provisioned for the Role. You can add more permissions or remove existing ones by clicking on the three dots beside each permission and clicking "Remove".
 ### Assigning a User to a Role
To assign a user to the Role, click the `Assigned Users` tab in the Roles Page.
### Assigning a User to a Role
To assign a user to the Role, click the `Assigned Users` tab in the Roles Page.
 Next, click "Assign Users". You'll be able to select multiple users to add to the role. Click "Confirm".
 Third, review the users you've added. You can add more users or remove existing ones by clicking on the three dots beside a user and clicking "Remove".
 **You’re all set!** The assigned users now have the access defined in this Role.
### Dealing with Role Conflicts
If a user is assigned to two roles with different permissions on the same object, we will take the **union of permissions**. Example:
* User is assigned to `Role A` which is given `Query Agents` on `All Agents`
* User is also assigned to `Role B` which is given the higher-level `Manage Agents` on `Agent A`.
* Outcome:
* User will have `Manage Agents` on `Agent A`
* User will have `Query Agents` on every other agent.
### Managing Roles
After creating a Role, you can return to its configuration page at any time. To do so, navigate to the **Roles** page and click on the Role you want to edit.
**You’re all set!** The assigned users now have the access defined in this Role.
### Dealing with Role Conflicts
If a user is assigned to two roles with different permissions on the same object, we will take the **union of permissions**. Example:
* User is assigned to `Role A` which is given `Query Agents` on `All Agents`
* User is also assigned to `Role B` which is given the higher-level `Manage Agents` on `Agent A`.
* Outcome:
* User will have `Manage Agents` on `Agent A`
* User will have `Query Agents` on every other agent.
### Managing Roles
After creating a Role, you can return to its configuration page at any time. To do so, navigate to the **Roles** page and click on the Role you want to edit.
 You can also delete a Role by clicking on the three dots beside it and clicking "Delete".
 ### Creating Agents and Datastores
If a user has created an Agent or Datastore, an owner Role will automatically be created with `Manage Agent` or `Manage Datastore` permissions. The user will automatically be assigned to that Role.
### Creating Agents and Datastores
If a user has created an Agent or Datastore, an owner Role will automatically be created with `Manage Agent` or `Manage Datastore` permissions. The user will automatically be assigned to that Role.
 ## Groups
### Navigating to the Groups page
Groups can help simplify access management. You can add multiple users to a Group and assign the Group to a Role.
First, click `Settings` under `Admin` in the side-panel.
## Groups
### Navigating to the Groups page
Groups can help simplify access management. You can add multiple users to a Group and assign the Group to a Role.
First, click `Settings` under `Admin` in the side-panel.
 ### Creating a Group
Click "New Group".
### Creating a Group
Click "New Group".
 Fill in Group Name and Description
 Click "Create group". You'll be automatically redirected to the Group page.
### Assigning Users to the Group
Click the tab "Assigned Users".
Click "Create group". You'll be automatically redirected to the Group page.
### Assigning Users to the Group
Click the tab "Assigned Users".
 Click "Assign Users" and select the users you want to include in the Group. Click "Confirm".
 Review the users you have added. You can add more users to the Group or remove existing users by clicking the three dots and clicking "Remove".
 ### Associating a Group with a Role
Navigate to the first tab: "Roles".
### Associating a Group with a Role
Navigate to the first tab: "Roles".
 Click "Add Roles".
You can select roles to associate with your Group.
Click "Add Roles".
You can select roles to associate with your Group.
 Click "Add Roles". You can add more roles or remove existing ones by clicking on the three dots and clicking "Remove".
 **You're set!** Members of the Group now have have the access defined in the attached Roles.
### Managing a Group
After creating a Group, you can return to its configuration page at any time. To do so, navigate to the **Groups** page and click on the Group you want to edit.
**You're set!** Members of the Group now have have the access defined in the attached Roles.
### Managing a Group
After creating a Group, you can return to its configuration page at any time. To do so, navigate to the **Groups** page and click on the Group you want to edit.
 You can also delete a Group by clicking on the three dots beside it and clicking "Delete".
 # SOC 2
Source: https://contextualai-new-home-nav.mintlify.app/admin-setup/soc2
Contextual AI SOC 2 Compliance
## Overview
Contextual AI is **SOC 2 Type II certified**, demonstrating that our security controls and operational practices meet the highest standards for protecting enterprise data.

This certification verifies that our systems, processes, and safeguards operate effectively over time—not just at a single point of audit.
***
## What SOC 2 Type II Means
SOC 2 Type II evaluates how well an organization upholds the **Trust Service Criteria**:
* **Security**
* **Availability**
* **Confidentiality**
An independent auditor verified that Contextual AI maintains strong, continuously monitored controls across all three criteria.
***
## Security at Every Layer
### Proven Security Controls
Our compliance audit confirms consistent adherence to stringent policies and processes governing data handling, infrastructure, and operations.
### Data Protection
* **Encryption in transit:** TLS 1.2+
* **Encryption at rest:** AES-256
* **Key management:** Cloud-native KMS services with restricted access
### Deployment Options
Choose the environment that fits your organization’s security posture:
* **SaaS** (fully managed)
* **VPC** (private cloud)
* **On-premises** (self-managed)
### Authentication & Access
* Enterprise **SSO** with **SAML** or **OIDC**
* **Role-based access control (RBAC)** for fine-grained permissions
***
## Core Security Controls
| Category | Description |
| ------------------------- | ---------------------------------------------------------------------------------------------- |
| **Application Security** | Continuous SAST/SCA scanning, dependency monitoring, and vulnerability management |
| **Business Continuity** | Kubernetes-based orchestration, automated failover, distributed infrastructure |
| **Monitoring & Response** | Real-time detection via centralized security data lake and defined incident-response playbooks |
| **Bug Bounty Program** | Ongoing responsible-disclosure program with independent security researchers |
***
## Continuous Compliance
* SOC 2 Type II is one component of our broader compliance framework.
* Contextual AI is hosted on **Google Cloud Platform**, which maintains its own certifications: SOC 2, SOC 3, PCI DSS, ISO/IEC 27017, and CSA STAR.
* We continuously evaluate and update controls to address evolving security and privacy requirements for enterprise AI systems.
***
## Learn More
* [SOC 2 Announcement](https://contextual.ai/blog/contextual-ai-is-soc-2-type-2-certified)
* [Security Overview](https://contextual.ai/security)
* [Trust Center](https://trust.contextual.ai/resources) – Request a copy of our SOC 2 Type II report
* [Contact Support](https://contextual.ai/contact-us) for compliance or security-related inquiries
# Get Metrics
Source: https://contextualai-new-home-nav.mintlify.app/api-reference/agents-query/get-metrics
api-reference/openapi.json get /agents/{agent_id}/metrics
Returns usage and user-provided feedback data. This information can be used for data-driven improvements and optimization.
# Get Retrieval Info
Source: https://contextualai-new-home-nav.mintlify.app/api-reference/agents-query/get-retrieval-info
api-reference/openapi.json get /agents/{agent_id}/query/{message_id}/retrieval/info
Return metadata of the contents used to generate the response for a given message.
# Provide Feedback
Source: https://contextualai-new-home-nav.mintlify.app/api-reference/agents-query/provide-feedback
api-reference/openapi.json post /agents/{agent_id}/feedback
Provide feedback for a generation or a retrieval. Feedback can be used to track overall `Agent` performance through the `Feedback` page in the Contextual UI, and as a basis for model fine-tuning.
# Query
Source: https://contextualai-new-home-nav.mintlify.app/api-reference/agents-query/query
api-reference/openapi.json post /agents/{agent_id}/query
Start a conversation with an `Agent` and receive its generated response, along with relevant retrieved data and attributions.
# Copy Agent
Source: https://contextualai-new-home-nav.mintlify.app/api-reference/agents/copy-agent
api-reference/openapi.json post /agents/{agent_id}/copy
Copy an existing agent with all its configurations and datastore associations. The copied agent will have "[COPY]" appended to its name.
# Create Agent
Source: https://contextualai-new-home-nav.mintlify.app/api-reference/agents/create-agent
api-reference/openapi.json post /agents
Create a new `Agent` with a specific configuration.
This creates a specialized RAG `Agent` which queries over one or multiple `Datastores` to retrieve relevant data on which its generations are grounded.
Retrieval and generation parameters are defined in the provided `Agent` configuration.
If no `datastore_id` is provided in the configuration, this API automatically creates an empty `Datastore` and configures the `Agent` to use the newly created `Datastore`.
> Note that self-serve users are currently required to create agents through our UI. Otherwise, they will receive the following message: "This endpoint is disabled as you need to go through checkout. Please use the UI to make this request."
# Delete Agent
Source: https://contextualai-new-home-nav.mintlify.app/api-reference/agents/delete-agent
api-reference/openapi.json delete /agents/{agent_id}
Delete a given `Agent`. This is an irreversible operation.
Note: `Datastores` which are associated with the `Agent` will not be deleted, even if no other `Agent` is using them. To delete a `Datastore`, use the `DELETE /datastores/{datastore_id}` API.
# Edit Agent
Source: https://contextualai-new-home-nav.mintlify.app/api-reference/agents/edit-agent
api-reference/openapi.json put /agents/{agent_id}
Modify a given `Agent` to utilize the provided configuration.
Fields not included in the request body will not be modified.
# Get Agent Metadata
Source: https://contextualai-new-home-nav.mintlify.app/api-reference/agents/get-agent-metadata
api-reference/openapi.json get /agents/{agent_id}/metadata
Get metadata and configuration of a given `Agent`.
# Get Template Configuration
Source: https://contextualai-new-home-nav.mintlify.app/api-reference/agents/get-template-configuration
api-reference/openapi.json get /agents/templates/{template}
# List Agents
Source: https://contextualai-new-home-nav.mintlify.app/api-reference/agents/list-agents
api-reference/openapi.json get /agents
Retrieve a list of all `Agents`.
# List Templates
Source: https://contextualai-new-home-nav.mintlify.app/api-reference/agents/list-templates
api-reference/openapi.json get /agents/templates
Retrieve a list of all available Templates.
# Reset Agent
Source: https://contextualai-new-home-nav.mintlify.app/api-reference/agents/reset-agent
api-reference/openapi.json put /agents/{agent_id}/reset
Reset a given `Agent` to default configuration.
# Save Template
Source: https://contextualai-new-home-nav.mintlify.app/api-reference/agents/save-template
api-reference/openapi.json post /agents/{agent_id}/template
# Disable Auto Top Up
Source: https://contextualai-new-home-nav.mintlify.app/api-reference/billing/disable-auto-top-up
api-reference/openapi.json post /billing/balance/auto-top-up/disable
Enable auto top-up for a tenant with a balance threshold and a top-up amount or Disable auto top-up for a tenant.
# Enable Auto Top Up
Source: https://contextualai-new-home-nav.mintlify.app/api-reference/billing/enable-auto-top-up
api-reference/openapi.json post /billing/balance/auto-top-up/enable
Enable auto top-up for a tenant with a balance threshold and a top-up amount or Disable auto top-up for a tenant.
# Get Auto Top Up Status
Source: https://contextualai-new-home-nav.mintlify.app/api-reference/billing/get-auto-top-up-status
api-reference/openapi.json get /billing/balance/auto-top-up
Get the auto top-up status for a tenant.
# Get Balance
Source: https://contextualai-new-home-nav.mintlify.app/api-reference/billing/get-balance
api-reference/openapi.json get /billing/balance
Get the remaining balance for a tenant
# Get Billing Metadata
Source: https://contextualai-new-home-nav.mintlify.app/api-reference/billing/get-billing-metadata
api-reference/openapi.json get /billing/metadata
Non admin endpoint for getting the billing metadata for a tenant.
# Get Billing Mode History
Source: https://contextualai-new-home-nav.mintlify.app/api-reference/billing/get-billing-mode-history
api-reference/openapi.json get /billing/billing_mode/history
Get the billing mode history for a tenant for a specific month.
Args: request: Request object containing year and month with validation user_context: User context with tenant admin permissions
Returns: Billing mode history records for the specified month and year Returns at least one entry which is the mode of the first date of the given month, with potential mode changes in the middle of the month. If no record found, defaults to LEGACY mode.
# Get Earliest Usage Date Endpoint
Source: https://contextualai-new-home-nav.mintlify.app/api-reference/billing/get-earliest-usage-date-endpoint
api-reference/openapi.json get /billing/usages/earliest_date
Get the earliest usage date for a tenant
# Get Monthly Usage Endpoint
Source: https://contextualai-new-home-nav.mintlify.app/api-reference/billing/get-monthly-usage-endpoint
api-reference/openapi.json get /billing/usages/monthly
Get monthly usage data for a tenant with validation for year and month parameters.
Args: request: Request object containing year and month with validation user_context: User context with tenant admin permissions resource_id: Optional[UUID]. If provided, get usage data for a specific resource. Otherwise, get aggregated usage data across all resources.
Returns: Monthly usage records for the specified month and year
# Get Top Up History Endpoint
Source: https://contextualai-new-home-nav.mintlify.app/api-reference/billing/get-top-up-history-endpoint
api-reference/openapi.json get /billing/balance/top-ups
Get the top-up history for a tenant. Paginated.
# Increment Balance
Source: https://contextualai-new-home-nav.mintlify.app/api-reference/billing/increment-balance
api-reference/openapi.json post /billing/balance
Increment the balance of a tenant
# Get Content Metadata
Source: https://contextualai-new-home-nav.mintlify.app/api-reference/contents/get-content-metadata
api-reference/openapi.json get /datastores/{datastore_id}/contents/{content_id}/metadata
# Get Document Contents
Source: https://contextualai-new-home-nav.mintlify.app/api-reference/contents/get-document-contents
api-reference/openapi.json get /datastores/{datastore_id}/contents
# Delete Document
Source: https://contextualai-new-home-nav.mintlify.app/api-reference/datastores-documents/delete-document
api-reference/openapi.json delete /datastores/{datastore_id}/documents/{document_id}
Delete a given document from its `Datastore`. This operation is irreversible.
# Edit Chunk Content
Source: https://contextualai-new-home-nav.mintlify.app/api-reference/datastores-documents/edit-chunk-content
api-reference/openapi.json put /datastores/{datastore_id}/chunks/{content_id}/content
Edit the content of a specific chunk in a datastore. This operation updates the chunk's text content and regenerates its embeddings.
# Get Document Metadata
Source: https://contextualai-new-home-nav.mintlify.app/api-reference/datastores-documents/get-document-metadata
api-reference/openapi.json get /datastores/{datastore_id}/documents/{document_id}/metadata
Get details of a given document, including its `name` and ingestion job `status`.
# Get Parse Results
Source: https://contextualai-new-home-nav.mintlify.app/api-reference/datastores-documents/get-parse-results
api-reference/openapi.json get /datastores/{datastore_id}/documents/{document_id}/parse
Get the parse results that are generated during ingestion for a given document. Retrieving parse results for existing documents ingested before the release of this endpoint is not supported and will return a 404 error.
# Ingest Document
Source: https://contextualai-new-home-nav.mintlify.app/api-reference/datastores-documents/ingest-document
api-reference/openapi.json post /datastores/{datastore_id}/documents
Ingest a document into a given `Datastore`.
Ingestion is an asynchronous task. Returns a document `id` which can be used to track the status of the ingestion job through calls to the `GET /datastores/{datastore_id}/documents/{document_id}/metadata` API.
This `id` can also be used to delete the document through the `DELETE /datastores/{datastore_id}/documents/{document_id}` API.
`file` must be a PDF, HTML, DOC(X) or PPT(X) file. The filename must end with one of the following extensions: `.pdf`, `.html`, `.htm`, `.mhtml`, `.doc`, `.docx`, `.ppt`, `.pptx`.
# List Documents
Source: https://contextualai-new-home-nav.mintlify.app/api-reference/datastores-documents/list-documents
api-reference/openapi.json get /datastores/{datastore_id}/documents
Get list of documents in a given `Datastore`, including document `id`, `name`, and ingestion job `status`.
Performs `cursor`-based pagination if the number of documents exceeds the requested `limit`. The returned `cursor` can be passed to the next `GET /datastores/{datastore_id}/documents` call to retrieve the next set of documents.
# Update Document Metadata
Source: https://contextualai-new-home-nav.mintlify.app/api-reference/datastores-documents/update-document-metadata
api-reference/openapi.json put /datastores/{datastore_id}/documents/{document_id}/metadata
Post details of a given document that will enrich the chunk and be added to the context or just for filtering. If Just for filtering, start with "_" in the key.
# Create Datastore
Source: https://contextualai-new-home-nav.mintlify.app/api-reference/datastores/create-datastore
api-reference/openapi.json post /datastores
Create a new `Datastore`.
A `Datastore` is a collection of documents. Documents can be ingested into and deleted from a `Datastore`.
A `Datastore` can be linked to one or more `Agents`, and conversely, an `Agent` can be associated with one or more `Datastores` to ground its responses with relevant data. This flexible many-to-many relationship allows `Agents` to draw from multiple sources of information. This linkage of `Datastore` to `Agent` is done through the `Create Agent` or `Edit Agent` APIs.
> Note that self-serve users are currently required to create datastores through our UI. Otherwise, they will receive the following message: "This endpoint is disabled as you need to go through checkout. Please use the UI to make this request."
# Delete Datastore
Source: https://contextualai-new-home-nav.mintlify.app/api-reference/datastores/delete-datastore
api-reference/openapi.json delete /datastores/{datastore_id}
Delete a given `Datastore`, including all the documents ingested into it. This operation is irreversible.
This operation will fail with status code 400 if there is an active `Agent` associated with the `Datastore`.
# Edit Datastore Configuration
Source: https://contextualai-new-home-nav.mintlify.app/api-reference/datastores/edit-datastore-configuration
api-reference/openapi.json put /datastores/{datastore_id}
# Get Datastore Metadata
Source: https://contextualai-new-home-nav.mintlify.app/api-reference/datastores/get-datastore-metadata
api-reference/openapi.json get /datastores/{datastore_id}/metadata
Get the details of a given `Datastore`, including its name, create time, and the list of `Agents` which are currently configured to use the `Datastore`.
# List Datastores
Source: https://contextualai-new-home-nav.mintlify.app/api-reference/datastores/list-datastores
api-reference/openapi.json get /datastores
Retrieve a list of `Datastores`.
Performs `cursor`-based pagination if the number of `Datastores` exceeds the requested `limit`. The returned `cursor` can be passed to the next `GET /datastores` call to retrieve the next set of `Datastores`.
# Reset Datastore
Source: https://contextualai-new-home-nav.mintlify.app/api-reference/datastores/reset-datastore
api-reference/openapi.json put /datastores/{datastore_id}/reset
Reset the give `Datastore`. This operation is irreversible and it deletes all the documents associated with the datastore.
# Create Schema
Source: https://contextualai-new-home-nav.mintlify.app/api-reference/extract/create-schema
api-reference/openapi.json post /extract/schemas
Create a new extraction schema.
Creates a JSON Schema that defines the structure of data to extract from documents. The schema must conform to our supported subset of JSON Schema 2020-12 features.
Supported Schema Features:
Basic Types: 1. string: Text data with optional constraints (minLength, maxLength, pattern, enum) 2. integer: Whole numbers with optional constraints (minimum, maximum, enum) 3. number: Decimal numbers with optional constraints (minimum, maximum, enum) 4. boolean: True/false values 5. null: Null values (often used with anyOf for optional fields)
Complex Types: 1. object: Key-value pairs with defined properties 2. array: Lists of items with defined item schemas 3. anyOf: Union types (e.g., string or null for optional fields)
String Formats: Supported formats: date-time, time, date, duration, email, hostname, ipv4, ipv6, uuid, uri
Schema Structure: 1. Root schema must be an object type 2. Use $defs for reusable schema components 3. Use $ref to reference definitions 4. Arrays must have items schema defined
Constraints: 1. Maximum 10 leaf nodes per array (prevents overly complex schemas) 2. No circular references in $ref definitions 3. String formats must be from the supported list
Example Schemas:
Simple Company Schema:
```json
{
"type": "object",
"properties": {
"company_name": {
"type": "string",
"description": "The name of the company exactly as it appears in the document"
},
"form_type": {
"type": "string",
"enum": ["10-K", "10-Q", "8-K", "S-1"],
"description": "The type of SEC form"
},
"trading_symbol": {
"type": "string",
"description": "The trading symbol of the company"
},
"zip_code": {
"type": "integer",
"description": "The zip code of the company headquarters"
}
},
"required": ["company_name", "form_type", "trading_symbol", "zip_code"]
}
```
Complex Resume Schema:
```json
{
"type": "object",
"properties": {
"personalInfo": {
"type": "object",
"properties": {
"fullName": {"type": "string"},
"contact": {
"type": "object",
"properties": {
"emails": {
"type": "array",
"items": {"type": "string", "format": "email"}
},
"phones": {
"type": "array",
"items": {"type": "string"}
}
}
}
},
"required": ["fullName"]
},
"workExperience": {
"type": "array",
"items": {
"type": "object",
"properties": {
"jobTitle": {"type": "string"},
"company": {"type": "string"},
"startDate": {"type": "string"},
"endDate": {"type": ["string", "null"]},
"isCurrent": {"type": "boolean"}
},
"required": ["jobTitle", "company", "startDate"]
}
}
},
"required": ["personalInfo", "workExperience"]
}
```
Schema with References:
```json
{
"type": "object",
"properties": {
"algorithms": {
"type": "array",
"items": {"$ref": "#/$defs/algorithm"}
}
},
"$defs": {
"algorithm": {
"type": "object",
"properties": {
"name": {"type": "string"},
"description": {"type": "string"}
},
"required": ["name"]
}
}
}
```
Best Practices: 1. Use descriptive field names that clearly indicate what data should be extracted 2. Add detailed descriptions to help the AI understand what to extract 3. Use enums for known values (e.g., form types, status values) 4. Make fields optional by using anyOf with null or omitting from required 5. Use arrays for lists of similar items (e.g., work experience, education) 6. Keep schemas focused - avoid overly complex nested structures 7. Test with sample documents to ensure the schema captures the expected data
# Delete Document
Source: https://contextualai-new-home-nav.mintlify.app/api-reference/extract/delete-document
api-reference/openapi.json delete /extract/documents/{document_id}
Delete a document.
# Delete Schema
Source: https://contextualai-new-home-nav.mintlify.app/api-reference/extract/delete-schema
api-reference/openapi.json delete /extract/schemas/{schema_id}
Delete a schema.
# Get Document
Source: https://contextualai-new-home-nav.mintlify.app/api-reference/extract/get-document
api-reference/openapi.json get /extract/documents/{document_id}
Get document information by ID.
# Get Job Results
Source: https://contextualai-new-home-nav.mintlify.app/api-reference/extract/get-job-results
api-reference/openapi.json get /extract/jobs/{job_id}/results
Get the results of a completed extraction job.
# Get Job Status
Source: https://contextualai-new-home-nav.mintlify.app/api-reference/extract/get-job-status
api-reference/openapi.json get /extract/jobs/{job_id}
Get the status of an extraction job.
# Get Schema
Source: https://contextualai-new-home-nav.mintlify.app/api-reference/extract/get-schema
api-reference/openapi.json get /extract/schemas/{schema_id}
Get schema information by ID.
# List Documents
Source: https://contextualai-new-home-nav.mintlify.app/api-reference/extract/list-documents
api-reference/openapi.json get /extract/documents
List documents for structured extraction.
# List Jobs
Source: https://contextualai-new-home-nav.mintlify.app/api-reference/extract/list-jobs
api-reference/openapi.json get /extract/jobs
List extraction jobs.
# List Schemas
Source: https://contextualai-new-home-nav.mintlify.app/api-reference/extract/list-schemas
api-reference/openapi.json get /extract/schemas
List schemas with optional search.
# Start Extraction Job
Source: https://contextualai-new-home-nav.mintlify.app/api-reference/extract/start-extraction-job
api-reference/openapi.json post /extract/jobs
Start a new structured extraction job.
Extracts structured data from a PDF document using AI models based on a JSON Schema. The document_id and schema_id must be valid UUIDs of previously uploaded documents and created schemas.
How It Works: 1. Document Processing: The system analyzes the PDF document and splits it into manageable sections 2. Schema Analysis: Your JSON schema is parsed and validated for supported features 3. AI Extraction: The AI model processes each section and extracts data according to your schema 4. Validation: Extracted data is validated against your schema to ensure accuracy 5. Results: Structured data is returned in the format defined by your schema
Supported Models: 1. gemini-2.5-flash: Fast, cost-effective model for most use cases (default) 2. gemini-2.5-pro: More powerful model for complex extractions
Configuration Options:
Basic Settings: 1. model: AI model to use for extraction 2. max_num_concurrent_requests: Number of parallel processing requests (1-20) 3. validate_response_schema: Whether to validate extracted data against schema
Advanced Settings: 1. per_key_attribution: Enable detailed reasoning and confidence scores for each field 2. temperature: Control randomness in AI responses (0.0-2.0) 3. seed: Set random seed for reproducible results 4. enable_thinking: Show AI reasoning process 5. n_max_retries: Maximum retry attempts for failed requests
Job Lifecycle: 1. pending: Job is queued and waiting to start 2. processing: AI is actively extracting data from the document 3. completed: Extraction finished successfully with results 4. failed: Extraction failed due to an error 5. cancelled: Job was cancelled before completion
Monitoring Progress: Use the /jobs/{job_id} endpoint to check job status and progress: 1. completion_percentage: Overall progress (0-100) 2. current_step: Current processing stage 3. fields_processed: Number of schema fields completed 4. estimated_remaining_time: Time until completion
Getting Results: Once a job is completed, use /jobs/{job_id}/results to retrieve: 1. results: Extracted data conforming to your schema 2. metadata: Processing information, costs, and performance metrics 3. attributions: (if enabled) Reasoning and confidence scores for each field
Example Request:
```json
{
"document_id": "123e4567-e89b-12d3-a456-426614174000",
"schema_id": "987fcdeb-51a2-43d1-b456-426614174000",
"config": {
"model": "gemini-2.5-flash",
"per_key_attribution": true,
"temperature": 0.1,
"enable_thinking": true
}
}
```
Example Response:
```json
{
"job_id": "456e7890-e89b-12d3-a456-426614174000",
"status": "pending",
"created_at": "2025-01-11T18:35:00Z",
"estimated_completion": "2025-01-11T18:40:00Z"
}
```
Error Handling: Status 400: Bad Request (invalid document_id or schema_id format) Status 404: Not Found (document or schema not found) Status 422: Unprocessable Entity (invalid schema definition) Status 500: Internal Server Error (processing error)
# Update Schema
Source: https://contextualai-new-home-nav.mintlify.app/api-reference/extract/update-schema
api-reference/openapi.json put /extract/schemas/{schema_id}
Update an existing schema.
# Upload Document
Source: https://contextualai-new-home-nav.mintlify.app/api-reference/extract/upload-document
api-reference/openapi.json post /extract/documents/upload
Upload a document for structured extraction.
Uploads a PDF document that can be used for structured data extraction. Only PDF files are supported.
Supported File Types: 1. PDF files only (.pdf extension) 2. Maximum file size: 50MB (recommended) 3. Documents are processed and validated upon upload
Document Processing: 1. File size and page count are automatically calculated 2. Document is validated for PDF format and readability 3. Metadata is extracted and stored for future reference 4. Document is stored securely and can be referenced by ID
Usage: After uploading, you'll receive a document_id that can be used with: 1. /jobs endpoint to start extraction jobs 2. /documents/{document_id} to retrieve document information 3. /documents/{document_id} DELETE to remove the document
Example Response:
```json
{
"document_id": "123e4567-e89b-12d3-a456-426614174000",
"file_name": "financial_report.pdf",
"file_size": 2048576,
"page_count": 45,
"uploaded_at": "2025-01-11T18:35:00Z",
"status": "uploaded"
}
```
# Generate
Source: https://contextualai-new-home-nav.mintlify.app/api-reference/generate/generate
api-reference/openapi.json post /generate
Generate a response using Contextual's Grounded Language Model (GLM), an LLM engineered specifically to prioritize faithfulness to in-context retrievals over parametric knowledge to reduce hallucinations in Retrieval-Augmented Generation and agentic use cases.
The total request cannot exceed 32,000 tokens.
See our [blog post](https://contextual.ai/blog/introducing-grounded-language-model/) and [code examples](https://colab.research.google.com/github/ContextualAI/examples/blob/main/03-standalone-api/02-generate/generate.ipynb). Email [glm-feedback@contextual.ai](mailto:glm-feedback@contextual.ai) with any feedback or questions.
# LMUnit
Source: https://contextualai-new-home-nav.mintlify.app/api-reference/lmunit/lmunit
api-reference/openapi.json post /lmunit
Given a `query`, `response`, and a `unit_test`, return the response's `score` on the unit test on a 5-point continuous scale. The total input cannot exceed 7000 tokens.
See a code example in [our blog post](https://contextual.ai/news/lmunit/). Email [lmunit-feedback@contextual.ai](mailto:lmunit-feedback@contextual.ai) with any feedback or questions.
>🚀 Obtain an LMUnit API key by completing [this form](https://contextual.ai/request-lmunit-api/)
# Parse File
Source: https://contextualai-new-home-nav.mintlify.app/api-reference/parse/parse-file
api-reference/openapi.json post /parse
Parse a file into a structured Markdown and/or JSON. Files must be less than 100MB and 400 pages. We use LibreOffice to convert DOC(X) and PPT(X) files to PDF, which may affect page count.
See our [blog post](https://contextual.ai/blog/document-parser-for-rag) and [code examples](https://github.com/ContextualAI/examples/blob/main/03-standalone-api/04-parse/parse.ipynb). Email [parse-feedback@contextual.ai](mailto:parse-feedback@contextual.ai) with any feedback or questions.
# Parse List Jobs
Source: https://contextualai-new-home-nav.mintlify.app/api-reference/parse/parse-list-jobs
api-reference/openapi.json get /parse/jobs
Get list of parse jobs, sorted from most recent to oldest.
Returns all jobs from the last 30 days, or since the optional `uploaded_after` timestamp.
# Parse Result
Source: https://contextualai-new-home-nav.mintlify.app/api-reference/parse/parse-result
api-reference/openapi.json get /parse/jobs/{job_id}/results
Get the results of a parse job.
Parse job results are retained for up to 30 days after job creation. Fetching results for a parse job that is older than 30 days will return a 404 error.
# Parse Status
Source: https://contextualai-new-home-nav.mintlify.app/api-reference/parse/parse-status
api-reference/openapi.json get /parse/jobs/{job_id}/status
Get the status of a parse job.
Parse job results are retained for up to 30 days after job creation. Fetching a status for a parse job that is older than 30 days will return a 404 error.
# Rerank
Source: https://contextualai-new-home-nav.mintlify.app/api-reference/rerank/rerank
api-reference/openapi.json post /rerank
Rank a list of documents according to their relevance to a query primarily and your custom instructions secondarily. We evaluated the model on instructions for recency, document type, source, and metadata, and it can generalize to other instructions as well. The reranker supports multilinguality.
The total request cannot exceed 400,000 tokens. The combined length of the query, instruction and any document with its metadata must not exceed 8,000 tokens.
See our [blog post](https://contextual.ai/blog/introducing-instruction-following-reranker/) and [code examples](https://colab.research.google.com/github/ContextualAI/examples/blob/main/03-standalone-api/03-rerank/rerank.ipynb). Email [rerank-feedback@contextual.ai](mailto:rerank-feedback@contextual.ai) with any feedback or questions.
# Get Users
Source: https://contextualai-new-home-nav.mintlify.app/api-reference/users/get-users
api-reference/openapi.json get /users
Retrieve a list of `users`.
# Invite Users
Source: https://contextualai-new-home-nav.mintlify.app/api-reference/users/invite-users
api-reference/openapi.json post /users
Invite users to the tenant. This checks if the user is already in the tenant and if not, creates the user. We will return a list of user emails that were successfully created (including existing users).
# Remove User
Source: https://contextualai-new-home-nav.mintlify.app/api-reference/users/remove-user
api-reference/openapi.json delete /users
Delete a given `user`.
# Update User
Source: https://contextualai-new-home-nav.mintlify.app/api-reference/users/update-user
api-reference/openapi.json put /users
Modify a given `User`.
Fields not included in the request body will not be modified.
# Get Consent
Source: https://contextualai-new-home-nav.mintlify.app/api-reference/workspaces/get-consent
api-reference/openapi.json get /workspaces/consent
Retrieve the current consent status for the workspace.
# Update Consent
Source: https://contextualai-new-home-nav.mintlify.app/api-reference/workspaces/update-consent
api-reference/openapi.json put /workspaces/consent
Update the consent status for the workspace.
# Auto & Manual Syncing
Source: https://contextualai-new-home-nav.mintlify.app/connectors/auto-manual-syncing
Detailed instructions on how to set up Auto & Manual Syncing
## Overview
You can enable or disable **auto-syncing** at the top of your Datastore. When enabled, data changes are synced every 3 hours and permission updates every hour.
# SOC 2
Source: https://contextualai-new-home-nav.mintlify.app/admin-setup/soc2
Contextual AI SOC 2 Compliance
## Overview
Contextual AI is **SOC 2 Type II certified**, demonstrating that our security controls and operational practices meet the highest standards for protecting enterprise data.

This certification verifies that our systems, processes, and safeguards operate effectively over time—not just at a single point of audit.
***
## What SOC 2 Type II Means
SOC 2 Type II evaluates how well an organization upholds the **Trust Service Criteria**:
* **Security**
* **Availability**
* **Confidentiality**
An independent auditor verified that Contextual AI maintains strong, continuously monitored controls across all three criteria.
***
## Security at Every Layer
### Proven Security Controls
Our compliance audit confirms consistent adherence to stringent policies and processes governing data handling, infrastructure, and operations.
### Data Protection
* **Encryption in transit:** TLS 1.2+
* **Encryption at rest:** AES-256
* **Key management:** Cloud-native KMS services with restricted access
### Deployment Options
Choose the environment that fits your organization’s security posture:
* **SaaS** (fully managed)
* **VPC** (private cloud)
* **On-premises** (self-managed)
### Authentication & Access
* Enterprise **SSO** with **SAML** or **OIDC**
* **Role-based access control (RBAC)** for fine-grained permissions
***
## Core Security Controls
| Category | Description |
| ------------------------- | ---------------------------------------------------------------------------------------------- |
| **Application Security** | Continuous SAST/SCA scanning, dependency monitoring, and vulnerability management |
| **Business Continuity** | Kubernetes-based orchestration, automated failover, distributed infrastructure |
| **Monitoring & Response** | Real-time detection via centralized security data lake and defined incident-response playbooks |
| **Bug Bounty Program** | Ongoing responsible-disclosure program with independent security researchers |
***
## Continuous Compliance
* SOC 2 Type II is one component of our broader compliance framework.
* Contextual AI is hosted on **Google Cloud Platform**, which maintains its own certifications: SOC 2, SOC 3, PCI DSS, ISO/IEC 27017, and CSA STAR.
* We continuously evaluate and update controls to address evolving security and privacy requirements for enterprise AI systems.
***
## Learn More
* [SOC 2 Announcement](https://contextual.ai/blog/contextual-ai-is-soc-2-type-2-certified)
* [Security Overview](https://contextual.ai/security)
* [Trust Center](https://trust.contextual.ai/resources) – Request a copy of our SOC 2 Type II report
* [Contact Support](https://contextual.ai/contact-us) for compliance or security-related inquiries
# Get Metrics
Source: https://contextualai-new-home-nav.mintlify.app/api-reference/agents-query/get-metrics
api-reference/openapi.json get /agents/{agent_id}/metrics
Returns usage and user-provided feedback data. This information can be used for data-driven improvements and optimization.
# Get Retrieval Info
Source: https://contextualai-new-home-nav.mintlify.app/api-reference/agents-query/get-retrieval-info
api-reference/openapi.json get /agents/{agent_id}/query/{message_id}/retrieval/info
Return metadata of the contents used to generate the response for a given message.
# Provide Feedback
Source: https://contextualai-new-home-nav.mintlify.app/api-reference/agents-query/provide-feedback
api-reference/openapi.json post /agents/{agent_id}/feedback
Provide feedback for a generation or a retrieval. Feedback can be used to track overall `Agent` performance through the `Feedback` page in the Contextual UI, and as a basis for model fine-tuning.
# Query
Source: https://contextualai-new-home-nav.mintlify.app/api-reference/agents-query/query
api-reference/openapi.json post /agents/{agent_id}/query
Start a conversation with an `Agent` and receive its generated response, along with relevant retrieved data and attributions.
# Copy Agent
Source: https://contextualai-new-home-nav.mintlify.app/api-reference/agents/copy-agent
api-reference/openapi.json post /agents/{agent_id}/copy
Copy an existing agent with all its configurations and datastore associations. The copied agent will have "[COPY]" appended to its name.
# Create Agent
Source: https://contextualai-new-home-nav.mintlify.app/api-reference/agents/create-agent
api-reference/openapi.json post /agents
Create a new `Agent` with a specific configuration.
This creates a specialized RAG `Agent` which queries over one or multiple `Datastores` to retrieve relevant data on which its generations are grounded.
Retrieval and generation parameters are defined in the provided `Agent` configuration.
If no `datastore_id` is provided in the configuration, this API automatically creates an empty `Datastore` and configures the `Agent` to use the newly created `Datastore`.
> Note that self-serve users are currently required to create agents through our UI. Otherwise, they will receive the following message: "This endpoint is disabled as you need to go through checkout. Please use the UI to make this request."
# Delete Agent
Source: https://contextualai-new-home-nav.mintlify.app/api-reference/agents/delete-agent
api-reference/openapi.json delete /agents/{agent_id}
Delete a given `Agent`. This is an irreversible operation.
Note: `Datastores` which are associated with the `Agent` will not be deleted, even if no other `Agent` is using them. To delete a `Datastore`, use the `DELETE /datastores/{datastore_id}` API.
# Edit Agent
Source: https://contextualai-new-home-nav.mintlify.app/api-reference/agents/edit-agent
api-reference/openapi.json put /agents/{agent_id}
Modify a given `Agent` to utilize the provided configuration.
Fields not included in the request body will not be modified.
# Get Agent Metadata
Source: https://contextualai-new-home-nav.mintlify.app/api-reference/agents/get-agent-metadata
api-reference/openapi.json get /agents/{agent_id}/metadata
Get metadata and configuration of a given `Agent`.
# Get Template Configuration
Source: https://contextualai-new-home-nav.mintlify.app/api-reference/agents/get-template-configuration
api-reference/openapi.json get /agents/templates/{template}
# List Agents
Source: https://contextualai-new-home-nav.mintlify.app/api-reference/agents/list-agents
api-reference/openapi.json get /agents
Retrieve a list of all `Agents`.
# List Templates
Source: https://contextualai-new-home-nav.mintlify.app/api-reference/agents/list-templates
api-reference/openapi.json get /agents/templates
Retrieve a list of all available Templates.
# Reset Agent
Source: https://contextualai-new-home-nav.mintlify.app/api-reference/agents/reset-agent
api-reference/openapi.json put /agents/{agent_id}/reset
Reset a given `Agent` to default configuration.
# Save Template
Source: https://contextualai-new-home-nav.mintlify.app/api-reference/agents/save-template
api-reference/openapi.json post /agents/{agent_id}/template
# Disable Auto Top Up
Source: https://contextualai-new-home-nav.mintlify.app/api-reference/billing/disable-auto-top-up
api-reference/openapi.json post /billing/balance/auto-top-up/disable
Enable auto top-up for a tenant with a balance threshold and a top-up amount or Disable auto top-up for a tenant.
# Enable Auto Top Up
Source: https://contextualai-new-home-nav.mintlify.app/api-reference/billing/enable-auto-top-up
api-reference/openapi.json post /billing/balance/auto-top-up/enable
Enable auto top-up for a tenant with a balance threshold and a top-up amount or Disable auto top-up for a tenant.
# Get Auto Top Up Status
Source: https://contextualai-new-home-nav.mintlify.app/api-reference/billing/get-auto-top-up-status
api-reference/openapi.json get /billing/balance/auto-top-up
Get the auto top-up status for a tenant.
# Get Balance
Source: https://contextualai-new-home-nav.mintlify.app/api-reference/billing/get-balance
api-reference/openapi.json get /billing/balance
Get the remaining balance for a tenant
# Get Billing Metadata
Source: https://contextualai-new-home-nav.mintlify.app/api-reference/billing/get-billing-metadata
api-reference/openapi.json get /billing/metadata
Non admin endpoint for getting the billing metadata for a tenant.
# Get Billing Mode History
Source: https://contextualai-new-home-nav.mintlify.app/api-reference/billing/get-billing-mode-history
api-reference/openapi.json get /billing/billing_mode/history
Get the billing mode history for a tenant for a specific month.
Args: request: Request object containing year and month with validation user_context: User context with tenant admin permissions
Returns: Billing mode history records for the specified month and year Returns at least one entry which is the mode of the first date of the given month, with potential mode changes in the middle of the month. If no record found, defaults to LEGACY mode.
# Get Earliest Usage Date Endpoint
Source: https://contextualai-new-home-nav.mintlify.app/api-reference/billing/get-earliest-usage-date-endpoint
api-reference/openapi.json get /billing/usages/earliest_date
Get the earliest usage date for a tenant
# Get Monthly Usage Endpoint
Source: https://contextualai-new-home-nav.mintlify.app/api-reference/billing/get-monthly-usage-endpoint
api-reference/openapi.json get /billing/usages/monthly
Get monthly usage data for a tenant with validation for year and month parameters.
Args: request: Request object containing year and month with validation user_context: User context with tenant admin permissions resource_id: Optional[UUID]. If provided, get usage data for a specific resource. Otherwise, get aggregated usage data across all resources.
Returns: Monthly usage records for the specified month and year
# Get Top Up History Endpoint
Source: https://contextualai-new-home-nav.mintlify.app/api-reference/billing/get-top-up-history-endpoint
api-reference/openapi.json get /billing/balance/top-ups
Get the top-up history for a tenant. Paginated.
# Increment Balance
Source: https://contextualai-new-home-nav.mintlify.app/api-reference/billing/increment-balance
api-reference/openapi.json post /billing/balance
Increment the balance of a tenant
# Get Content Metadata
Source: https://contextualai-new-home-nav.mintlify.app/api-reference/contents/get-content-metadata
api-reference/openapi.json get /datastores/{datastore_id}/contents/{content_id}/metadata
# Get Document Contents
Source: https://contextualai-new-home-nav.mintlify.app/api-reference/contents/get-document-contents
api-reference/openapi.json get /datastores/{datastore_id}/contents
# Delete Document
Source: https://contextualai-new-home-nav.mintlify.app/api-reference/datastores-documents/delete-document
api-reference/openapi.json delete /datastores/{datastore_id}/documents/{document_id}
Delete a given document from its `Datastore`. This operation is irreversible.
# Edit Chunk Content
Source: https://contextualai-new-home-nav.mintlify.app/api-reference/datastores-documents/edit-chunk-content
api-reference/openapi.json put /datastores/{datastore_id}/chunks/{content_id}/content
Edit the content of a specific chunk in a datastore. This operation updates the chunk's text content and regenerates its embeddings.
# Get Document Metadata
Source: https://contextualai-new-home-nav.mintlify.app/api-reference/datastores-documents/get-document-metadata
api-reference/openapi.json get /datastores/{datastore_id}/documents/{document_id}/metadata
Get details of a given document, including its `name` and ingestion job `status`.
# Get Parse Results
Source: https://contextualai-new-home-nav.mintlify.app/api-reference/datastores-documents/get-parse-results
api-reference/openapi.json get /datastores/{datastore_id}/documents/{document_id}/parse
Get the parse results that are generated during ingestion for a given document. Retrieving parse results for existing documents ingested before the release of this endpoint is not supported and will return a 404 error.
# Ingest Document
Source: https://contextualai-new-home-nav.mintlify.app/api-reference/datastores-documents/ingest-document
api-reference/openapi.json post /datastores/{datastore_id}/documents
Ingest a document into a given `Datastore`.
Ingestion is an asynchronous task. Returns a document `id` which can be used to track the status of the ingestion job through calls to the `GET /datastores/{datastore_id}/documents/{document_id}/metadata` API.
This `id` can also be used to delete the document through the `DELETE /datastores/{datastore_id}/documents/{document_id}` API.
`file` must be a PDF, HTML, DOC(X) or PPT(X) file. The filename must end with one of the following extensions: `.pdf`, `.html`, `.htm`, `.mhtml`, `.doc`, `.docx`, `.ppt`, `.pptx`.
# List Documents
Source: https://contextualai-new-home-nav.mintlify.app/api-reference/datastores-documents/list-documents
api-reference/openapi.json get /datastores/{datastore_id}/documents
Get list of documents in a given `Datastore`, including document `id`, `name`, and ingestion job `status`.
Performs `cursor`-based pagination if the number of documents exceeds the requested `limit`. The returned `cursor` can be passed to the next `GET /datastores/{datastore_id}/documents` call to retrieve the next set of documents.
# Update Document Metadata
Source: https://contextualai-new-home-nav.mintlify.app/api-reference/datastores-documents/update-document-metadata
api-reference/openapi.json put /datastores/{datastore_id}/documents/{document_id}/metadata
Post details of a given document that will enrich the chunk and be added to the context or just for filtering. If Just for filtering, start with "_" in the key.
# Create Datastore
Source: https://contextualai-new-home-nav.mintlify.app/api-reference/datastores/create-datastore
api-reference/openapi.json post /datastores
Create a new `Datastore`.
A `Datastore` is a collection of documents. Documents can be ingested into and deleted from a `Datastore`.
A `Datastore` can be linked to one or more `Agents`, and conversely, an `Agent` can be associated with one or more `Datastores` to ground its responses with relevant data. This flexible many-to-many relationship allows `Agents` to draw from multiple sources of information. This linkage of `Datastore` to `Agent` is done through the `Create Agent` or `Edit Agent` APIs.
> Note that self-serve users are currently required to create datastores through our UI. Otherwise, they will receive the following message: "This endpoint is disabled as you need to go through checkout. Please use the UI to make this request."
# Delete Datastore
Source: https://contextualai-new-home-nav.mintlify.app/api-reference/datastores/delete-datastore
api-reference/openapi.json delete /datastores/{datastore_id}
Delete a given `Datastore`, including all the documents ingested into it. This operation is irreversible.
This operation will fail with status code 400 if there is an active `Agent` associated with the `Datastore`.
# Edit Datastore Configuration
Source: https://contextualai-new-home-nav.mintlify.app/api-reference/datastores/edit-datastore-configuration
api-reference/openapi.json put /datastores/{datastore_id}
# Get Datastore Metadata
Source: https://contextualai-new-home-nav.mintlify.app/api-reference/datastores/get-datastore-metadata
api-reference/openapi.json get /datastores/{datastore_id}/metadata
Get the details of a given `Datastore`, including its name, create time, and the list of `Agents` which are currently configured to use the `Datastore`.
# List Datastores
Source: https://contextualai-new-home-nav.mintlify.app/api-reference/datastores/list-datastores
api-reference/openapi.json get /datastores
Retrieve a list of `Datastores`.
Performs `cursor`-based pagination if the number of `Datastores` exceeds the requested `limit`. The returned `cursor` can be passed to the next `GET /datastores` call to retrieve the next set of `Datastores`.
# Reset Datastore
Source: https://contextualai-new-home-nav.mintlify.app/api-reference/datastores/reset-datastore
api-reference/openapi.json put /datastores/{datastore_id}/reset
Reset the give `Datastore`. This operation is irreversible and it deletes all the documents associated with the datastore.
# Create Schema
Source: https://contextualai-new-home-nav.mintlify.app/api-reference/extract/create-schema
api-reference/openapi.json post /extract/schemas
Create a new extraction schema.
Creates a JSON Schema that defines the structure of data to extract from documents. The schema must conform to our supported subset of JSON Schema 2020-12 features.
Supported Schema Features:
Basic Types: 1. string: Text data with optional constraints (minLength, maxLength, pattern, enum) 2. integer: Whole numbers with optional constraints (minimum, maximum, enum) 3. number: Decimal numbers with optional constraints (minimum, maximum, enum) 4. boolean: True/false values 5. null: Null values (often used with anyOf for optional fields)
Complex Types: 1. object: Key-value pairs with defined properties 2. array: Lists of items with defined item schemas 3. anyOf: Union types (e.g., string or null for optional fields)
String Formats: Supported formats: date-time, time, date, duration, email, hostname, ipv4, ipv6, uuid, uri
Schema Structure: 1. Root schema must be an object type 2. Use $defs for reusable schema components 3. Use $ref to reference definitions 4. Arrays must have items schema defined
Constraints: 1. Maximum 10 leaf nodes per array (prevents overly complex schemas) 2. No circular references in $ref definitions 3. String formats must be from the supported list
Example Schemas:
Simple Company Schema:
```json
{
"type": "object",
"properties": {
"company_name": {
"type": "string",
"description": "The name of the company exactly as it appears in the document"
},
"form_type": {
"type": "string",
"enum": ["10-K", "10-Q", "8-K", "S-1"],
"description": "The type of SEC form"
},
"trading_symbol": {
"type": "string",
"description": "The trading symbol of the company"
},
"zip_code": {
"type": "integer",
"description": "The zip code of the company headquarters"
}
},
"required": ["company_name", "form_type", "trading_symbol", "zip_code"]
}
```
Complex Resume Schema:
```json
{
"type": "object",
"properties": {
"personalInfo": {
"type": "object",
"properties": {
"fullName": {"type": "string"},
"contact": {
"type": "object",
"properties": {
"emails": {
"type": "array",
"items": {"type": "string", "format": "email"}
},
"phones": {
"type": "array",
"items": {"type": "string"}
}
}
}
},
"required": ["fullName"]
},
"workExperience": {
"type": "array",
"items": {
"type": "object",
"properties": {
"jobTitle": {"type": "string"},
"company": {"type": "string"},
"startDate": {"type": "string"},
"endDate": {"type": ["string", "null"]},
"isCurrent": {"type": "boolean"}
},
"required": ["jobTitle", "company", "startDate"]
}
}
},
"required": ["personalInfo", "workExperience"]
}
```
Schema with References:
```json
{
"type": "object",
"properties": {
"algorithms": {
"type": "array",
"items": {"$ref": "#/$defs/algorithm"}
}
},
"$defs": {
"algorithm": {
"type": "object",
"properties": {
"name": {"type": "string"},
"description": {"type": "string"}
},
"required": ["name"]
}
}
}
```
Best Practices: 1. Use descriptive field names that clearly indicate what data should be extracted 2. Add detailed descriptions to help the AI understand what to extract 3. Use enums for known values (e.g., form types, status values) 4. Make fields optional by using anyOf with null or omitting from required 5. Use arrays for lists of similar items (e.g., work experience, education) 6. Keep schemas focused - avoid overly complex nested structures 7. Test with sample documents to ensure the schema captures the expected data
# Delete Document
Source: https://contextualai-new-home-nav.mintlify.app/api-reference/extract/delete-document
api-reference/openapi.json delete /extract/documents/{document_id}
Delete a document.
# Delete Schema
Source: https://contextualai-new-home-nav.mintlify.app/api-reference/extract/delete-schema
api-reference/openapi.json delete /extract/schemas/{schema_id}
Delete a schema.
# Get Document
Source: https://contextualai-new-home-nav.mintlify.app/api-reference/extract/get-document
api-reference/openapi.json get /extract/documents/{document_id}
Get document information by ID.
# Get Job Results
Source: https://contextualai-new-home-nav.mintlify.app/api-reference/extract/get-job-results
api-reference/openapi.json get /extract/jobs/{job_id}/results
Get the results of a completed extraction job.
# Get Job Status
Source: https://contextualai-new-home-nav.mintlify.app/api-reference/extract/get-job-status
api-reference/openapi.json get /extract/jobs/{job_id}
Get the status of an extraction job.
# Get Schema
Source: https://contextualai-new-home-nav.mintlify.app/api-reference/extract/get-schema
api-reference/openapi.json get /extract/schemas/{schema_id}
Get schema information by ID.
# List Documents
Source: https://contextualai-new-home-nav.mintlify.app/api-reference/extract/list-documents
api-reference/openapi.json get /extract/documents
List documents for structured extraction.
# List Jobs
Source: https://contextualai-new-home-nav.mintlify.app/api-reference/extract/list-jobs
api-reference/openapi.json get /extract/jobs
List extraction jobs.
# List Schemas
Source: https://contextualai-new-home-nav.mintlify.app/api-reference/extract/list-schemas
api-reference/openapi.json get /extract/schemas
List schemas with optional search.
# Start Extraction Job
Source: https://contextualai-new-home-nav.mintlify.app/api-reference/extract/start-extraction-job
api-reference/openapi.json post /extract/jobs
Start a new structured extraction job.
Extracts structured data from a PDF document using AI models based on a JSON Schema. The document_id and schema_id must be valid UUIDs of previously uploaded documents and created schemas.
How It Works: 1. Document Processing: The system analyzes the PDF document and splits it into manageable sections 2. Schema Analysis: Your JSON schema is parsed and validated for supported features 3. AI Extraction: The AI model processes each section and extracts data according to your schema 4. Validation: Extracted data is validated against your schema to ensure accuracy 5. Results: Structured data is returned in the format defined by your schema
Supported Models: 1. gemini-2.5-flash: Fast, cost-effective model for most use cases (default) 2. gemini-2.5-pro: More powerful model for complex extractions
Configuration Options:
Basic Settings: 1. model: AI model to use for extraction 2. max_num_concurrent_requests: Number of parallel processing requests (1-20) 3. validate_response_schema: Whether to validate extracted data against schema
Advanced Settings: 1. per_key_attribution: Enable detailed reasoning and confidence scores for each field 2. temperature: Control randomness in AI responses (0.0-2.0) 3. seed: Set random seed for reproducible results 4. enable_thinking: Show AI reasoning process 5. n_max_retries: Maximum retry attempts for failed requests
Job Lifecycle: 1. pending: Job is queued and waiting to start 2. processing: AI is actively extracting data from the document 3. completed: Extraction finished successfully with results 4. failed: Extraction failed due to an error 5. cancelled: Job was cancelled before completion
Monitoring Progress: Use the /jobs/{job_id} endpoint to check job status and progress: 1. completion_percentage: Overall progress (0-100) 2. current_step: Current processing stage 3. fields_processed: Number of schema fields completed 4. estimated_remaining_time: Time until completion
Getting Results: Once a job is completed, use /jobs/{job_id}/results to retrieve: 1. results: Extracted data conforming to your schema 2. metadata: Processing information, costs, and performance metrics 3. attributions: (if enabled) Reasoning and confidence scores for each field
Example Request:
```json
{
"document_id": "123e4567-e89b-12d3-a456-426614174000",
"schema_id": "987fcdeb-51a2-43d1-b456-426614174000",
"config": {
"model": "gemini-2.5-flash",
"per_key_attribution": true,
"temperature": 0.1,
"enable_thinking": true
}
}
```
Example Response:
```json
{
"job_id": "456e7890-e89b-12d3-a456-426614174000",
"status": "pending",
"created_at": "2025-01-11T18:35:00Z",
"estimated_completion": "2025-01-11T18:40:00Z"
}
```
Error Handling: Status 400: Bad Request (invalid document_id or schema_id format) Status 404: Not Found (document or schema not found) Status 422: Unprocessable Entity (invalid schema definition) Status 500: Internal Server Error (processing error)
# Update Schema
Source: https://contextualai-new-home-nav.mintlify.app/api-reference/extract/update-schema
api-reference/openapi.json put /extract/schemas/{schema_id}
Update an existing schema.
# Upload Document
Source: https://contextualai-new-home-nav.mintlify.app/api-reference/extract/upload-document
api-reference/openapi.json post /extract/documents/upload
Upload a document for structured extraction.
Uploads a PDF document that can be used for structured data extraction. Only PDF files are supported.
Supported File Types: 1. PDF files only (.pdf extension) 2. Maximum file size: 50MB (recommended) 3. Documents are processed and validated upon upload
Document Processing: 1. File size and page count are automatically calculated 2. Document is validated for PDF format and readability 3. Metadata is extracted and stored for future reference 4. Document is stored securely and can be referenced by ID
Usage: After uploading, you'll receive a document_id that can be used with: 1. /jobs endpoint to start extraction jobs 2. /documents/{document_id} to retrieve document information 3. /documents/{document_id} DELETE to remove the document
Example Response:
```json
{
"document_id": "123e4567-e89b-12d3-a456-426614174000",
"file_name": "financial_report.pdf",
"file_size": 2048576,
"page_count": 45,
"uploaded_at": "2025-01-11T18:35:00Z",
"status": "uploaded"
}
```
# Generate
Source: https://contextualai-new-home-nav.mintlify.app/api-reference/generate/generate
api-reference/openapi.json post /generate
Generate a response using Contextual's Grounded Language Model (GLM), an LLM engineered specifically to prioritize faithfulness to in-context retrievals over parametric knowledge to reduce hallucinations in Retrieval-Augmented Generation and agentic use cases.
The total request cannot exceed 32,000 tokens.
See our [blog post](https://contextual.ai/blog/introducing-grounded-language-model/) and [code examples](https://colab.research.google.com/github/ContextualAI/examples/blob/main/03-standalone-api/02-generate/generate.ipynb). Email [glm-feedback@contextual.ai](mailto:glm-feedback@contextual.ai) with any feedback or questions.
# LMUnit
Source: https://contextualai-new-home-nav.mintlify.app/api-reference/lmunit/lmunit
api-reference/openapi.json post /lmunit
Given a `query`, `response`, and a `unit_test`, return the response's `score` on the unit test on a 5-point continuous scale. The total input cannot exceed 7000 tokens.
See a code example in [our blog post](https://contextual.ai/news/lmunit/). Email [lmunit-feedback@contextual.ai](mailto:lmunit-feedback@contextual.ai) with any feedback or questions.
>🚀 Obtain an LMUnit API key by completing [this form](https://contextual.ai/request-lmunit-api/)
# Parse File
Source: https://contextualai-new-home-nav.mintlify.app/api-reference/parse/parse-file
api-reference/openapi.json post /parse
Parse a file into a structured Markdown and/or JSON. Files must be less than 100MB and 400 pages. We use LibreOffice to convert DOC(X) and PPT(X) files to PDF, which may affect page count.
See our [blog post](https://contextual.ai/blog/document-parser-for-rag) and [code examples](https://github.com/ContextualAI/examples/blob/main/03-standalone-api/04-parse/parse.ipynb). Email [parse-feedback@contextual.ai](mailto:parse-feedback@contextual.ai) with any feedback or questions.
# Parse List Jobs
Source: https://contextualai-new-home-nav.mintlify.app/api-reference/parse/parse-list-jobs
api-reference/openapi.json get /parse/jobs
Get list of parse jobs, sorted from most recent to oldest.
Returns all jobs from the last 30 days, or since the optional `uploaded_after` timestamp.
# Parse Result
Source: https://contextualai-new-home-nav.mintlify.app/api-reference/parse/parse-result
api-reference/openapi.json get /parse/jobs/{job_id}/results
Get the results of a parse job.
Parse job results are retained for up to 30 days after job creation. Fetching results for a parse job that is older than 30 days will return a 404 error.
# Parse Status
Source: https://contextualai-new-home-nav.mintlify.app/api-reference/parse/parse-status
api-reference/openapi.json get /parse/jobs/{job_id}/status
Get the status of a parse job.
Parse job results are retained for up to 30 days after job creation. Fetching a status for a parse job that is older than 30 days will return a 404 error.
# Rerank
Source: https://contextualai-new-home-nav.mintlify.app/api-reference/rerank/rerank
api-reference/openapi.json post /rerank
Rank a list of documents according to their relevance to a query primarily and your custom instructions secondarily. We evaluated the model on instructions for recency, document type, source, and metadata, and it can generalize to other instructions as well. The reranker supports multilinguality.
The total request cannot exceed 400,000 tokens. The combined length of the query, instruction and any document with its metadata must not exceed 8,000 tokens.
See our [blog post](https://contextual.ai/blog/introducing-instruction-following-reranker/) and [code examples](https://colab.research.google.com/github/ContextualAI/examples/blob/main/03-standalone-api/03-rerank/rerank.ipynb). Email [rerank-feedback@contextual.ai](mailto:rerank-feedback@contextual.ai) with any feedback or questions.
# Get Users
Source: https://contextualai-new-home-nav.mintlify.app/api-reference/users/get-users
api-reference/openapi.json get /users
Retrieve a list of `users`.
# Invite Users
Source: https://contextualai-new-home-nav.mintlify.app/api-reference/users/invite-users
api-reference/openapi.json post /users
Invite users to the tenant. This checks if the user is already in the tenant and if not, creates the user. We will return a list of user emails that were successfully created (including existing users).
# Remove User
Source: https://contextualai-new-home-nav.mintlify.app/api-reference/users/remove-user
api-reference/openapi.json delete /users
Delete a given `user`.
# Update User
Source: https://contextualai-new-home-nav.mintlify.app/api-reference/users/update-user
api-reference/openapi.json put /users
Modify a given `User`.
Fields not included in the request body will not be modified.
# Get Consent
Source: https://contextualai-new-home-nav.mintlify.app/api-reference/workspaces/get-consent
api-reference/openapi.json get /workspaces/consent
Retrieve the current consent status for the workspace.
# Update Consent
Source: https://contextualai-new-home-nav.mintlify.app/api-reference/workspaces/update-consent
api-reference/openapi.json put /workspaces/consent
Update the consent status for the workspace.
# Auto & Manual Syncing
Source: https://contextualai-new-home-nav.mintlify.app/connectors/auto-manual-syncing
Detailed instructions on how to set up Auto & Manual Syncing
## Overview
You can enable or disable **auto-syncing** at the top of your Datastore. When enabled, data changes are synced every 3 hours and permission updates every hour.
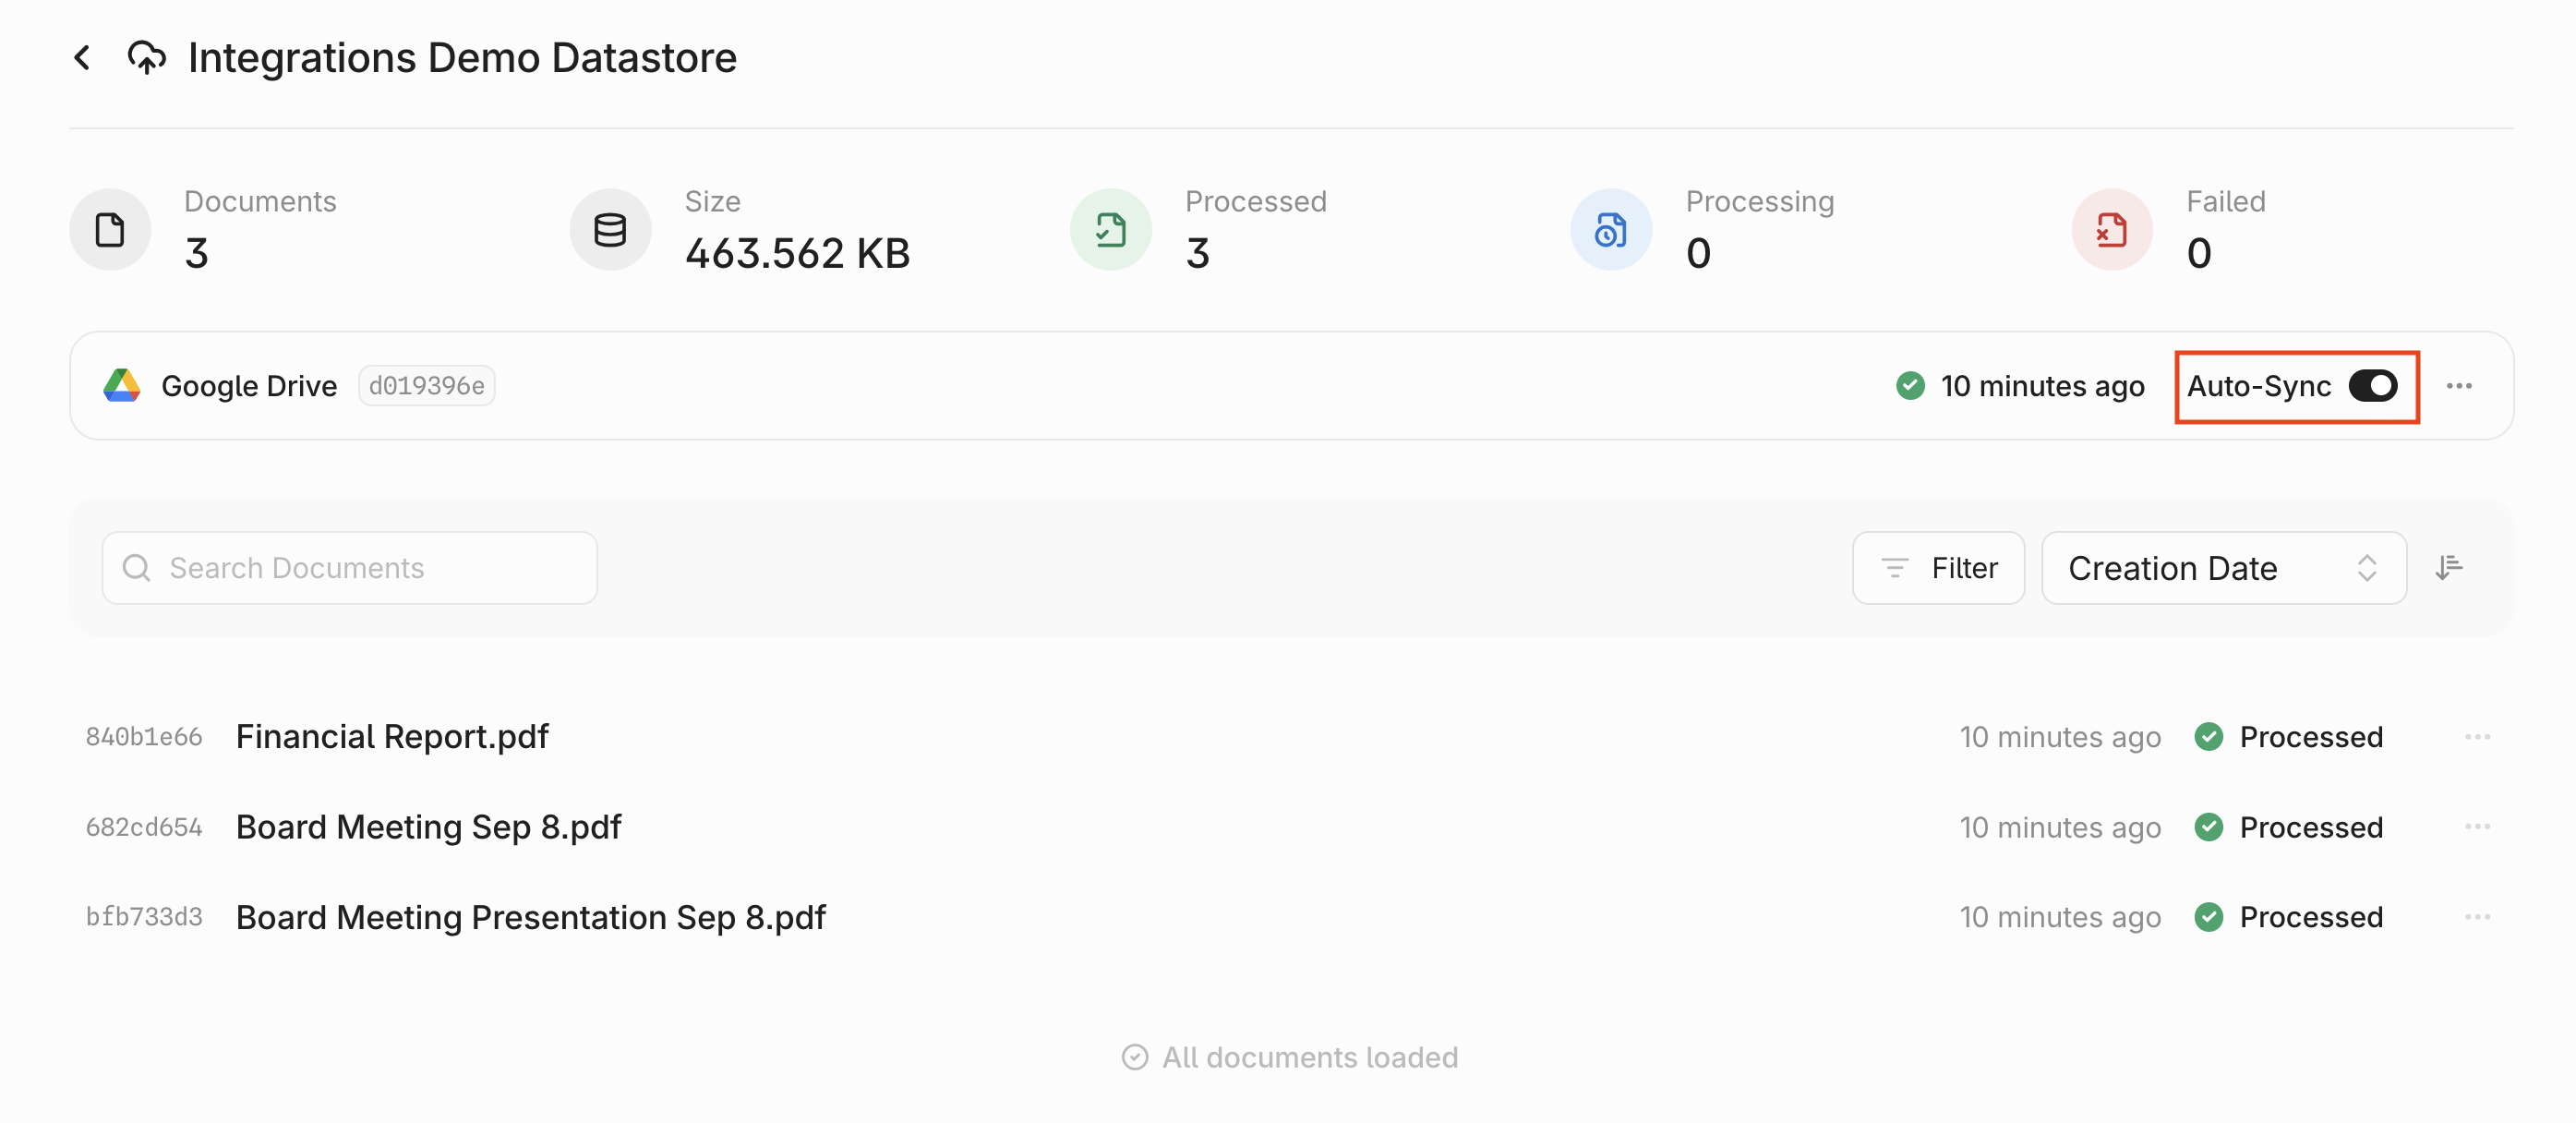 You can also trigger a **manual sync** to pull in changes.
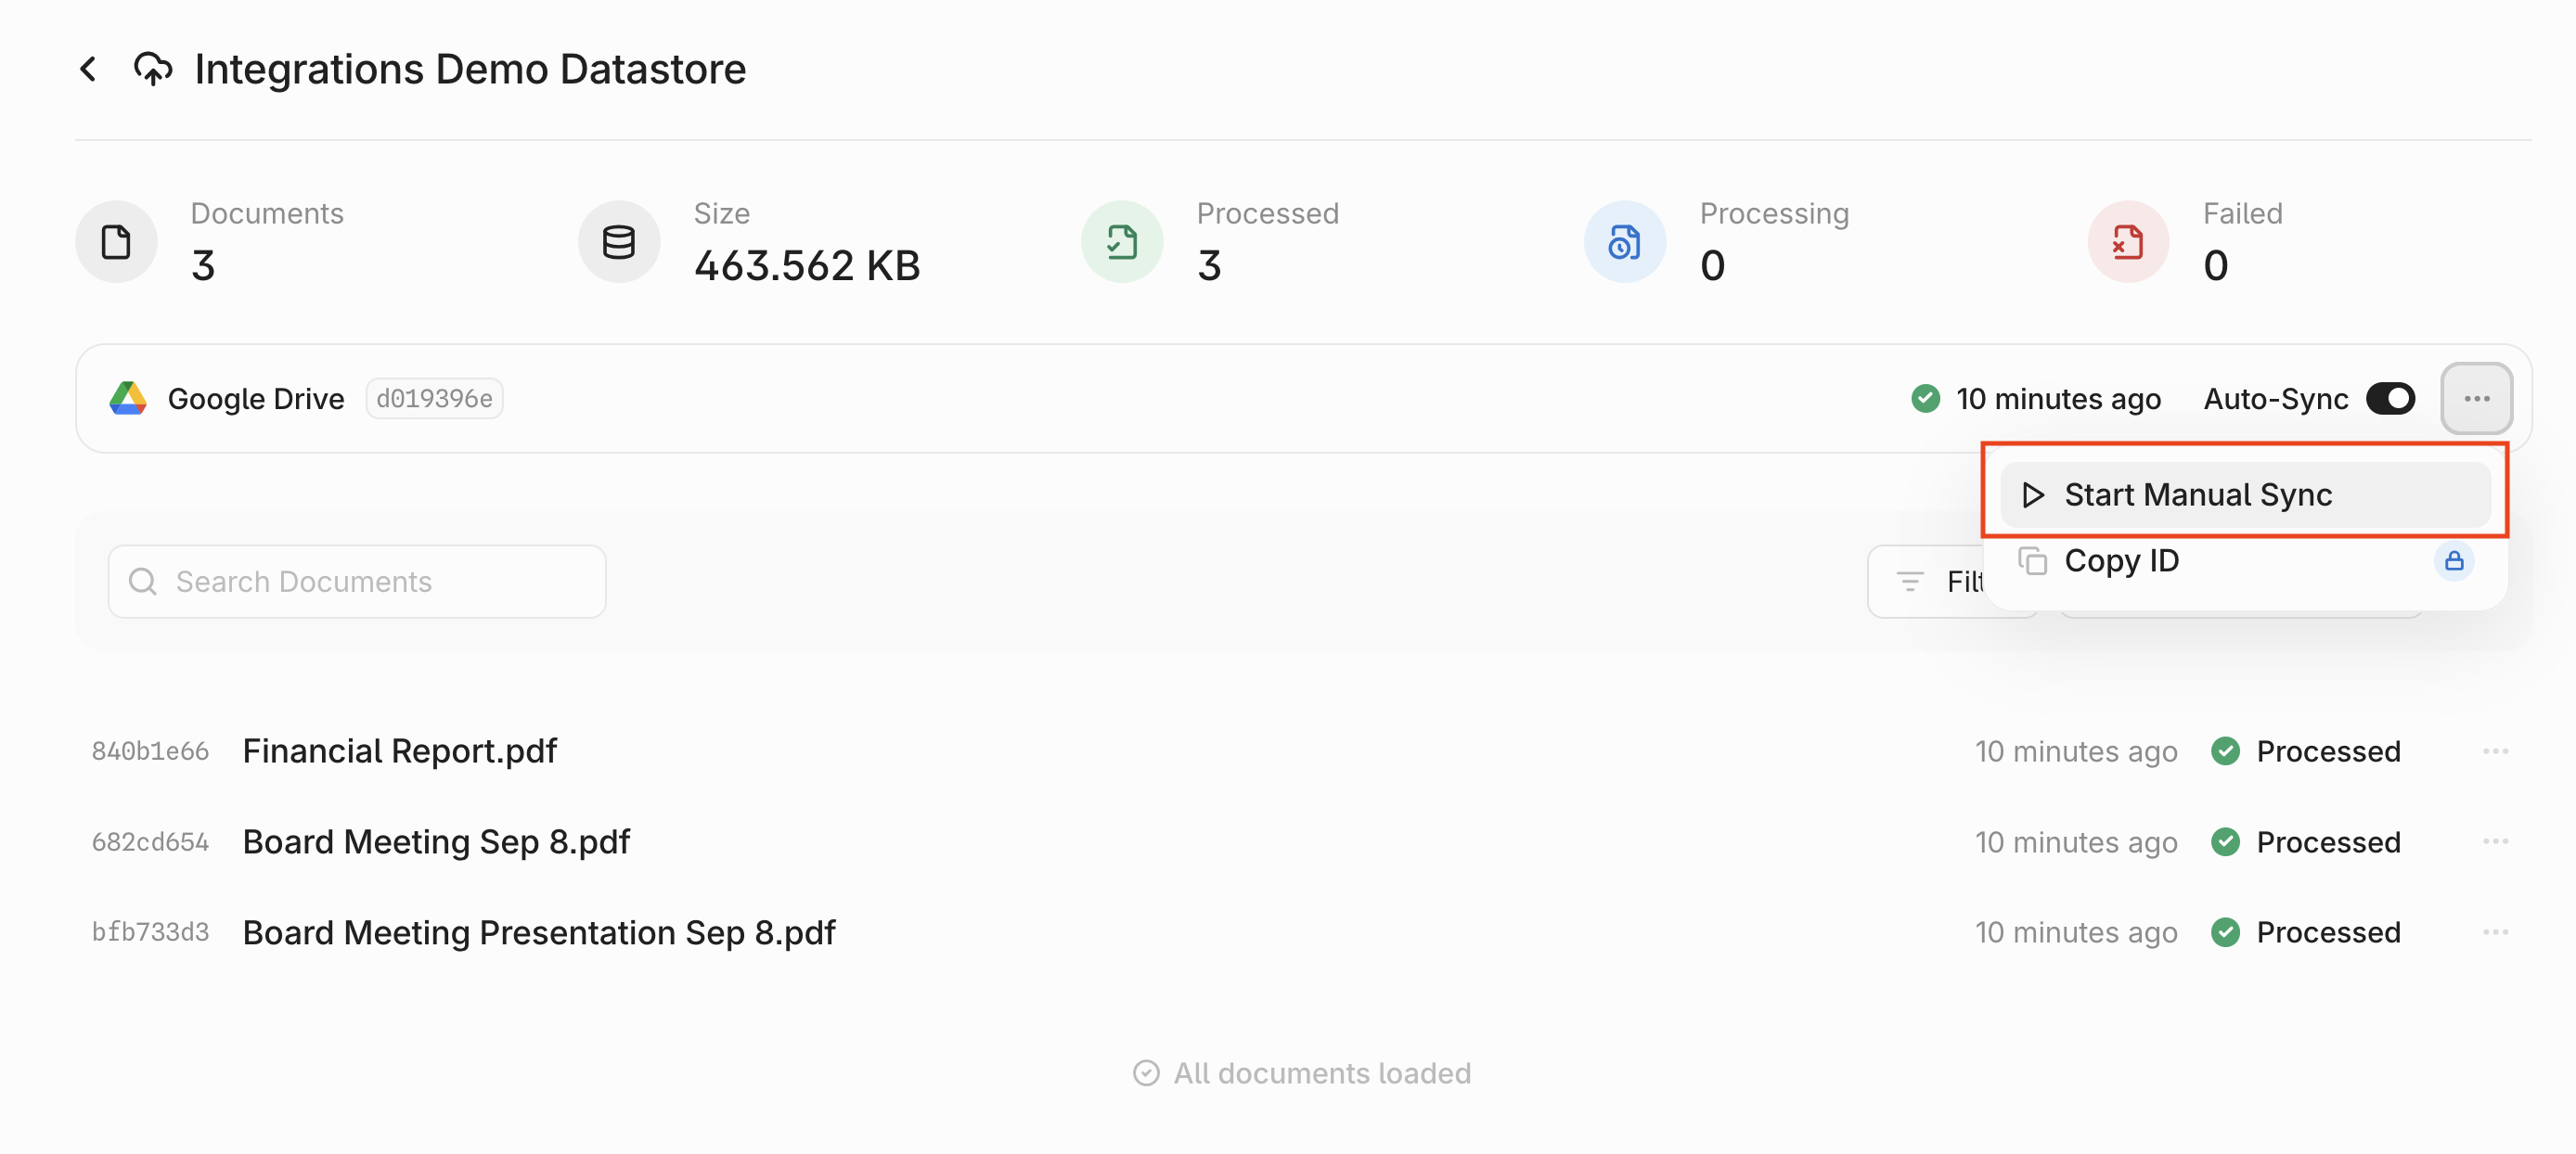 Possible sync status indicators include:
* **Syncing metadata:** We are syncing file metadata, users, and groups. We will need to sync metadata before we can begin ingestion.
* **Processing:** We are ingesting any document or metadata changes.
* **Synced / Green checkmark:** The sync has completed successfully.
* **Partially Synced:** Some documents failed in the sync. To correct this issue, wait for 10-15 minutes and retrigger a manual sync. The failed documents will be retried.
* **Failed:** All documents failed in the sync. Make sure that you have sufficient credits and retry with a manual sync after waiting for 10-15 minutes.
Possible sync status indicators include:
* **Syncing metadata:** We are syncing file metadata, users, and groups. We will need to sync metadata before we can begin ingestion.
* **Processing:** We are ingesting any document or metadata changes.
* **Synced / Green checkmark:** The sync has completed successfully.
* **Partially Synced:** Some documents failed in the sync. To correct this issue, wait for 10-15 minutes and retrigger a manual sync. The failed documents will be retried.
* **Failed:** All documents failed in the sync. Make sure that you have sufficient credits and retry with a manual sync after waiting for 10-15 minutes.
 ### 2. Review Access Levels & Set Account Type
* Click the **Connect** button next to **Box**.
* Confirm Contextual AI's read/write access levels and review the end user terms. Click **Next** to continue.
* Select your **Account Type**:
**Admin account (read-only)** - You are setting up a connection for your organization and have admin access to your data source.
**User account (read-only)** - You are setting up a personal connection or do not have admin access to your data source.
### 2. Review Access Levels & Set Account Type
* Click the **Connect** button next to **Box**.
* Confirm Contextual AI's read/write access levels and review the end user terms. Click **Next** to continue.
* Select your **Account Type**:
**Admin account (read-only)** - You are setting up a connection for your organization and have admin access to your data source.
**User account (read-only)** - You are setting up a personal connection or do not have admin access to your data source.
 ### 3. Grant Access & Sync Settings
* Review the access permissions that will be granted from your Box account.
* Click **Grant Access to Box** to continue.
### 3. Grant Access & Sync Settings
* Review the access permissions that will be granted from your Box account.
* Click **Grant Access to Box** to continue.
 ### 4. Configure Sync Settings
Contextual AI offers two ways to sync your data. You can choose to sync all your files or only specific folders in Box.
#### Sync Options
* **Share all files** - Grants access to all your content in Box.
* **Share specific files** - Restricts access to only the folders you select.
To share specific folders:
* Hover over the folder and check the box to select it.
* You can click into a folder to view its contents, but note that **only folders**—not individual files—can be selected.
* Select one or multiple folders as needed.
* Click **Confirm** to finalize your selections, then click **Next** once setup is complete.
* You can review or edit your connection (for example, to choose a different folder) on the confirmation page. Click **Finish setup** to continue.
### 4. Configure Sync Settings
Contextual AI offers two ways to sync your data. You can choose to sync all your files or only specific folders in Box.
#### Sync Options
* **Share all files** - Grants access to all your content in Box.
* **Share specific files** - Restricts access to only the folders you select.
To share specific folders:
* Hover over the folder and check the box to select it.
* You can click into a folder to view its contents, but note that **only folders**—not individual files—can be selected.
* Select one or multiple folders as needed.
* Click **Confirm** to finalize your selections, then click **Next** once setup is complete.
* You can review or edit your connection (for example, to choose a different folder) on the confirmation page. Click **Finish setup** to continue.
 ### 5. Create Datastore & Start Sync
You’re now ready to start syncing your data. Click **Create** to initialize your connection and create your datastore.
You’ll be redirected to your **Datastore** page, where the **Syncing Metadata** status will appear. During this stage, Contextual AI syncs your file metadata, users, and groups. This process is typically quick but may take a few hours if you have a large number of files, users, or groups.
Once metadata syncing is complete, ingestion will begin automatically and the status will update to **Processing**.
### 5. Create Datastore & Start Sync
You’re now ready to start syncing your data. Click **Create** to initialize your connection and create your datastore.
You’ll be redirected to your **Datastore** page, where the **Syncing Metadata** status will appear. During this stage, Contextual AI syncs your file metadata, users, and groups. This process is typically quick but may take a few hours if you have a large number of files, users, or groups.
Once metadata syncing is complete, ingestion will begin automatically and the status will update to **Processing**.
 You can check the progress bar to track how many documents remain to be processed.
Once all documents finish ingesting, you’ll see a **green checkmark** indicating that your datastore is ready to use.
# Entitlements Enforcement
Source: https://contextualai-new-home-nav.mintlify.app/connectors/entitlements-enforcement
Using your Connector with Entitlements Enforcement
## Using your Connector with Entitlements Enforcement
To use your connected Datastore, simply link it to an Agent and start querying. All original datasource entitlements are automatically enforced. If you do not have access to a document in the source system, two restrictions will apply:
1. The document will not be used to generate a response to the your query.
2. On the **Datastore** page, the document will be displayed as **Private Document**. You'll only be able to view documents that you have access to.
You can check the progress bar to track how many documents remain to be processed.
Once all documents finish ingesting, you’ll see a **green checkmark** indicating that your datastore is ready to use.
# Entitlements Enforcement
Source: https://contextualai-new-home-nav.mintlify.app/connectors/entitlements-enforcement
Using your Connector with Entitlements Enforcement
## Using your Connector with Entitlements Enforcement
To use your connected Datastore, simply link it to an Agent and start querying. All original datasource entitlements are automatically enforced. If you do not have access to a document in the source system, two restrictions will apply:
1. The document will not be used to generate a response to the your query.
2. On the **Datastore** page, the document will be displayed as **Private Document**. You'll only be able to view documents that you have access to.
 # Google Drive
Source: https://contextualai-new-home-nav.mintlify.app/connectors/google-drive
Connect your Google Drive documents to Contextual AI
## Connecting Google Drive
Log in through the Contextual AI UI and follow these steps to configure Google Drive as a data source.
### 1. Set Data Source Name & Type
* Click **Datastores** in the left-hand pane, followed by the **Create** button in the top right.
* Give your datastore a unique name, then select **Third-Party Connection** as the method for adding content to your datastore. Click the **Next** button.
* On the **Connection Setup** page, you can **set up auto top-off** to automatically add credits when low, or click **Skip for now** to bypass this step.
# Google Drive
Source: https://contextualai-new-home-nav.mintlify.app/connectors/google-drive
Connect your Google Drive documents to Contextual AI
## Connecting Google Drive
Log in through the Contextual AI UI and follow these steps to configure Google Drive as a data source.
### 1. Set Data Source Name & Type
* Click **Datastores** in the left-hand pane, followed by the **Create** button in the top right.
* Give your datastore a unique name, then select **Third-Party Connection** as the method for adding content to your datastore. Click the **Next** button.
* On the **Connection Setup** page, you can **set up auto top-off** to automatically add credits when low, or click **Skip for now** to bypass this step.
 ### 3. Authorize Connection & Sync Settings
* In the pop-up window, select the account for authorizing the connection.
* Click **Continue** to authorize the connection.
### 3. Authorize Connection & Sync Settings
* In the pop-up window, select the account for authorizing the connection.
* Click **Continue** to authorize the connection.
 ### 4. Configure Sync Settings
Contextual AI offers two ways to sync your data. You can choose to sync all your files or only specific folders in Google Drive.
#### Sync Options
* **Share all files** - Grants access to all content in your Google Drive.
* **Share specific folders** - Restricts access to only the folders you select.
To share specific folders:
* Hover over the folder and check the box to select it.
* You can click into a folder to view its contents, but note that **only folders**—not individual files—can be selected.
* Select one or multiple folders as needed.
* Click **Confirm** to finalize your selections, then click **Next** once setup is complete.
You can review or edit your connection (for example, to choose a different folder) on the confirmation page. Click **Finish** to continue.
### 4. Configure Sync Settings
Contextual AI offers two ways to sync your data. You can choose to sync all your files or only specific folders in Google Drive.
#### Sync Options
* **Share all files** - Grants access to all content in your Google Drive.
* **Share specific folders** - Restricts access to only the folders you select.
To share specific folders:
* Hover over the folder and check the box to select it.
* You can click into a folder to view its contents, but note that **only folders**—not individual files—can be selected.
* Select one or multiple folders as needed.
* Click **Confirm** to finalize your selections, then click **Next** once setup is complete.
You can review or edit your connection (for example, to choose a different folder) on the confirmation page. Click **Finish** to continue.
 ### 5. Create Datastore & Start Sync
You’re now ready to start syncing your data. Click **Create** to initialize your connection and create your datastore.
You’ll be redirected to your **Datastore** page, where the **Syncing Metadata** status will appear. During this stage, Contextual AI syncs your file metadata, users, and groups.
Once metadata syncing is complete, ingestion will begin automatically and the status will update to **Processing**.
### 5. Create Datastore & Start Sync
You’re now ready to start syncing your data. Click **Create** to initialize your connection and create your datastore.
You’ll be redirected to your **Datastore** page, where the **Syncing Metadata** status will appear. During this stage, Contextual AI syncs your file metadata, users, and groups.
Once metadata syncing is complete, ingestion will begin automatically and the status will update to **Processing**.
 You can check the progress bar to track how many documents remain to be processed.
Once all documents finish ingesting, you’ll see a **green checkmark** indicating that your datastore is ready to use.
# Local File Upload
Source: https://contextualai-new-home-nav.mintlify.app/connectors/local-file-upload
Upload your documents to Contextual AI
## Uploading Your Local File
Log in through the Contextual AI UI and follow these steps to upload a local file to use as a data source.
### 1. Set Data Source Name & Type
* Click **Datastores** in the left-hand pane, followed by the **Create** button in the top right.
* Give your datastore a unique name, then click the **local file upload button** (the left panel) as the method for adding content to your datastore. Click the **Next** button.
You can check the progress bar to track how many documents remain to be processed.
Once all documents finish ingesting, you’ll see a **green checkmark** indicating that your datastore is ready to use.
# Local File Upload
Source: https://contextualai-new-home-nav.mintlify.app/connectors/local-file-upload
Upload your documents to Contextual AI
## Uploading Your Local File
Log in through the Contextual AI UI and follow these steps to upload a local file to use as a data source.
### 1. Set Data Source Name & Type
* Click **Datastores** in the left-hand pane, followed by the **Create** button in the top right.
* Give your datastore a unique name, then click the **local file upload button** (the left panel) as the method for adding content to your datastore. Click the **Next** button.
 ### 2. Upload & Process Your File
* On the **Datastores** page, click the **Upload** button.
* Drag and drop or select the file to upload, and click the **Start Uploading** button.
* After Contextual AI finishes processing your file, go back to the **Datasources** page. You should see your newly-created datasource with the previously uploaded file.
### 2. Upload & Process Your File
* On the **Datastores** page, click the **Upload** button.
* Drag and drop or select the file to upload, and click the **Start Uploading** button.
* After Contextual AI finishes processing your file, go back to the **Datasources** page. You should see your newly-created datasource with the previously uploaded file.
 # Microsoft OneDrive
Source: https://contextualai-new-home-nav.mintlify.app/connectors/microsoft-onedrive
Connect your Microsoft OneDrive documents to Contextual AI
## Connecting Microsoft OneDrive
You can sync your OneDrive data via the Contextual AI SharePoint connector.
# Microsoft OneDrive
Source: https://contextualai-new-home-nav.mintlify.app/connectors/microsoft-onedrive
Connect your Microsoft OneDrive documents to Contextual AI
## Connecting Microsoft OneDrive
You can sync your OneDrive data via the Contextual AI SharePoint connector.
 ### 3. Configure Sync Settings
Contextual AI offers two ways to sync your data. You can choose to sync all your files or only specific folders.
#### Sync Options
* **Share all files** - Grants access to all content. This includes OneDrive folders within SharePoint sites and an individual user’s OneDrive folders.
* **Share specific folders** - Restricts access to only the folders you select. You can pick specific OneDrive folders within SharePoint sites, but not an individual user’s OneDrive folders.
Once you've selected and configured your sync option, click **Confirm** to finalize your selections, then click **Next** once setup is complete.
Click **Finish setup** to continue. On the next page, click **Create** to initialize your connection and create your datastore.
### 3. Configure Sync Settings
Contextual AI offers two ways to sync your data. You can choose to sync all your files or only specific folders.
#### Sync Options
* **Share all files** - Grants access to all content. This includes OneDrive folders within SharePoint sites and an individual user’s OneDrive folders.
* **Share specific folders** - Restricts access to only the folders you select. You can pick specific OneDrive folders within SharePoint sites, but not an individual user’s OneDrive folders.
Once you've selected and configured your sync option, click **Confirm** to finalize your selections, then click **Next** once setup is complete.
Click **Finish setup** to continue. On the next page, click **Create** to initialize your connection and create your datastore.
 You’ll be redirected to your **Datastore** page, where the **Syncing Metadata** status will appear. During this stage, Contextual AI syncs your file metadata, users, and groups.
Once metadata syncing is complete, ingestion will begin automatically and the status will update to **Processing**. You can check the progress bar to track how many documents remain to be processed.
You’ll be redirected to your **Datastore** page, where the **Syncing Metadata** status will appear. During this stage, Contextual AI syncs your file metadata, users, and groups.
Once metadata syncing is complete, ingestion will begin automatically and the status will update to **Processing**. You can check the progress bar to track how many documents remain to be processed.
 ## Overview
Each demo highlights a real-world scenario—from customer support copilots that draw on private knowledge bases to research assistants that understand context across documents and data sources. You’ll see how Contextual AI unifies retrieval, reasoning, and generation to deliver answers that are accurate, explainable, and compliant.
## Experiment with Contextual AI in Action
Some of these demos are fully interactive, while others are full-realized notebooks that allow you to explore the platform’s capabilities hands-on, at the code level. Learn how developers use Contextual AI’s APIs, connectors, and structured output features to build reliable AI agents that adapt to enterprise workflows.
## More Resources
For more demos and sample code, please visit the following:
* [GitHub Repos](https://github.com/ContextualAI)
* [Hugging Face](https://huggingface.co/ContextualAI)
# RAG Agent
Source: https://contextualai-new-home-nav.mintlify.app/examples/rag-agent
Explore real-world use cases and live demos
## Overview
Contextual AI lets you create and run specialized AI agents that are powered by your data. This demo creates a retrieval-augmented generation (RAG) agent for a financial use case. The agent will answer questions based on the documents provided, but avoid any forward looking statements (e.g., "Tell me about sales in 2048")
## Scope
This example can be completed in under 30 minutes and walks you through the core steps of building a simple RAG workflow:
* **Create a Datastore:** The home for your unstructured documents.
* **Ingest Documents:** We’ll upload a single PDF, though the platform scales to many formats—including HTML.
* **Create a RAG Agent:** All you need to begin is a well-crafted system prompt.
* **Query the Agent:** Get answers grounded entirely in your own data.
## Prerequisites
* Contextual AI API Key
* Python 3.9+
## Running The Demo
You can run the demo either locally or using Google Colab:
* [VS Code Instructions](https://github.com/ContextualAI/examples/tree/main/02-hands-on-lab#-getting-started)
* [Google Colab](https://colab.research.google.com/github/ContextualAI/examples/blob/main/02-hands-on-lab/lab1_create_agent.ipynb)
# Google Sheets Tutorial
Source: https://contextualai-new-home-nav.mintlify.app/examples/tutorial-google-sheets
Explore real-world use cases and live demos
## Overview
This tutorial guides you through a Google Sheets script that integrates with Contextual AI. The script automates form filling by connecting to Contextual AI’s API, enabling dynamic, real-time population of form fields powered by a Contextual AI RAG agent.
## Overview
Each demo highlights a real-world scenario—from customer support copilots that draw on private knowledge bases to research assistants that understand context across documents and data sources. You’ll see how Contextual AI unifies retrieval, reasoning, and generation to deliver answers that are accurate, explainable, and compliant.
## Experiment with Contextual AI in Action
Some of these demos are fully interactive, while others are full-realized notebooks that allow you to explore the platform’s capabilities hands-on, at the code level. Learn how developers use Contextual AI’s APIs, connectors, and structured output features to build reliable AI agents that adapt to enterprise workflows.
## More Resources
For more demos and sample code, please visit the following:
* [GitHub Repos](https://github.com/ContextualAI)
* [Hugging Face](https://huggingface.co/ContextualAI)
# RAG Agent
Source: https://contextualai-new-home-nav.mintlify.app/examples/rag-agent
Explore real-world use cases and live demos
## Overview
Contextual AI lets you create and run specialized AI agents that are powered by your data. This demo creates a retrieval-augmented generation (RAG) agent for a financial use case. The agent will answer questions based on the documents provided, but avoid any forward looking statements (e.g., "Tell me about sales in 2048")
## Scope
This example can be completed in under 30 minutes and walks you through the core steps of building a simple RAG workflow:
* **Create a Datastore:** The home for your unstructured documents.
* **Ingest Documents:** We’ll upload a single PDF, though the platform scales to many formats—including HTML.
* **Create a RAG Agent:** All you need to begin is a well-crafted system prompt.
* **Query the Agent:** Get answers grounded entirely in your own data.
## Prerequisites
* Contextual AI API Key
* Python 3.9+
## Running The Demo
You can run the demo either locally or using Google Colab:
* [VS Code Instructions](https://github.com/ContextualAI/examples/tree/main/02-hands-on-lab#-getting-started)
* [Google Colab](https://colab.research.google.com/github/ContextualAI/examples/blob/main/02-hands-on-lab/lab1_create_agent.ipynb)
# Google Sheets Tutorial
Source: https://contextualai-new-home-nav.mintlify.app/examples/tutorial-google-sheets
Explore real-world use cases and live demos
## Overview
This tutorial guides you through a Google Sheets script that integrates with Contextual AI. The script automates form filling by connecting to Contextual AI’s API, enabling dynamic, real-time population of form fields powered by a Contextual AI RAG agent.
 ## Features
* Use Contextual AI RAG Agents directly from within Google Sheets
* Real-time API integration
## Prerequisites
* Access to Google Sheets
* A Contextual AI API key
***
## Tutorial Steps
## Features
* Use Contextual AI RAG Agents directly from within Google Sheets
* Real-time API integration
## Prerequisites
* Access to Google Sheets
* A Contextual AI API key
***
## Tutorial Steps
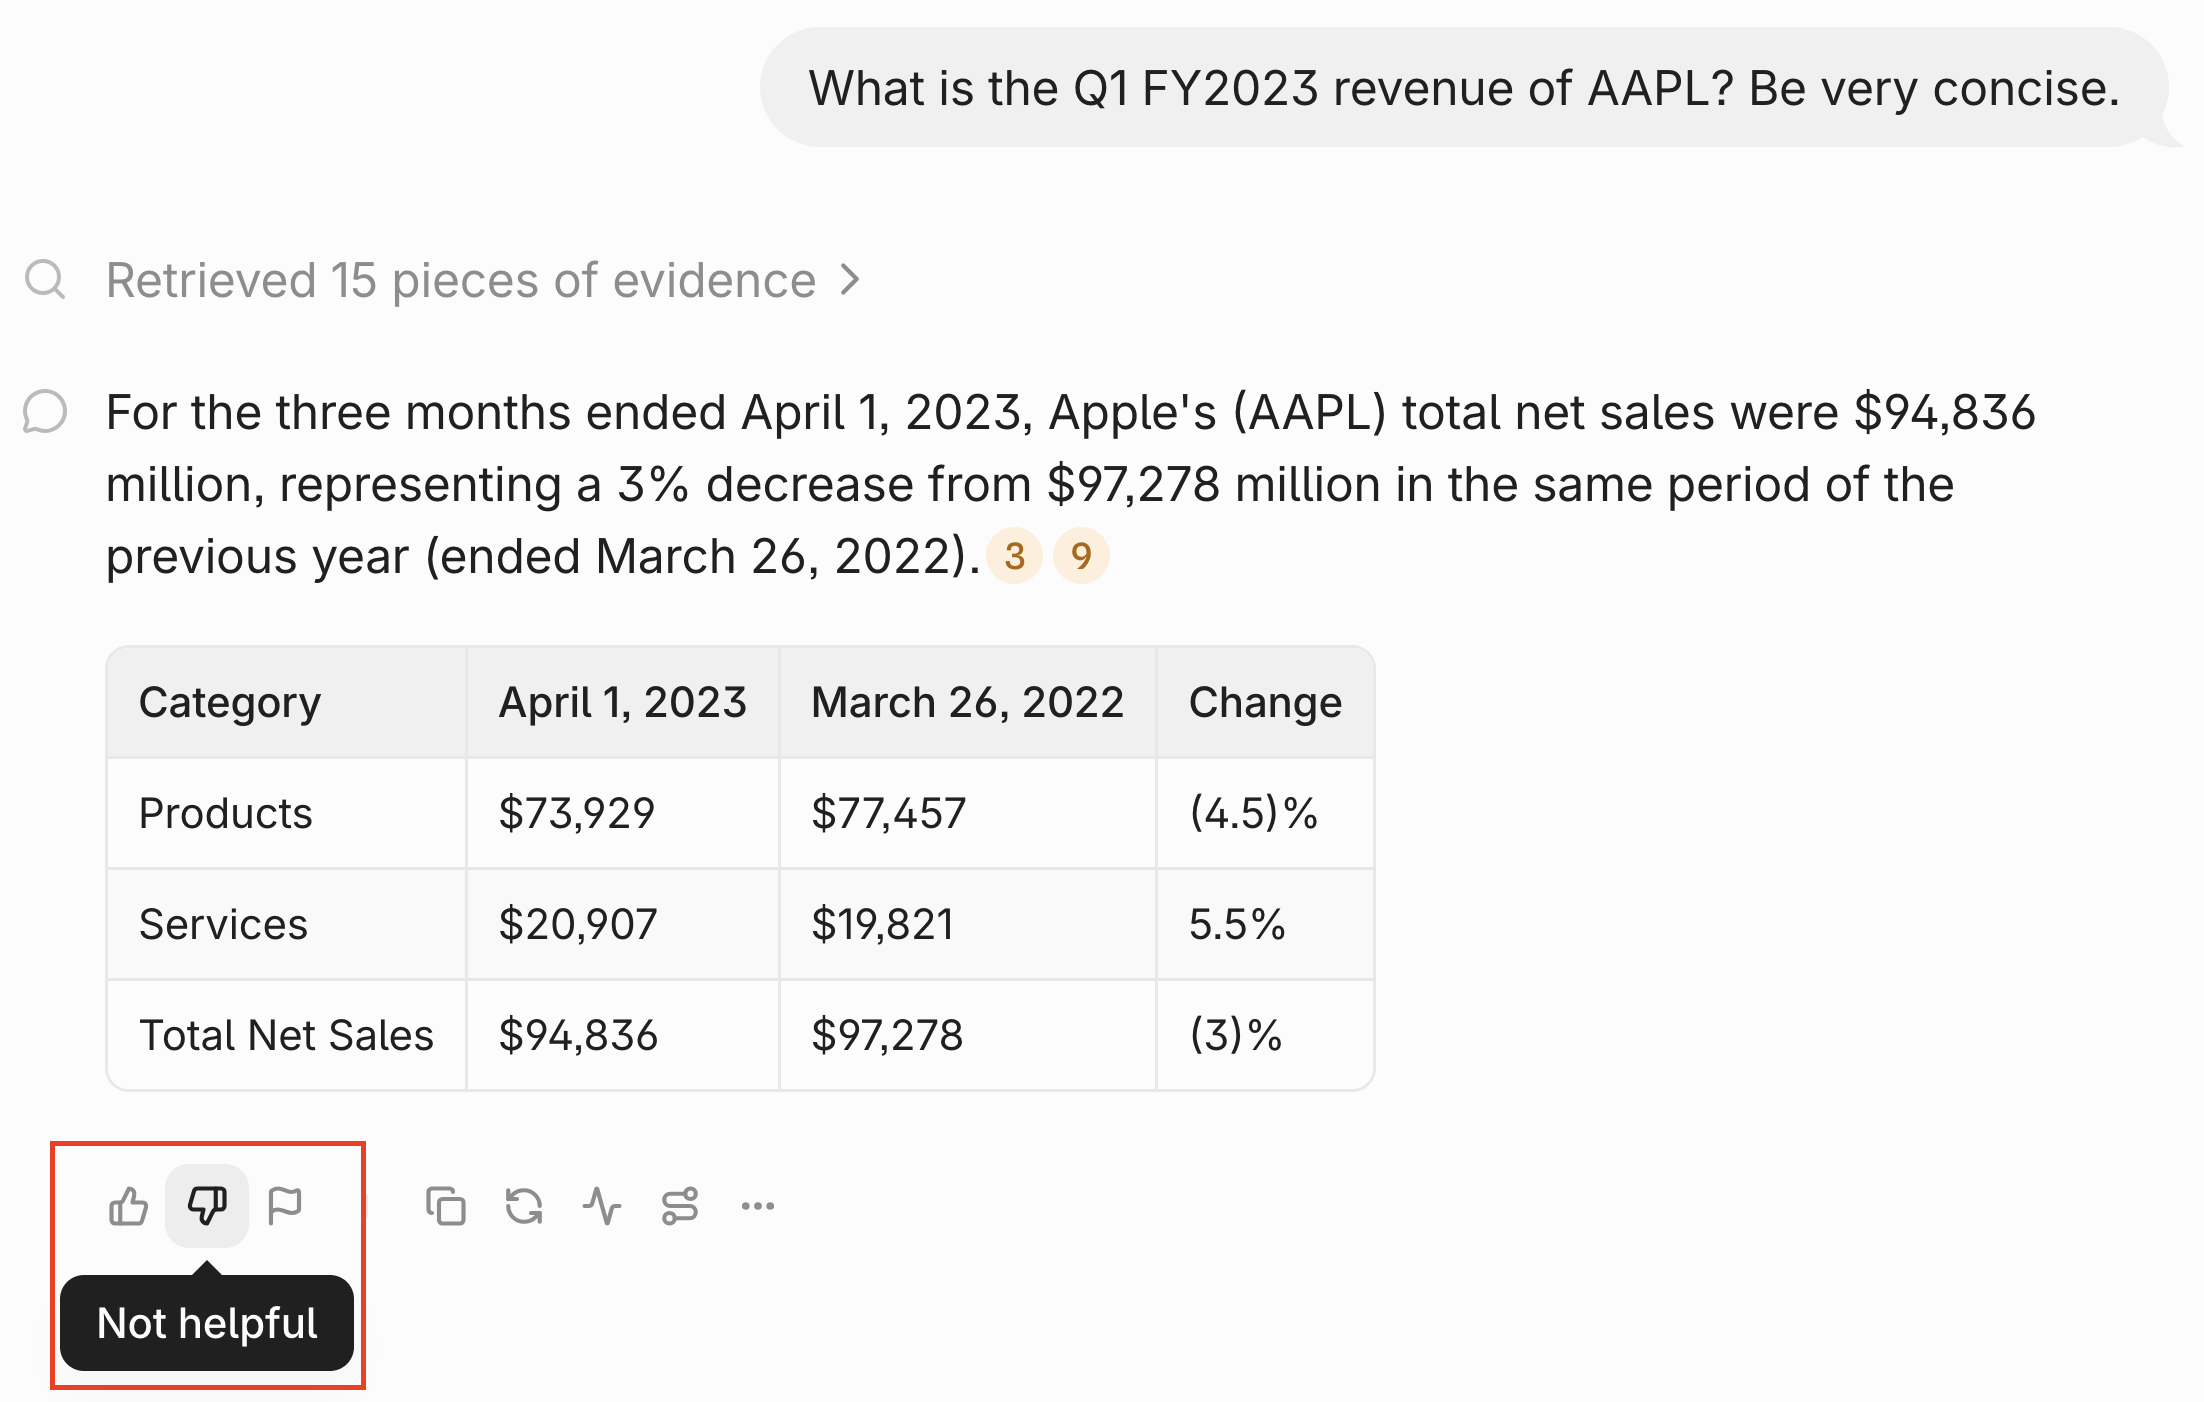 API
We provide an [API for users to leave feedback programatically](https://docs.contextual.ai/api-reference/agents-query/provide-feedback). In the API body, you can flag the query as `thumbs_up`, `thumbs_down`, or `flagged` and include an `explanation`. Here's an example:
```
curl --request POST \
--url https://api.contextual.ai/v1/agents/{agent_id}/feedback \
--header 'Authorization: Bearer
API
We provide an [API for users to leave feedback programatically](https://docs.contextual.ai/api-reference/agents-query/provide-feedback). In the API body, you can flag the query as `thumbs_up`, `thumbs_down`, or `flagged` and include an `explanation`. Here's an example:
```
curl --request POST \
--url https://api.contextual.ai/v1/agents/{agent_id}/feedback \
--header 'Authorization: Bearer  3. Admins are able to configure the feedback workflow that users go through. Navigate to the agent configuration menu and click on `User Experience` under the `Advanced` section. Scroll down to `Feedback Customization`.
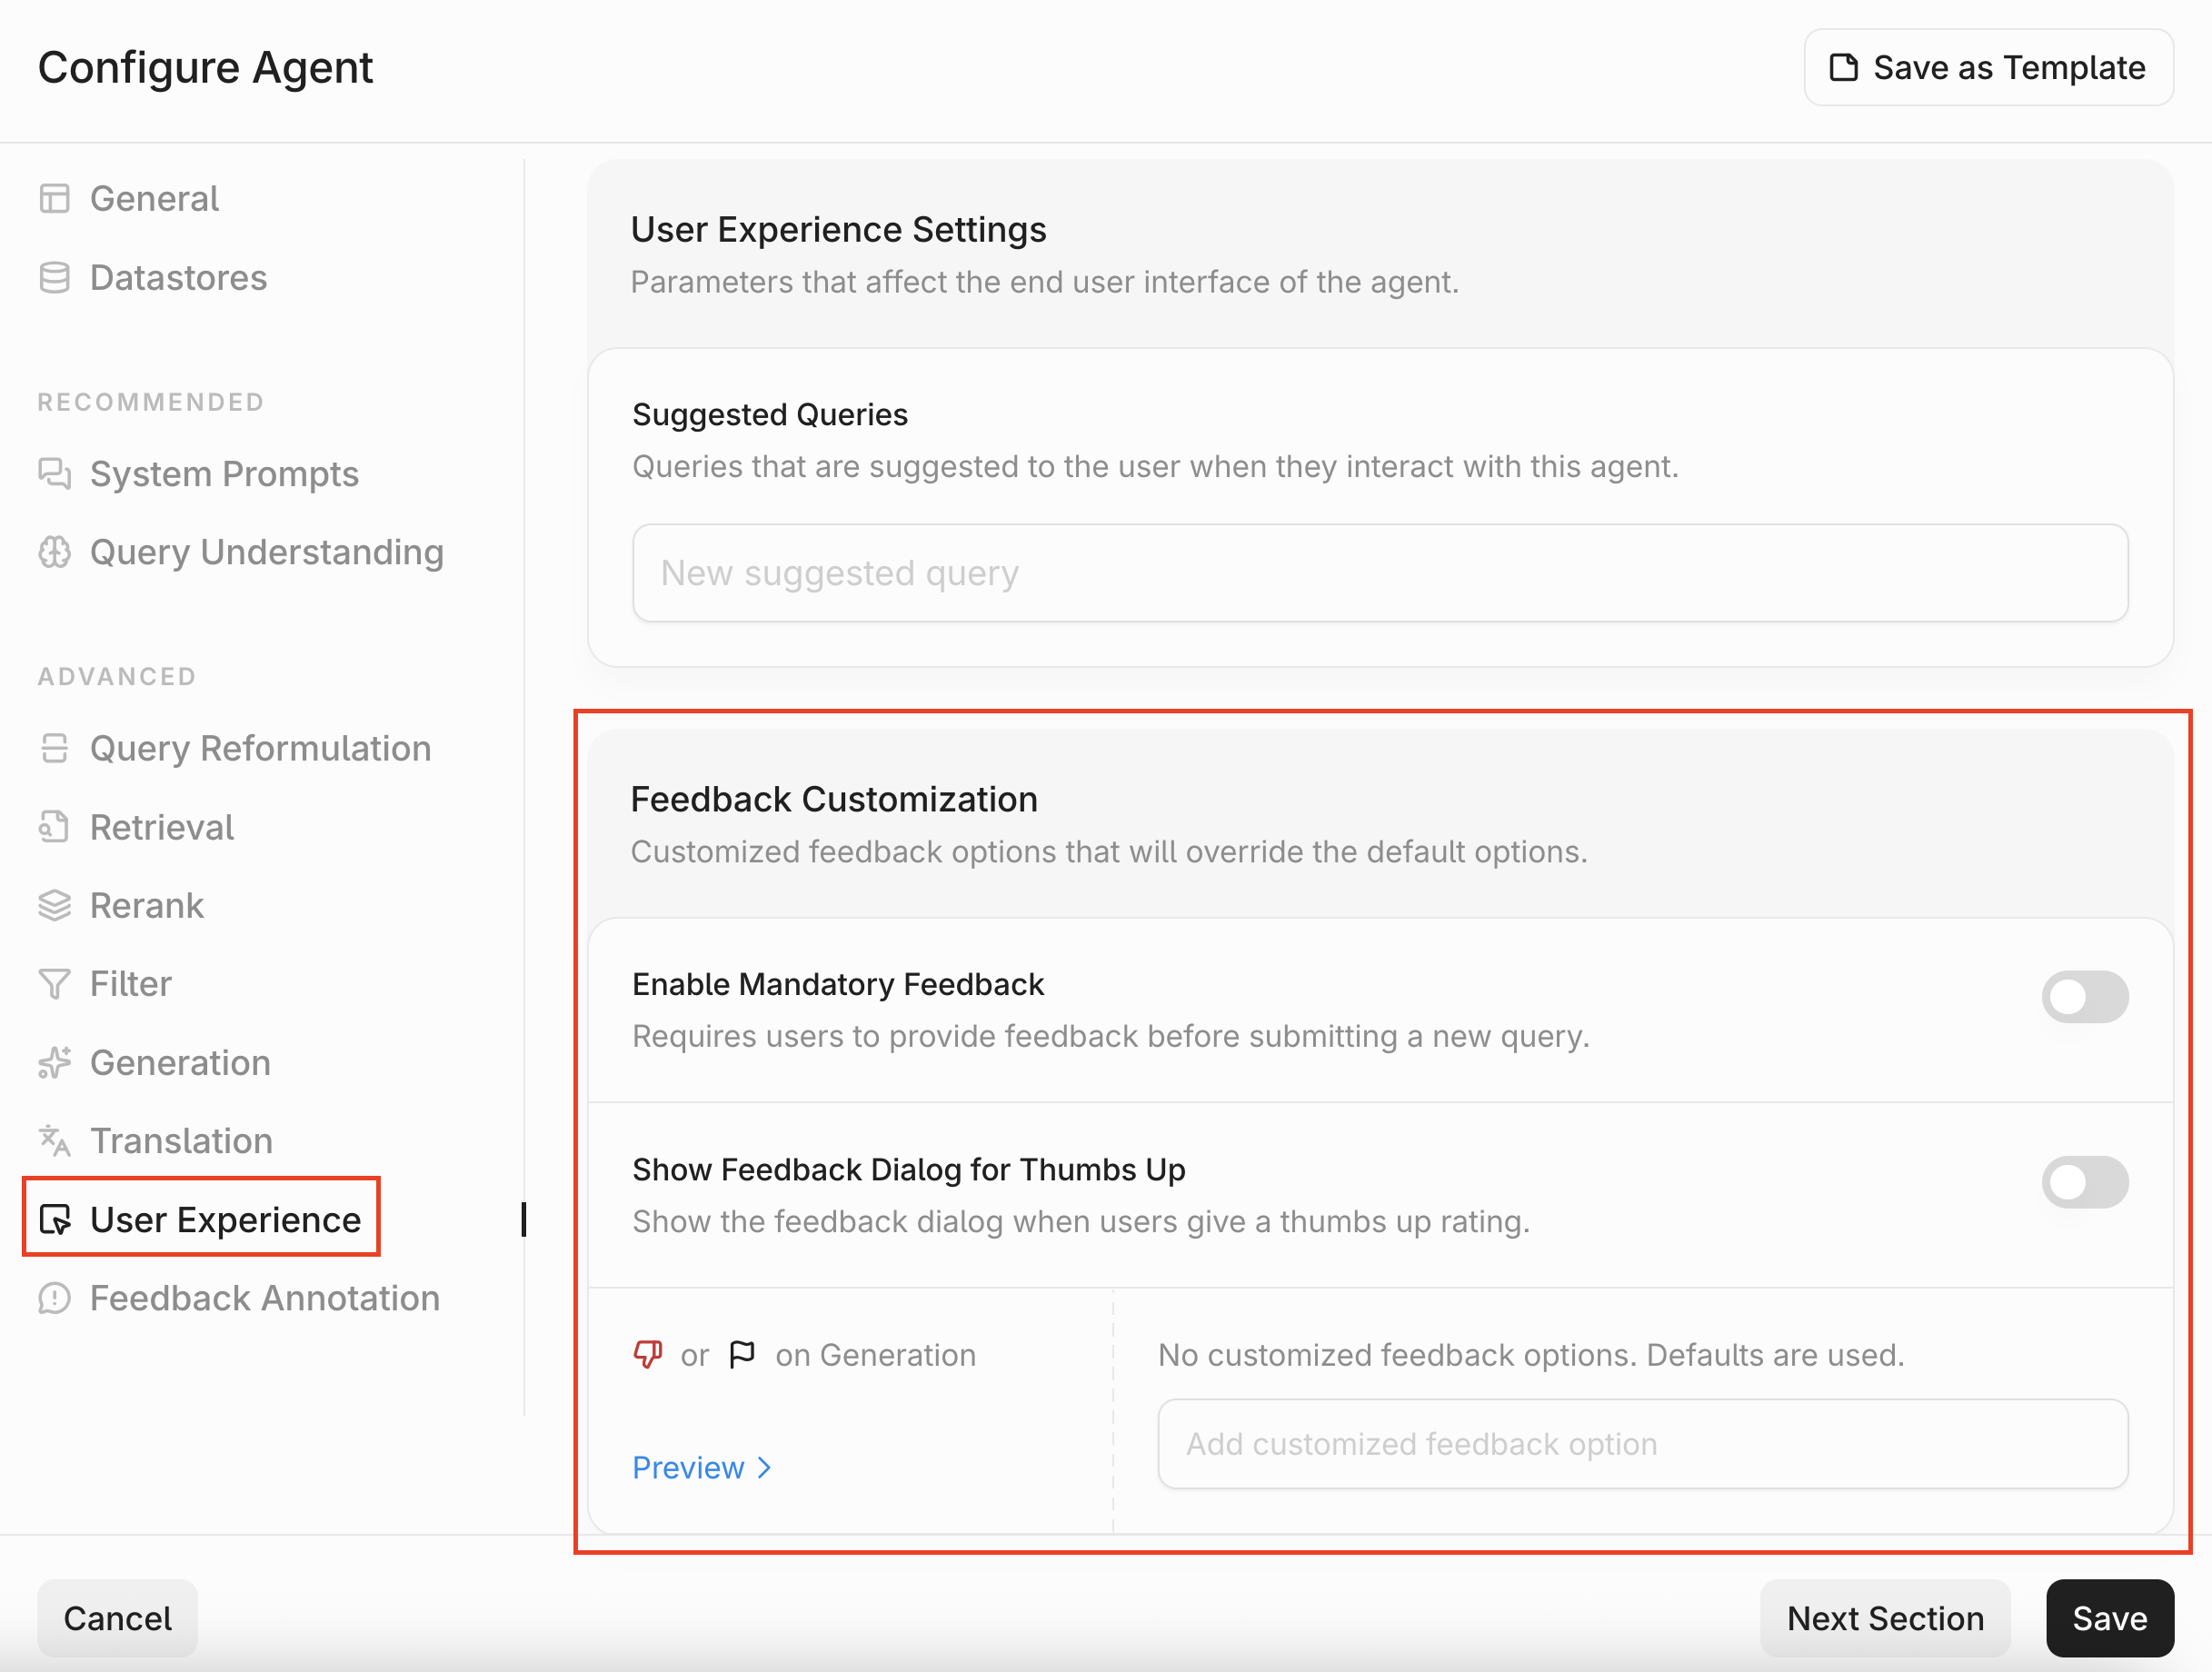 4. In the Feedback Customization section, you have three configs:
1. **Enable Mandatory Feedback:** Toggle this if you require your users to provide feedback before submitting a new query.
2. **Show Feedback Dialog for Thumbs Up:** On the Contextual UI, we will prompt the user to leave details if they submit a `thumbs_down`. With this option enabled, we will also prompt users if they submit a `thumbs_up`.
3. **Customized feedback options for thumbs down:** When a user gives a thumbs down, they’ll be prompted to provide additional context by selecting one or more reasons for their feedback. This setting allows you to customize the list of reasons users can choose. If this section is blank, we will show users a list of default reasons.
1. You can click `Preview` to see how the feedback workflow will look like.
4. In the Feedback Customization section, you have three configs:
1. **Enable Mandatory Feedback:** Toggle this if you require your users to provide feedback before submitting a new query.
2. **Show Feedback Dialog for Thumbs Up:** On the Contextual UI, we will prompt the user to leave details if they submit a `thumbs_down`. With this option enabled, we will also prompt users if they submit a `thumbs_up`.
3. **Customized feedback options for thumbs down:** When a user gives a thumbs down, they’ll be prompted to provide additional context by selecting one or more reasons for their feedback. This setting allows you to customize the list of reasons users can choose. If this section is blank, we will show users a list of default reasons.
1. You can click `Preview` to see how the feedback workflow will look like.
 ### Feedback Annotation
After collecting feedback from real users, you can annotate the feedback as part of your quality assurance (QA) workflow.
1. Before starting your annotation, you will need to configure your annotation labels. Navigate to the agent configuration menu and click on `Feedback Annotation` under the `Advanced` section.
### Feedback Annotation
After collecting feedback from real users, you can annotate the feedback as part of your quality assurance (QA) workflow.
1. Before starting your annotation, you will need to configure your annotation labels. Navigate to the agent configuration menu and click on `Feedback Annotation` under the `Advanced` section.
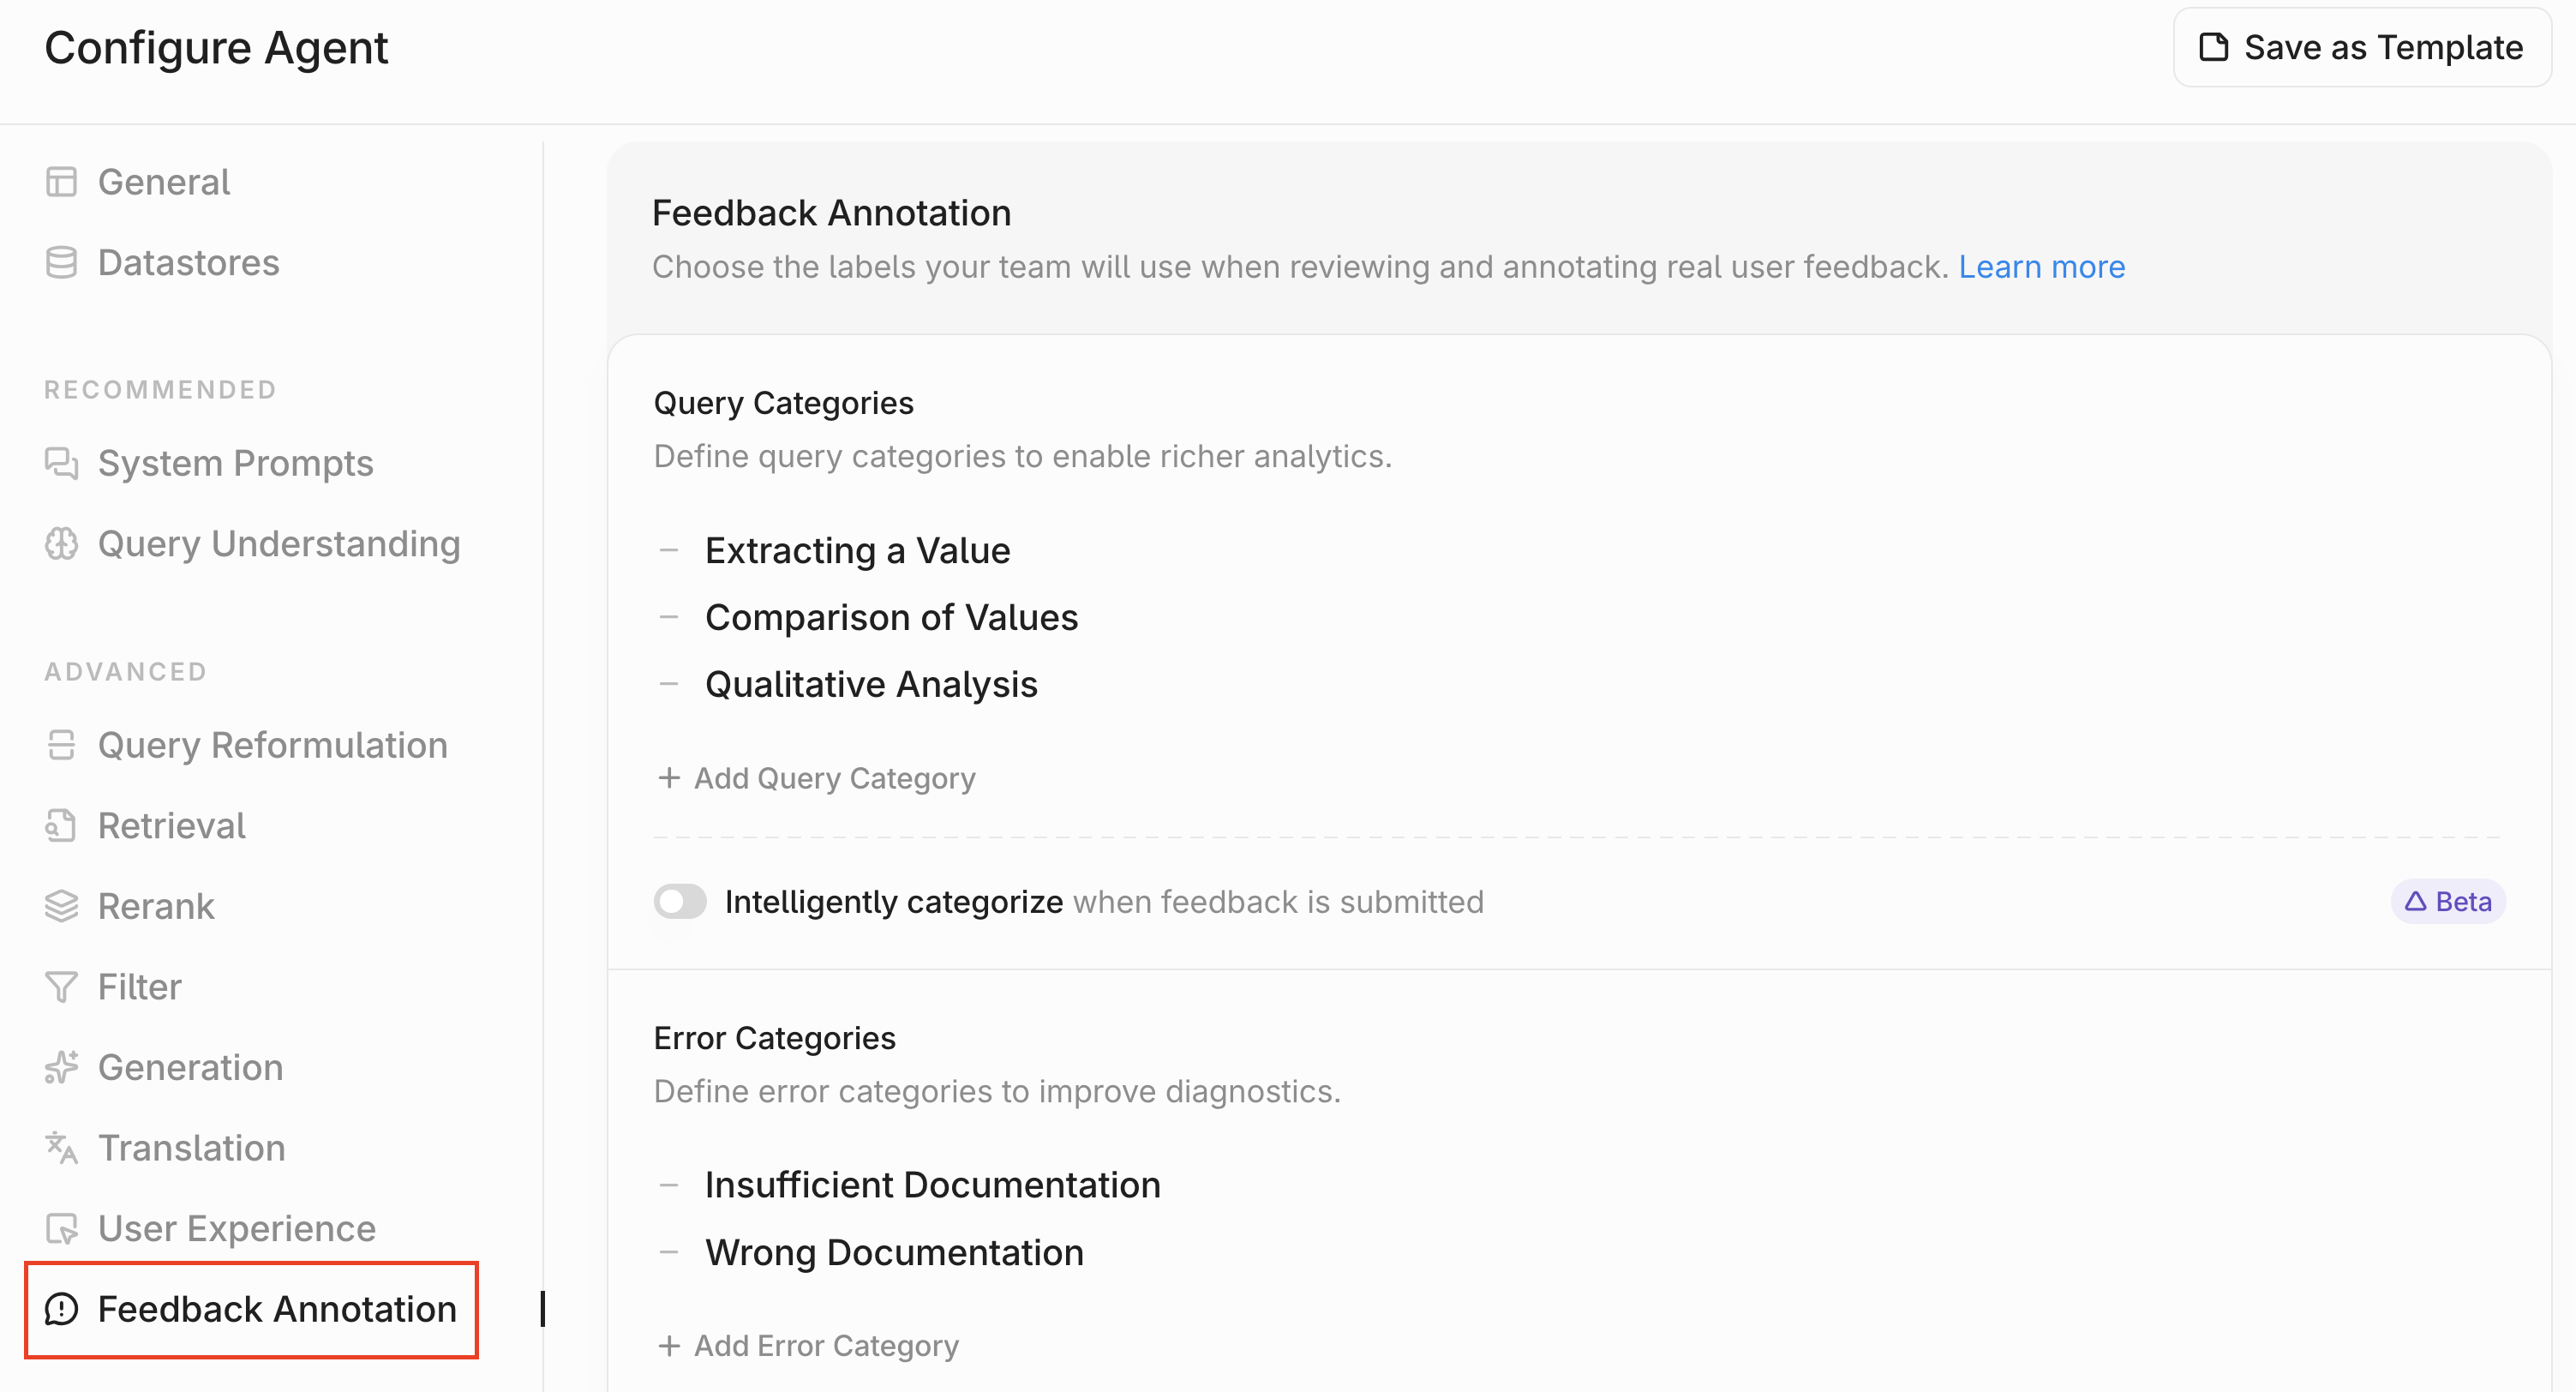 2. There are four annotation columns you can define labels for. The first column is `Query Categories`. To add a label, click `Add Query Category`. You can remove a label by clicking the `-` icon. Finally, you can turn on `Intelligent Categorization` which will automatically classify all flagged queries into one of the labels you've defined.
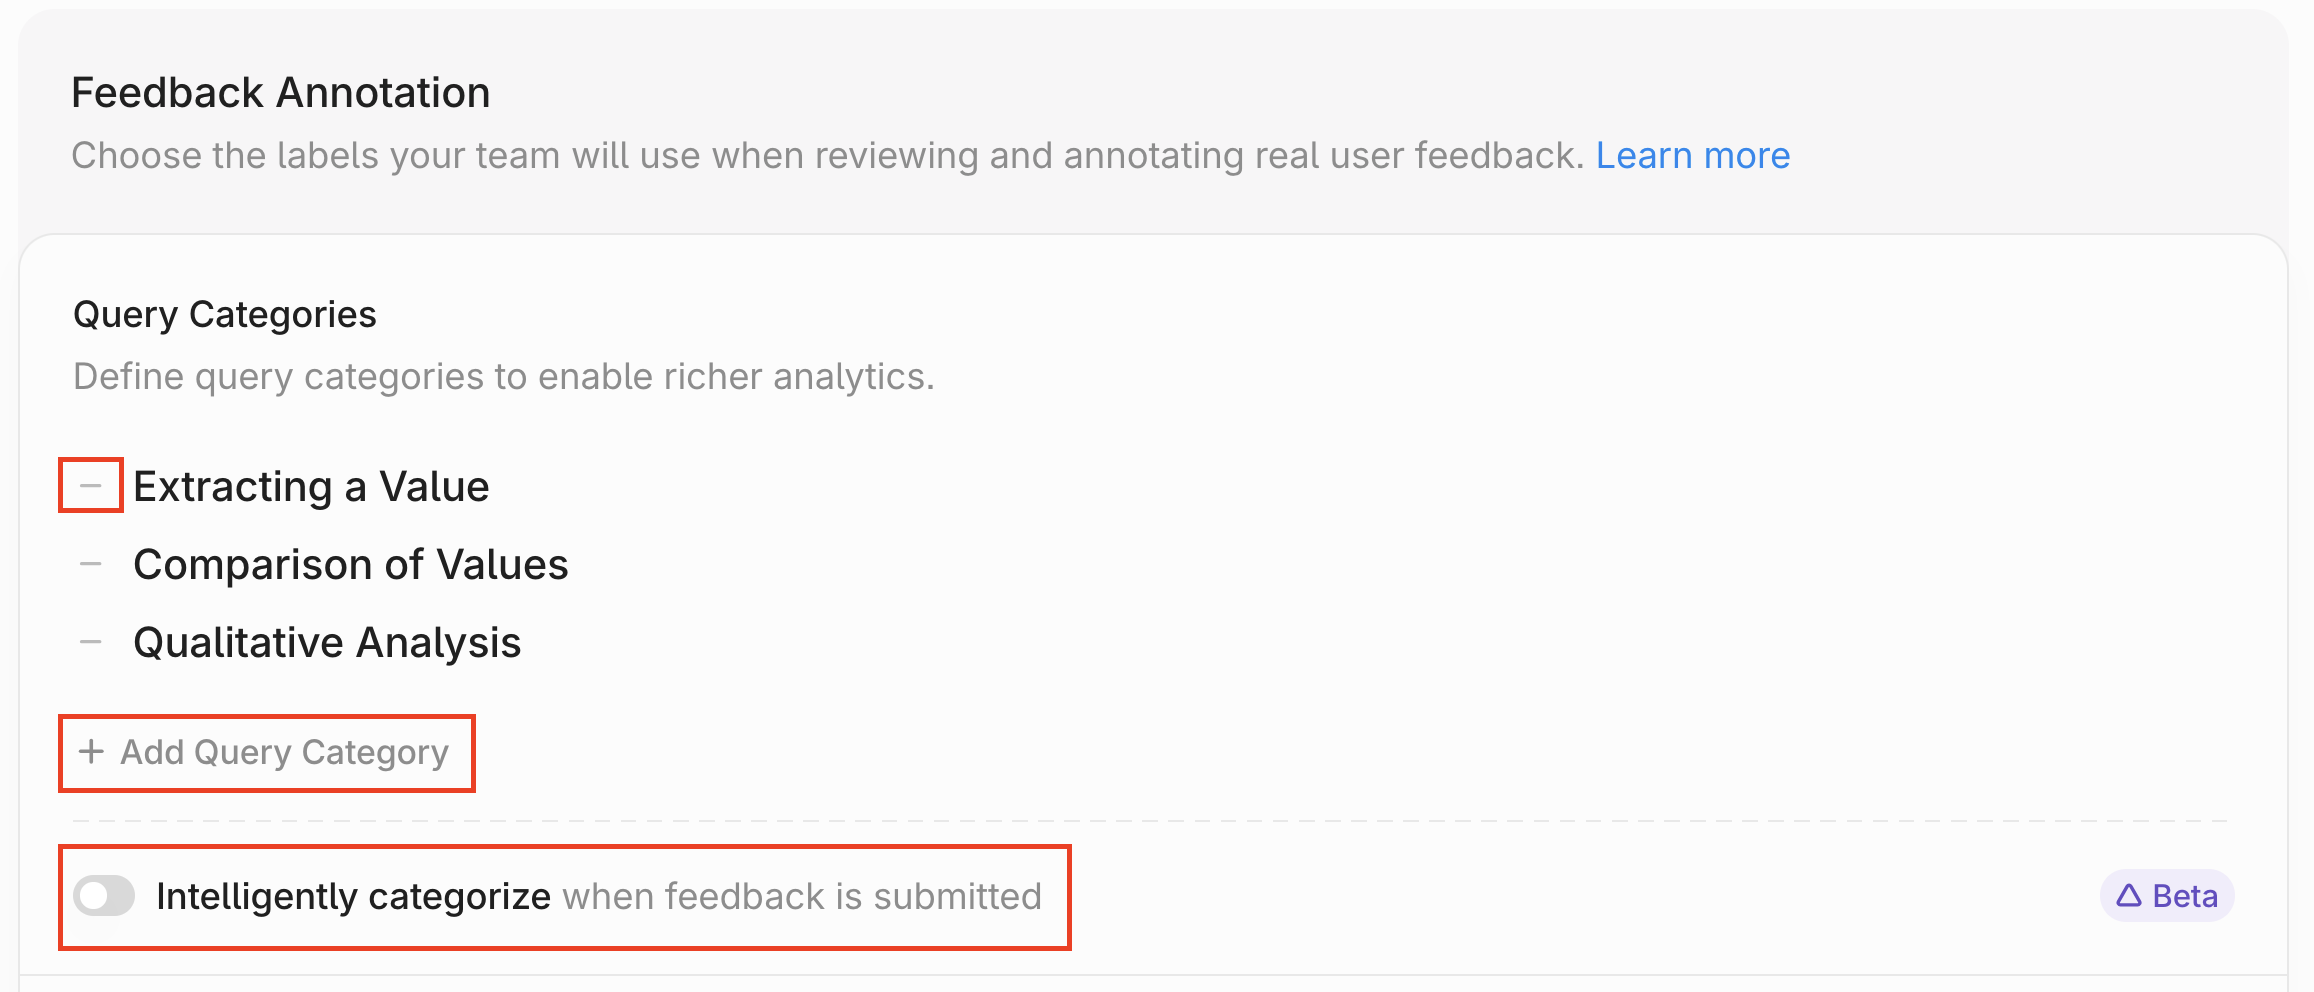 3. Repeat the same process for the other three columns: `Error Categories` (annotate any issues identified), `Response Quality` (annotate the overall quality of the response), `Resolution Status` (annotate the status of the issue -- open/closed/etc).
4. You can also rename any of the existing columns. If you’d like to introduce a new column type beyond the four provided by default, simply update one of the column names to match the new category you want to track.
3. Repeat the same process for the other three columns: `Error Categories` (annotate any issues identified), `Response Quality` (annotate the overall quality of the response), `Resolution Status` (annotate the status of the issue -- open/closed/etc).
4. You can also rename any of the existing columns. If you’d like to introduce a new column type beyond the four provided by default, simply update one of the column names to match the new category you want to track.
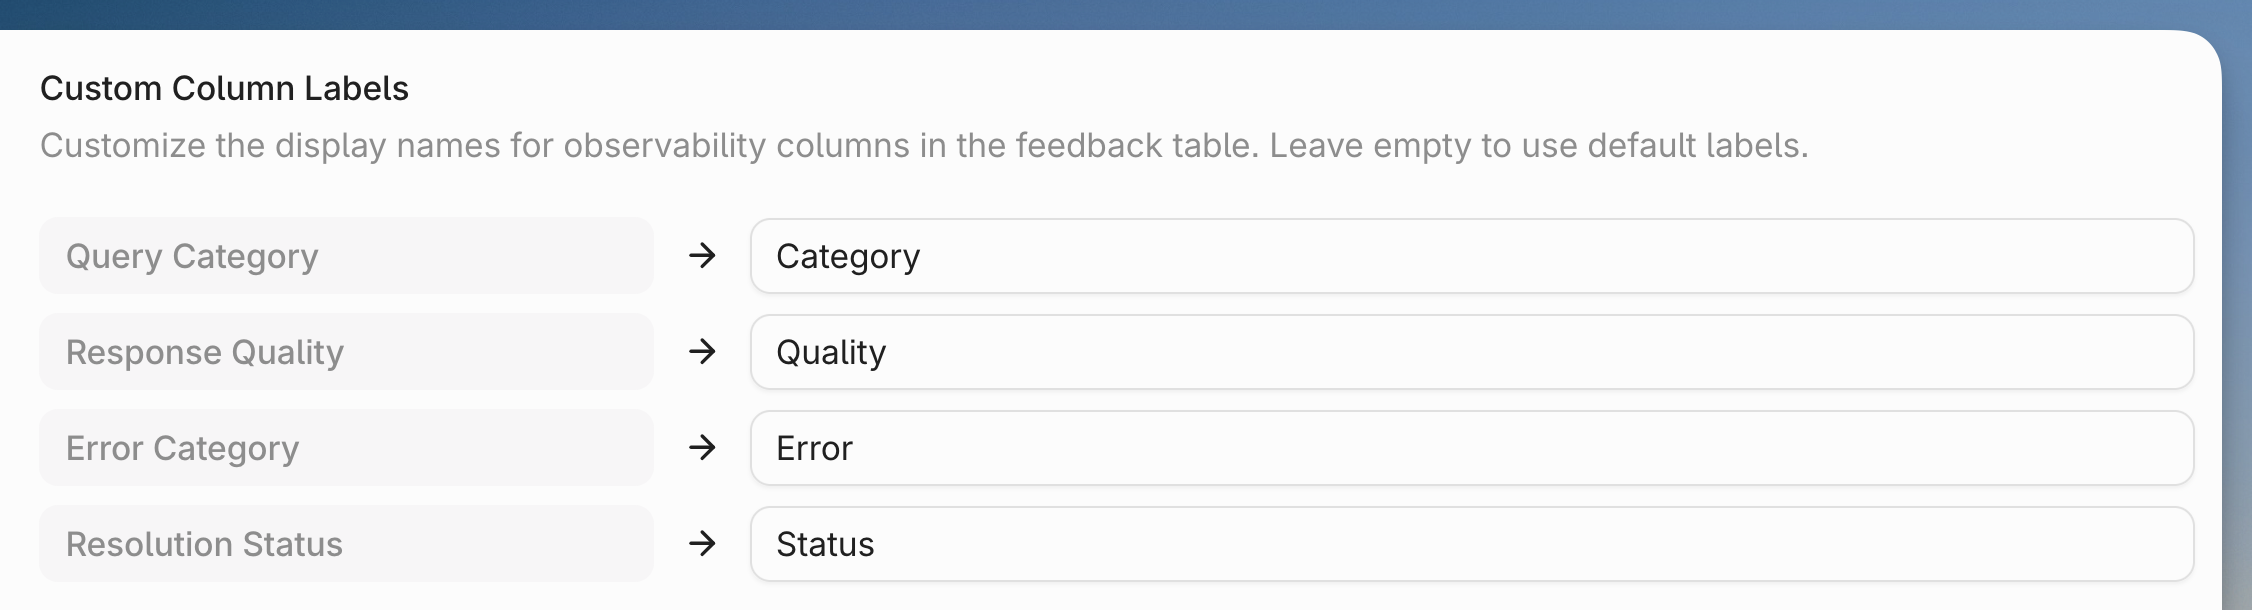 5. Click `Save` at the bottom when you are done.
6. Navigate to the `Feedback Annotation` module through the agent menu.
5. Click `Save` at the bottom when you are done.
6. Navigate to the `Feedback Annotation` module through the agent menu.
 7. To annotate a piece of feedback, simply click on it. The annotation UI will pop up and you can annotate with the custom labels you defined previously.
 8. You can click on citations in the annotation UI to view source chunks.
 9. You can also filter the feedback list to focus on what matters most. Filters can be applied by any column or by the date the feedback was submitted.
 10. There are a few other capabilities in the annotation dashboard:
* Click `Export to CSV` to download the annotated data
* Click the eye icon to select which columns to display
* You can also choose which column to sort by.
10. There are a few other capabilities in the annotation dashboard:
* Click `Export to CSV` to download the annotated data
* Click the eye icon to select which columns to display
* You can also choose which column to sort by.
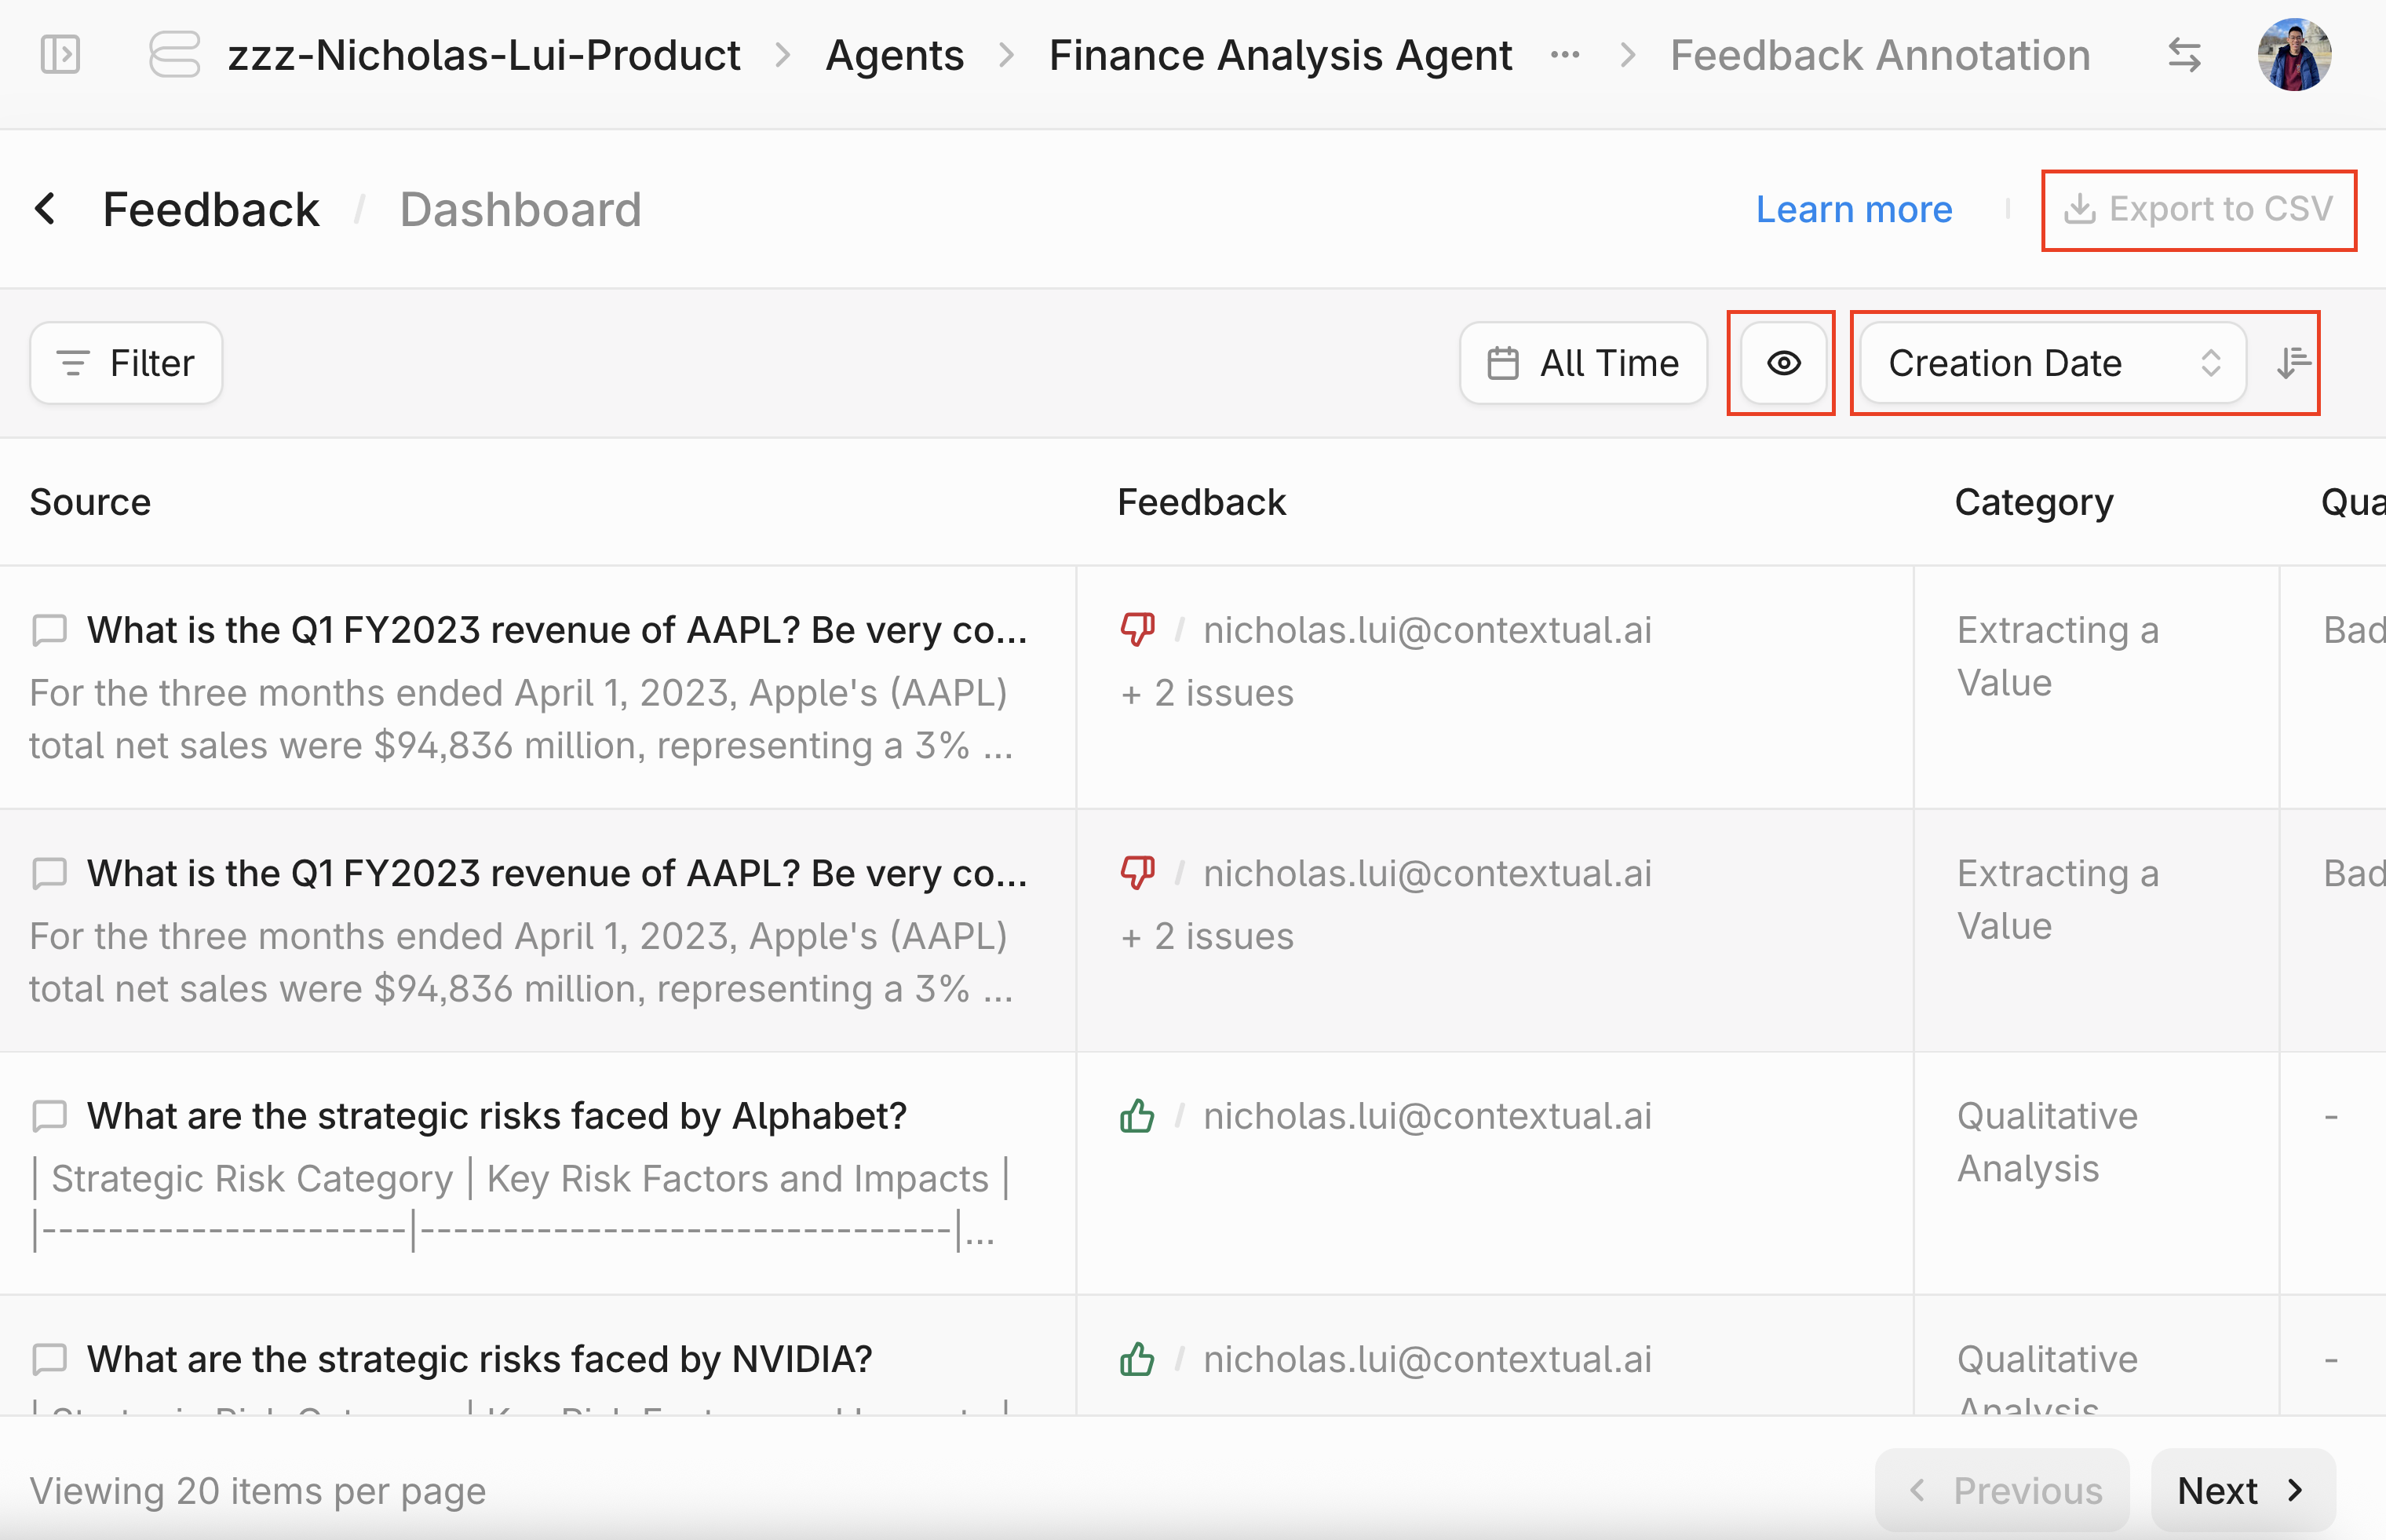 11. Finally, you can click the `Dashboard` button at the top to view an **auto-generated dashboard** that visualizes your annotated feedback results.
Navigating to the Dashboard:
11. Finally, you can click the `Dashboard` button at the top to view an **auto-generated dashboard** that visualizes your annotated feedback results.
Navigating to the Dashboard:
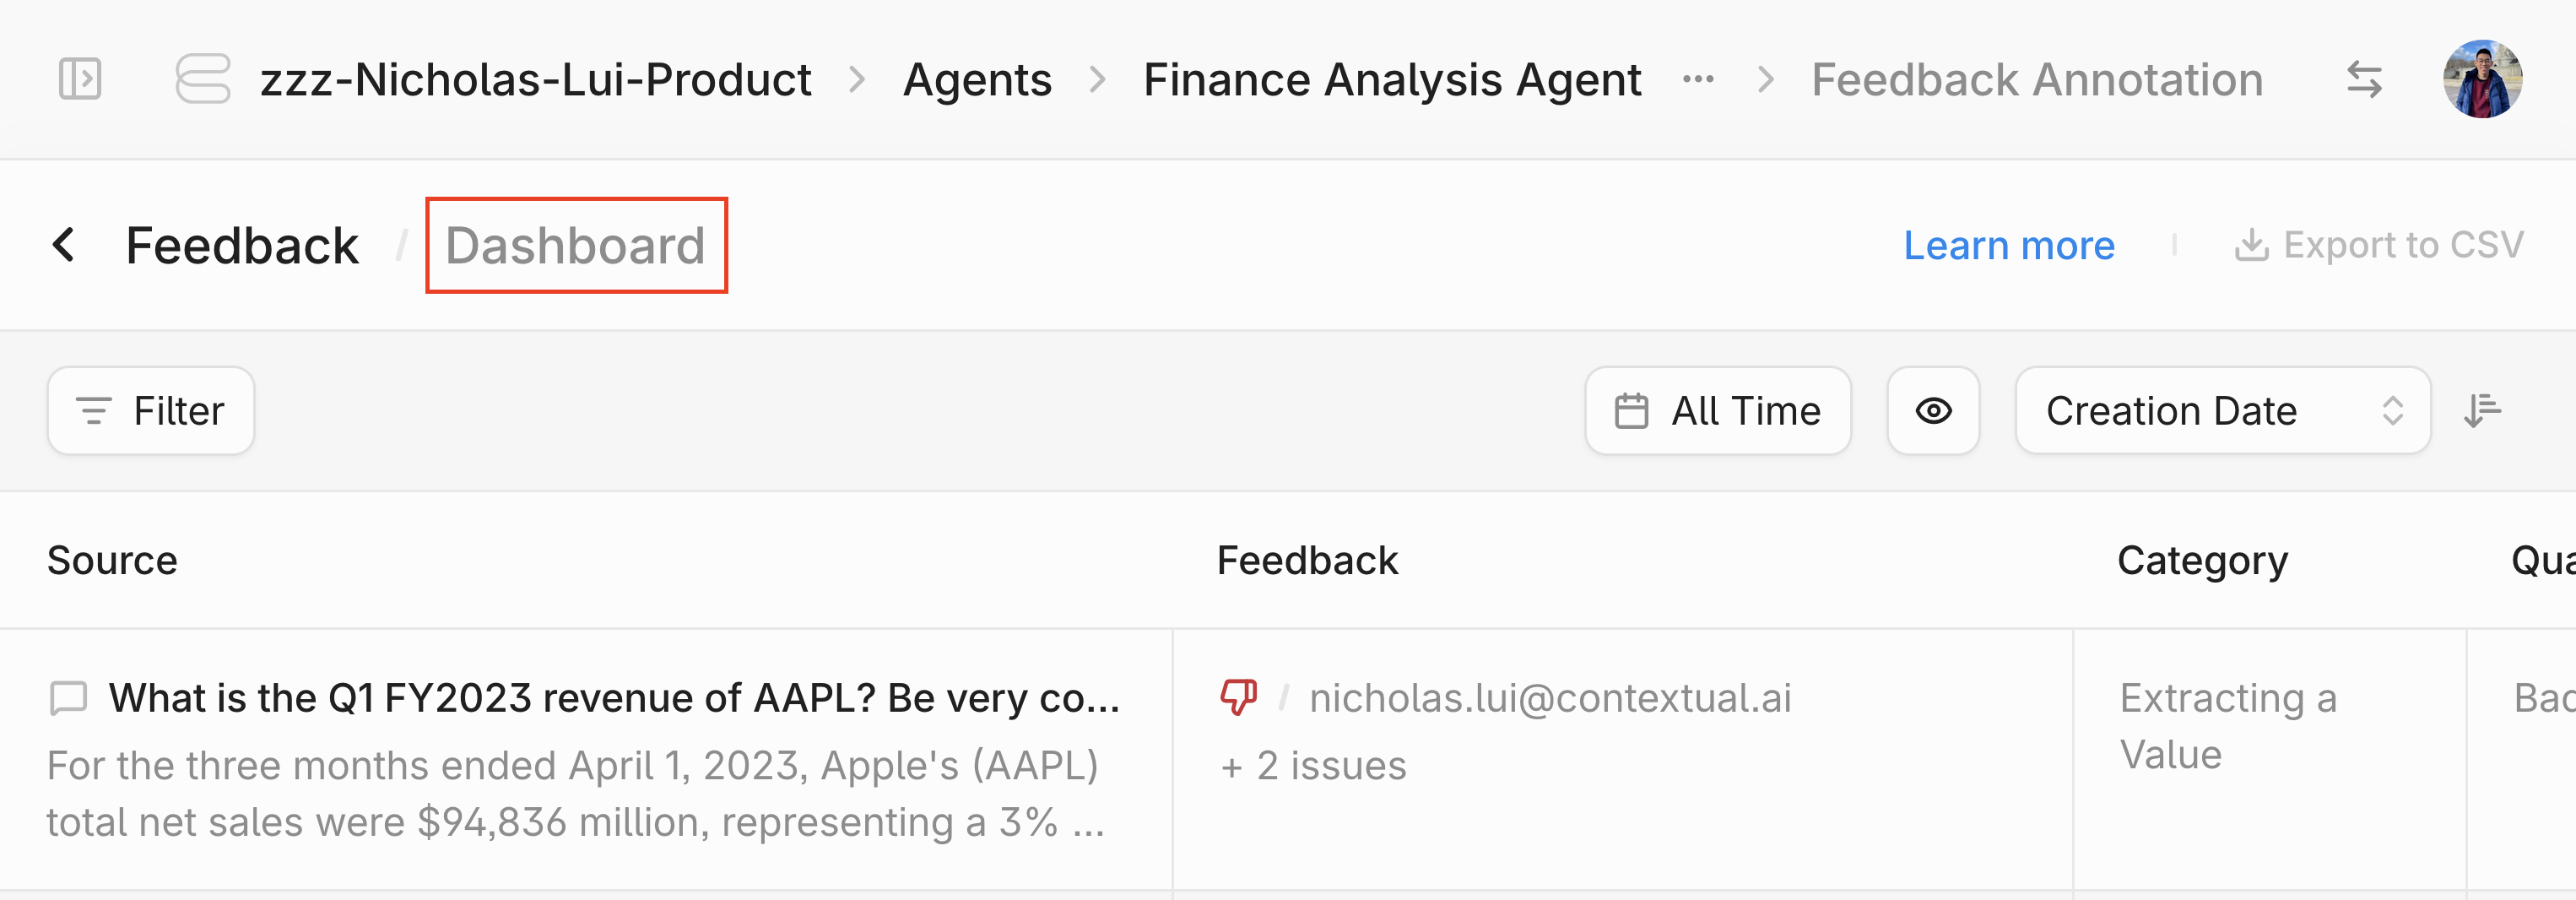 Viewing the Dashboard:
 # Generate
Source: https://contextualai-new-home-nav.mintlify.app/how-to-guides/generate
Contextual AI How-to Guide
## Overview
Contextual AI's Grounded Language Model (GLM) is the most grounded language model in the world, making it the best language model to use for RAG and agentic use cases for which minimizing hallucinations is critical.
## Global Variables & Examples
First, we will set up the global variables and examples we'll use with each different implementation method.
```python theme={null}
from google.colab import userdata
api_key = userdata.get("API_TOKEN")
base_url = "https://api.contextual.ai/v1"
generate_api_endpoint = f"{base_url}/generate"
```
```python theme={null}
# Example conversation messages
messages = [
{
"role": "user",
"content": "What are the most promising renewable energy technologies for addressing climate change in developing nations?"
},
{
"role": "assistant",
"content": "Based on current research, solar and wind power show significant potential for developing nations due to decreasing costs and scalability. Would you like to know more about specific implementation challenges and success stories?"
},
{
"role": "user",
"content": "Yes, please tell me about successful solar implementations in Africa and their economic impact, particularly focusing on rural electrification."
}
]
# Detailed knowledge sources with varied information
knowledge = [
"""According to the International Renewable Energy Agency (IRENA) 2023 report:
- Solar PV installations in Africa reached 10.4 GW in 2022
- The cost of solar PV modules decreased by 80% between 2010 and 2022
- Rural electrification projects have provided power to 17 million households""",
"""Case Study: Rural Electrification in Kenya (2020-2023)
- 2.5 million households connected through mini-grid systems
- Average household income increased by 35% after electrification
- Local businesses reported 47% growth in revenue
- Education outcomes improved with 3 additional study hours per day""",
"""Economic Analysis of Solar Projects in Sub-Saharan Africa:
- Job creation: 25 jobs per MW of installed capacity
- ROI average of 12-15% for mini-grid projects
- Reduced energy costs by 60% compared to diesel generators
- Carbon emissions reduction: 2.3 million tonnes CO2 equivalent""",
"""Technical Specifications and Best Practices:
- Optimal solar panel efficiency in African climate conditions: 15-22%
- Battery storage requirements: 4-8 kWh per household
- Maintenance costs: $0.02-0.04 per kWh
- Expected system lifetime: 20-25 years""",
"""Social Impact Assessment:
- Women-led businesses increased by 45% in electrified areas
- Healthcare facilities reported 72% improvement in service delivery
- Mobile money usage increased by 60%
- Agricultural productivity improved by 28% with electric irrigation"""
]
```
## Direct API implementation
```python theme={null}
import requests
headers = {
"accept": "application/json",
"content-type": "application/json",
"authorization": f"Bearer {api_key}"
}
```
```python theme={null}
payload = {
"model": "v1",
"messages": messages,
"knowledge": knowledge,
"avoid_commentary": False,
"max_new_tokens": 1024,
"temperature": 0,
"top_p": 0.9
}
generate_response = requests.post(generate_api_endpoint, json=payload, headers=headers)
print(generate_response.json()['response'])
```
```
Let me share the current state of solar energy in Africa, focusing on rural electrification and its economic impact:
Africa has seen significant solar PV adoption, with total installations reaching 10.4 GW as of 2022, supported by an 80% decrease in solar PV module costs between 2010 and 2022.
The impact on rural communities has been particularly noteworthy:
Rural electrification initiatives have already connected 17 million households to power. A specific case study in Kenya (2020-2023) demonstrated impressive results:
- 2.5 million households were connected through mini-grid systems
- Average household income increased by 35%
- Local businesses saw 47% revenue growth
- Students gained 3 additional study hours per day
The economic benefits extend beyond household income:
The solar industry has created substantial economic opportunities:
- Each MW of installed capacity generates 25 jobs
- Mini-grid projects typically achieve 12-15% ROI
- Energy costs have been reduced by 60% compared to diesel generators
- The projects have resulted in 2.3 million tonnes CO2 equivalent in emissions reduction
The social impact has been particularly significant:
The data shows:
- 45% increase in women-led businesses
- 72% improvement in healthcare service delivery
- 60% increase in mobile money usage
- 28% improvement in agricultural productivity with electric irrigation
```
## Python SDK
```python theme={null}
try:
from contextual import ContextualAI
except:
%pip install contextual-client
from contextual import ContextualAI
client = ContextualAI (api_key = api_key, base_url = base_url)
```
```python theme={null}
generate_response = client.generate.create(
model="v1",
messages=messages,
knowledge=knowledge,
avoid_commentary=False,
max_new_tokens=1024,
temperature=0,
top_p=0.9
)
print(generate_response.response)
```
```
Let me share the current state of solar energy in Africa, focusing on rural electrification and its economic impact:
Africa has seen significant solar PV adoption, with total installations reaching 10.4 GW as of 2022, supported by an 80% decrease in solar PV module costs between 2010 and 2022.
The impact on rural communities has been particularly noteworthy:
Rural electrification initiatives have already connected 17 million households to power. A specific case study in Kenya (2020-2023) demonstrated impressive results:
- 2.5 million households were connected through mini-grid systems
- Average household income increased by 35%
- Local businesses saw 47% revenue growth
- Students gained 3 additional study hours per day
The economic benefits extend beyond household income:
The solar industry has created substantial economic opportunities:
- Each MW of installed capacity generates 25 jobs
- Mini-grid projects typically achieve 12-15% ROI
- Energy costs have been reduced by 60% compared to diesel generators
- The projects have resulted in 2.3 million tonnes CO2 equivalent in emissions reduction
The social impact has been particularly significant:
The data shows:
- 45% increase in women-led businesses
- 72% improvement in healthcare service delivery
- 60% increase in mobile money usage
- 28% improvement in agricultural productivity with electric irrigation
```
## Langchain
```
try:
from langchain_contextual import ChatContextual
except:
%pip install langchain-contextual
from langchain_contextual import ChatContextual
# intialize Contextual llm via langchain_contextual
llm = ChatContextual(
model="v1",
api_key=api_key,
)
ai_msg = llm.invoke(
messages,
knowledge=knowledge,
avoid_commentary=False,
max_new_tokens=1024,
temperature=0,
top_p=0.9
)
print(ai_msg.content)
```
```
Let me share the current state of solar energy in Africa, focusing on rural electrification and its economic impact:
Africa has seen significant solar PV adoption, with total installations reaching 10.4 GW as of 2022, supported by an 80% decrease in solar PV module costs between 2010 and 2022.
The impact on rural communities has been particularly noteworthy:
Rural electrification initiatives have already connected 17 million households to power. A specific case study in Kenya (2020-2023) demonstrated impressive results:
- 2.5 million households were connected through mini-grid systems
- Average household income increased by 35%
- Local businesses saw 47% revenue growth
- Students gained 3 additional study hours per day
The economic benefits extend beyond household income:
The solar industry has created substantial economic opportunities:
- Each MW of installed capacity generates 25 jobs
- Mini-grid projects typically achieve 12-15% ROI
- Energy costs have been reduced by 60% compared to diesel generators
- The projects have resulted in 2.3 million tonnes CO2 equivalent in emissions reduction
The social impact has been particularly significant:
The data shows:
- 45% increase in women-led businesses
- 72% improvement in healthcare service delivery
- 60% increase in mobile money usage
- 28% improvement in agricultural productivity with electric irrigation
```
## LLamaIndex
```
try:
from llama_index.llms.contextual import Contextual
from llama_index.core.chat_engine.types import ChatMessage
except:
%pip install -U llama-index-llms-contextual
from llama_index.llms.contextual import Contextual
from llama_index.core.chat_engine.types import ChatMessage
llm = Contextual(model="v1", api_key=api_key)
response = llm.complete(
messages[0]['content'],
knowledge=knowledge,
avoid_commentary=False,
max_new_tokens=1024,
temperature=0,
top_p=0.9
)
print(response.text)
```
```
Based on recent data and implementation results, solar energy emerges as a particularly promising renewable energy technology for developing nations. Here are the key findings:
As of 2022, solar PV installations in Africa have reached 10.4 GW, with solar PV module costs decreasing by 80% between 2010 and 2022.
The technology has demonstrated impressive economic and social impacts:
- Creates significant employment opportunities with 25 jobs per MW of installed capacity
- Delivers strong returns with 12-15% ROI for mini-grid projects
- Reduces energy costs by 60% compared to diesel generators
- Achieves substantial carbon savings of 2.3 million tonnes CO2 equivalent
The implementation data shows remarkable social benefits:
- Rural electrification projects have connected 17 million households
- In Kenya specifically, 2.5 million households have been connected through mini-grid systems
- Average household income increased by 35% after electrification
- Local businesses reported 47% growth in revenue
- Education outcomes improved with 3 additional study hours per day
From a technical perspective:
- Solar panels achieve optimal efficiency of 15-22% in African climate conditions
- Systems require 4-8 kWh of battery storage per household
- Maintenance costs are relatively low at $0.02-0.04 per kWh
- Systems have an expected lifetime of 20-25 years
These metrics demonstrate solar energy's potential as a viable solution for developing nations.
messages_llama_index = [ChatMessage(role=message['role'], content=message['content']) for message in messages]
response = llm.chat(
messages_llama_index,
knowledge_base=knowledge,
avoid_commentary=False,
max_new_tokens=1024,
temperature=0,
top_p=0.9
)
print(response)
```
```
assistant: Let me share the current state of solar energy in Africa, focusing on rural electrification and its economic impact:
Africa has seen significant solar PV adoption, with total installations reaching 10.4 GW as of 2022, supported by an 80% decrease in solar PV module costs between 2010 and 2022.
The impact on rural communities has been particularly noteworthy:
Rural electrification initiatives have already connected 17 million households to power. A specific case study in Kenya (2020-2023) demonstrated impressive results:
- 2.5 million households were connected through mini-grid systems
- Average household income increased by 35%
- Local businesses saw 47% revenue growth
- Students gained 3 additional study hours per day
The economic benefits extend beyond household income:
The solar industry has created substantial economic opportunities:
- Each MW of installed capacity generates 25 jobs
- Mini-grid projects typically achieve 12-15% ROI
- Energy costs have been reduced by 60% compared to diesel generators
- The projects have resulted in 2.3 million tonnes CO2 equivalent in emissions reduction
The social impact has been particularly significant:
The data shows:
- 45% increase in women-led businesses
- 72% improvement in healthcare service delivery
- 60% increase in mobile money usage
- 28% improvement in agricultural productivity with electric irrigation
```
## Multi-Turn Conversations
The GLM supports multi-turn conversations, but with an important consideration: the model is stateless and knowledge does not automatically persist between turns. This means:
* To continue a conversation using the same knowledge: You must provide your knowledge array again with each new request.
* To continue a conversation with additional information: You must combine your existing knowledge array with the new information and provide the complete updated array.
Remember that the GLM relies entirely on the knowledge you explicitly provide in each request, as it prioritizes these facts over its parametric knowledge.
```
#@title First Turn of Conversation
user_msg_1 = "Tell me about the Emperor Penguin"
messages_1 = [
{
"role": "user",
"content": user_msg_1
}
]
knowledge_1 = [
"Emperor penguins (Aptenodytes forsteri) are the tallest and heaviest of all living penguin species, standing up to 122 cm (48 inches) tall and weighing up to 45 kg (99 pounds).",
"Emperor penguins are the only penguin species that breeds during the Antarctic winter, enduring temperatures as low as -60°C (-76°F) and wind speeds up to 200 km/h (124 mph).",
"Male Emperor penguins incubate their single egg for about 65-75 days while balancing it on their feet and covering it with a special brood pouch, during which time they don't eat and can lose up to 45% of their body weight.",
"Emperor penguins can dive deeper than any other bird, reaching depths of up to 565 meters (1,850 feet) and staying underwater for up to 22 minutes when hunting for fish, squid and krill."
]
response = client.generate.create(
knowledge=knowledge_1,
messages=messages_1,
model="v1",
)
returned_response = response.to_dict()['response']
print(f"User: {user_msg_1}\n\n")
print(f"Assistant: {returned_response}")
```
```
User: Tell me about the Emperor Penguin
Assistant: Let me tell you about the Emperor Penguin's remarkable characteristics and behaviors:
Emperor penguins are the largest penguin species, reaching heights of up to 122 cm (48 inches) and weighing up to 45 kg (99 pounds).
Their breeding habits are particularly fascinating:
They are unique among penguins as they breed during the Antarctic winter, withstanding extreme conditions including:
- Temperatures as low as -60°C (-76°F)
- Wind speeds up to 200 km/h (124 mph)
During breeding, male Emperor penguins take on remarkable parental responsibilities:
- They incubate a single egg for 65-75 days
- They balance the egg on their feet and cover it with a special brood pouch
- During this time, they fast and can lose up to 45% of their body weight
Their hunting abilities are equally impressive:
Emperor penguins are exceptional divers, capable of:
- Reaching depths of up to 565 meters (1,850 feet)
- Staying underwater for up to 22 minutes
- Hunting for fish, squid, and krill
```
```
#@title Second Turn (without Extending Knowledge)
user_msg_2 = "Compare the emperor penguin with the adelie penguin"
messages_2 = [
{
"role": "user",
"content": user_msg_1
},
{
"role": "assistant",
"content": returned_response,
},
{
"role": "user",
"content": user_msg_2
}
]
knowledge_2 = [
"Adélie penguins (Pygoscelis adeliae) are named after Adélie Land, a territory in Antarctica discovered by French explorer Jules Dumont d'Urville, who named it after his wife.",
"Adélie penguins are one of the most southerly distributed birds and one of only two penguin species that are truly Antarctic (the other being the Emperor penguin), breeding exclusively on the Antarctic continent and nearby islands.",
"Adélie penguins build nests made of small stones which they sometimes steal from neighboring nests, and males present these stones as gifts to potential mates during courtship.",
"With a distinctive white ring around their eyes, Adélie penguins are excellent swimmers that can travel up to 185 km (115 miles) round trip to forage for food and can reach swimming speeds of up to 45 km/h (28 mph)."
]
print('This is turn 2')
print(f"User: {user_msg_2}\n\n")
response_2_bad = client.generate.create(
knowledge=knowledge_2,
messages=messages_2,
model='v1',
)
print(f"Assistant: {response_2_bad.to_dict()['response']}")
```
```
This is turn 2
User: Compare the emperor penguin with the adelie penguin
Assistant: I can provide some basic comparisons between these two penguin species based on the available information:
Both Emperor and Adélie penguins are truly Antarctic species, with Adélie penguins breeding exclusively on the Antarctic continent and nearby islands.
Adélie penguins have distinctive physical characteristics, including a white ring around their eyes.
Regarding their behavior, Adélie penguins are known to:
- Build nests using small stones
- Sometimes steal stones from neighboring nests
- Use stones as gifts during courtship
- Travel up to 185 km (115 miles) for food
- Reach swimming speeds of up to 45 km/h (28 mph)
I don't have specific information about Emperor penguins in the provided documentation to make a more detailed comparison. If you'd like to know more about Emperor penguins specifically, I'd be happy to share that information if you provide it.
```
```
#@title Second Turn (with Extending Knowledge)
extended_knowledge = knowledge_1 + knowledge_2
print(f"User: {user_msg_2}\n\n")
response_2_good = client.generate.create(
knowledge=extended_knowledge,
messages=messages_2,
model='v1',
)
print(f"Assistant: {response_2_good.to_dict()['response']}")
```
```
User: Compare the emperor penguin with the adelie penguin
Assistant: Let me compare these two fascinating penguin species based on the available information:
Emperor penguins are the largest penguin species, reaching heights of up to 122 cm (48 inches) and weighing up to 45 kg (99 pounds).
Both species are well adapted to extreme Antarctic conditions, with Emperor penguins being the only species that breeds during the Antarctic winter, enduring temperatures as low as -60°C (-76°F) and wind speeds up to 200 km/h (124 mph).
Adélie penguins are one of the most southerly distributed birds and, along with Emperor penguins, are truly Antarctic, breeding exclusively on the Antarctic continent and nearby islands.
When it comes to breeding behaviors:
- Emperor penguins have males incubating eggs for 65-75 days while fasting and losing up to 45% of their body weight
- Adélie penguins build nests using small stones, which they sometimes take from neighboring nests
In terms of swimming abilities:
- Emperor penguins can dive to 565 meters (1,850 feet) and stay underwater for up to 22 minutes
- Adélie penguins can travel up to 185 km (115 miles) round trip while foraging and reach swimming speeds of up to 45 km/h (28 mph)
```
## Additional Resources
* [Read the blog post](https://contextual.ai/blog/introducing-grounded-language-model) to learn more about the GLM and the criticality of groundedness in enterprise AI
* [Access the related notebook](https://github.com/ContextualAI/examples/blob/main/03-standalone-api/02-generate/generate.ipynb) that demonstrates how to use the GLM with the Contextual API directly, our Python SDK, and our Langchain package
* [API Reference](/api-reference/generate/generate)
* [Python SDK](https://github.com/ContextualAI/contextual-client-python/blob/main/api.md#generate)
* [Langchain Package](https://pypi.org/project/langchain-contextual/)
* [LlamaIndex Integration](https://github.com/run-llama/llama_index/tree/main/llama-index-integrations/llms/llama-index-llms-contextual)
# LMUnit
Source: https://contextualai-new-home-nav.mintlify.app/how-to-guides/lmunit
Contextual AI How-to Guide
## Overview
Evaluating LLM outputs is critical, but underexplored for generative AI uses cases. Natural language unit tests provide a systematic approach for evaluating LLM response quality. Contextual AI's LMUnit is a specialized model that achieves state-of-the-art performance in creating and applying unit tests to evaluate LLM outputs.
### Why Natural Language Unit Testing?
Traditional LLM evaluation methods often face several challenges:
* Human evaluations are inconsistent and costly, while metrics like ROUGE fail to capture nuanced quality measures.
* General-purpose LLMs may not provide fine-grained feedback
* Simple yes/no evaluations miss important nuances
Natural language unit tests address these challenges by:
* Breaking down evaluation into specific, testable criteria
* Providing granular feedback on different quality aspects
* Enabling systematic improvement of LLM outputs
* Supporting domain-specific quality requirements
For example, financial compliance often requires precise regulatory phrasing, which is hard to assess with a generic style evaluation.
## 1. Set Up Development Environment
Set up your environment to start using LMUnit to evaluate LLM responses. This example uses LMUnit as provided through the Contextual AI python client, so install it first.
```python theme={null}
%pip install contextual-client tqdm
```
You'll need several Python packages for data handling and visualization:
```python theme={null}
import os
import pandas as pd
from contextual import ContextualAI
# polar plots
import numpy as np
import matplotlib.pyplot as plt
from typing import List, Dict, Optional, Union, Tuple
#clustering analysis
from sklearn.cluster import KMeans
from sklearn.preprocessing import StandardScaler
import seaborn as sns
```
# Generate
Source: https://contextualai-new-home-nav.mintlify.app/how-to-guides/generate
Contextual AI How-to Guide
## Overview
Contextual AI's Grounded Language Model (GLM) is the most grounded language model in the world, making it the best language model to use for RAG and agentic use cases for which minimizing hallucinations is critical.
## Global Variables & Examples
First, we will set up the global variables and examples we'll use with each different implementation method.
```python theme={null}
from google.colab import userdata
api_key = userdata.get("API_TOKEN")
base_url = "https://api.contextual.ai/v1"
generate_api_endpoint = f"{base_url}/generate"
```
```python theme={null}
# Example conversation messages
messages = [
{
"role": "user",
"content": "What are the most promising renewable energy technologies for addressing climate change in developing nations?"
},
{
"role": "assistant",
"content": "Based on current research, solar and wind power show significant potential for developing nations due to decreasing costs and scalability. Would you like to know more about specific implementation challenges and success stories?"
},
{
"role": "user",
"content": "Yes, please tell me about successful solar implementations in Africa and their economic impact, particularly focusing on rural electrification."
}
]
# Detailed knowledge sources with varied information
knowledge = [
"""According to the International Renewable Energy Agency (IRENA) 2023 report:
- Solar PV installations in Africa reached 10.4 GW in 2022
- The cost of solar PV modules decreased by 80% between 2010 and 2022
- Rural electrification projects have provided power to 17 million households""",
"""Case Study: Rural Electrification in Kenya (2020-2023)
- 2.5 million households connected through mini-grid systems
- Average household income increased by 35% after electrification
- Local businesses reported 47% growth in revenue
- Education outcomes improved with 3 additional study hours per day""",
"""Economic Analysis of Solar Projects in Sub-Saharan Africa:
- Job creation: 25 jobs per MW of installed capacity
- ROI average of 12-15% for mini-grid projects
- Reduced energy costs by 60% compared to diesel generators
- Carbon emissions reduction: 2.3 million tonnes CO2 equivalent""",
"""Technical Specifications and Best Practices:
- Optimal solar panel efficiency in African climate conditions: 15-22%
- Battery storage requirements: 4-8 kWh per household
- Maintenance costs: $0.02-0.04 per kWh
- Expected system lifetime: 20-25 years""",
"""Social Impact Assessment:
- Women-led businesses increased by 45% in electrified areas
- Healthcare facilities reported 72% improvement in service delivery
- Mobile money usage increased by 60%
- Agricultural productivity improved by 28% with electric irrigation"""
]
```
## Direct API implementation
```python theme={null}
import requests
headers = {
"accept": "application/json",
"content-type": "application/json",
"authorization": f"Bearer {api_key}"
}
```
```python theme={null}
payload = {
"model": "v1",
"messages": messages,
"knowledge": knowledge,
"avoid_commentary": False,
"max_new_tokens": 1024,
"temperature": 0,
"top_p": 0.9
}
generate_response = requests.post(generate_api_endpoint, json=payload, headers=headers)
print(generate_response.json()['response'])
```
```
Let me share the current state of solar energy in Africa, focusing on rural electrification and its economic impact:
Africa has seen significant solar PV adoption, with total installations reaching 10.4 GW as of 2022, supported by an 80% decrease in solar PV module costs between 2010 and 2022.
The impact on rural communities has been particularly noteworthy:
Rural electrification initiatives have already connected 17 million households to power. A specific case study in Kenya (2020-2023) demonstrated impressive results:
- 2.5 million households were connected through mini-grid systems
- Average household income increased by 35%
- Local businesses saw 47% revenue growth
- Students gained 3 additional study hours per day
The economic benefits extend beyond household income:
The solar industry has created substantial economic opportunities:
- Each MW of installed capacity generates 25 jobs
- Mini-grid projects typically achieve 12-15% ROI
- Energy costs have been reduced by 60% compared to diesel generators
- The projects have resulted in 2.3 million tonnes CO2 equivalent in emissions reduction
The social impact has been particularly significant:
The data shows:
- 45% increase in women-led businesses
- 72% improvement in healthcare service delivery
- 60% increase in mobile money usage
- 28% improvement in agricultural productivity with electric irrigation
```
## Python SDK
```python theme={null}
try:
from contextual import ContextualAI
except:
%pip install contextual-client
from contextual import ContextualAI
client = ContextualAI (api_key = api_key, base_url = base_url)
```
```python theme={null}
generate_response = client.generate.create(
model="v1",
messages=messages,
knowledge=knowledge,
avoid_commentary=False,
max_new_tokens=1024,
temperature=0,
top_p=0.9
)
print(generate_response.response)
```
```
Let me share the current state of solar energy in Africa, focusing on rural electrification and its economic impact:
Africa has seen significant solar PV adoption, with total installations reaching 10.4 GW as of 2022, supported by an 80% decrease in solar PV module costs between 2010 and 2022.
The impact on rural communities has been particularly noteworthy:
Rural electrification initiatives have already connected 17 million households to power. A specific case study in Kenya (2020-2023) demonstrated impressive results:
- 2.5 million households were connected through mini-grid systems
- Average household income increased by 35%
- Local businesses saw 47% revenue growth
- Students gained 3 additional study hours per day
The economic benefits extend beyond household income:
The solar industry has created substantial economic opportunities:
- Each MW of installed capacity generates 25 jobs
- Mini-grid projects typically achieve 12-15% ROI
- Energy costs have been reduced by 60% compared to diesel generators
- The projects have resulted in 2.3 million tonnes CO2 equivalent in emissions reduction
The social impact has been particularly significant:
The data shows:
- 45% increase in women-led businesses
- 72% improvement in healthcare service delivery
- 60% increase in mobile money usage
- 28% improvement in agricultural productivity with electric irrigation
```
## Langchain
```
try:
from langchain_contextual import ChatContextual
except:
%pip install langchain-contextual
from langchain_contextual import ChatContextual
# intialize Contextual llm via langchain_contextual
llm = ChatContextual(
model="v1",
api_key=api_key,
)
ai_msg = llm.invoke(
messages,
knowledge=knowledge,
avoid_commentary=False,
max_new_tokens=1024,
temperature=0,
top_p=0.9
)
print(ai_msg.content)
```
```
Let me share the current state of solar energy in Africa, focusing on rural electrification and its economic impact:
Africa has seen significant solar PV adoption, with total installations reaching 10.4 GW as of 2022, supported by an 80% decrease in solar PV module costs between 2010 and 2022.
The impact on rural communities has been particularly noteworthy:
Rural electrification initiatives have already connected 17 million households to power. A specific case study in Kenya (2020-2023) demonstrated impressive results:
- 2.5 million households were connected through mini-grid systems
- Average household income increased by 35%
- Local businesses saw 47% revenue growth
- Students gained 3 additional study hours per day
The economic benefits extend beyond household income:
The solar industry has created substantial economic opportunities:
- Each MW of installed capacity generates 25 jobs
- Mini-grid projects typically achieve 12-15% ROI
- Energy costs have been reduced by 60% compared to diesel generators
- The projects have resulted in 2.3 million tonnes CO2 equivalent in emissions reduction
The social impact has been particularly significant:
The data shows:
- 45% increase in women-led businesses
- 72% improvement in healthcare service delivery
- 60% increase in mobile money usage
- 28% improvement in agricultural productivity with electric irrigation
```
## LLamaIndex
```
try:
from llama_index.llms.contextual import Contextual
from llama_index.core.chat_engine.types import ChatMessage
except:
%pip install -U llama-index-llms-contextual
from llama_index.llms.contextual import Contextual
from llama_index.core.chat_engine.types import ChatMessage
llm = Contextual(model="v1", api_key=api_key)
response = llm.complete(
messages[0]['content'],
knowledge=knowledge,
avoid_commentary=False,
max_new_tokens=1024,
temperature=0,
top_p=0.9
)
print(response.text)
```
```
Based on recent data and implementation results, solar energy emerges as a particularly promising renewable energy technology for developing nations. Here are the key findings:
As of 2022, solar PV installations in Africa have reached 10.4 GW, with solar PV module costs decreasing by 80% between 2010 and 2022.
The technology has demonstrated impressive economic and social impacts:
- Creates significant employment opportunities with 25 jobs per MW of installed capacity
- Delivers strong returns with 12-15% ROI for mini-grid projects
- Reduces energy costs by 60% compared to diesel generators
- Achieves substantial carbon savings of 2.3 million tonnes CO2 equivalent
The implementation data shows remarkable social benefits:
- Rural electrification projects have connected 17 million households
- In Kenya specifically, 2.5 million households have been connected through mini-grid systems
- Average household income increased by 35% after electrification
- Local businesses reported 47% growth in revenue
- Education outcomes improved with 3 additional study hours per day
From a technical perspective:
- Solar panels achieve optimal efficiency of 15-22% in African climate conditions
- Systems require 4-8 kWh of battery storage per household
- Maintenance costs are relatively low at $0.02-0.04 per kWh
- Systems have an expected lifetime of 20-25 years
These metrics demonstrate solar energy's potential as a viable solution for developing nations.
messages_llama_index = [ChatMessage(role=message['role'], content=message['content']) for message in messages]
response = llm.chat(
messages_llama_index,
knowledge_base=knowledge,
avoid_commentary=False,
max_new_tokens=1024,
temperature=0,
top_p=0.9
)
print(response)
```
```
assistant: Let me share the current state of solar energy in Africa, focusing on rural electrification and its economic impact:
Africa has seen significant solar PV adoption, with total installations reaching 10.4 GW as of 2022, supported by an 80% decrease in solar PV module costs between 2010 and 2022.
The impact on rural communities has been particularly noteworthy:
Rural electrification initiatives have already connected 17 million households to power. A specific case study in Kenya (2020-2023) demonstrated impressive results:
- 2.5 million households were connected through mini-grid systems
- Average household income increased by 35%
- Local businesses saw 47% revenue growth
- Students gained 3 additional study hours per day
The economic benefits extend beyond household income:
The solar industry has created substantial economic opportunities:
- Each MW of installed capacity generates 25 jobs
- Mini-grid projects typically achieve 12-15% ROI
- Energy costs have been reduced by 60% compared to diesel generators
- The projects have resulted in 2.3 million tonnes CO2 equivalent in emissions reduction
The social impact has been particularly significant:
The data shows:
- 45% increase in women-led businesses
- 72% improvement in healthcare service delivery
- 60% increase in mobile money usage
- 28% improvement in agricultural productivity with electric irrigation
```
## Multi-Turn Conversations
The GLM supports multi-turn conversations, but with an important consideration: the model is stateless and knowledge does not automatically persist between turns. This means:
* To continue a conversation using the same knowledge: You must provide your knowledge array again with each new request.
* To continue a conversation with additional information: You must combine your existing knowledge array with the new information and provide the complete updated array.
Remember that the GLM relies entirely on the knowledge you explicitly provide in each request, as it prioritizes these facts over its parametric knowledge.
```
#@title First Turn of Conversation
user_msg_1 = "Tell me about the Emperor Penguin"
messages_1 = [
{
"role": "user",
"content": user_msg_1
}
]
knowledge_1 = [
"Emperor penguins (Aptenodytes forsteri) are the tallest and heaviest of all living penguin species, standing up to 122 cm (48 inches) tall and weighing up to 45 kg (99 pounds).",
"Emperor penguins are the only penguin species that breeds during the Antarctic winter, enduring temperatures as low as -60°C (-76°F) and wind speeds up to 200 km/h (124 mph).",
"Male Emperor penguins incubate their single egg for about 65-75 days while balancing it on their feet and covering it with a special brood pouch, during which time they don't eat and can lose up to 45% of their body weight.",
"Emperor penguins can dive deeper than any other bird, reaching depths of up to 565 meters (1,850 feet) and staying underwater for up to 22 minutes when hunting for fish, squid and krill."
]
response = client.generate.create(
knowledge=knowledge_1,
messages=messages_1,
model="v1",
)
returned_response = response.to_dict()['response']
print(f"User: {user_msg_1}\n\n")
print(f"Assistant: {returned_response}")
```
```
User: Tell me about the Emperor Penguin
Assistant: Let me tell you about the Emperor Penguin's remarkable characteristics and behaviors:
Emperor penguins are the largest penguin species, reaching heights of up to 122 cm (48 inches) and weighing up to 45 kg (99 pounds).
Their breeding habits are particularly fascinating:
They are unique among penguins as they breed during the Antarctic winter, withstanding extreme conditions including:
- Temperatures as low as -60°C (-76°F)
- Wind speeds up to 200 km/h (124 mph)
During breeding, male Emperor penguins take on remarkable parental responsibilities:
- They incubate a single egg for 65-75 days
- They balance the egg on their feet and cover it with a special brood pouch
- During this time, they fast and can lose up to 45% of their body weight
Their hunting abilities are equally impressive:
Emperor penguins are exceptional divers, capable of:
- Reaching depths of up to 565 meters (1,850 feet)
- Staying underwater for up to 22 minutes
- Hunting for fish, squid, and krill
```
```
#@title Second Turn (without Extending Knowledge)
user_msg_2 = "Compare the emperor penguin with the adelie penguin"
messages_2 = [
{
"role": "user",
"content": user_msg_1
},
{
"role": "assistant",
"content": returned_response,
},
{
"role": "user",
"content": user_msg_2
}
]
knowledge_2 = [
"Adélie penguins (Pygoscelis adeliae) are named after Adélie Land, a territory in Antarctica discovered by French explorer Jules Dumont d'Urville, who named it after his wife.",
"Adélie penguins are one of the most southerly distributed birds and one of only two penguin species that are truly Antarctic (the other being the Emperor penguin), breeding exclusively on the Antarctic continent and nearby islands.",
"Adélie penguins build nests made of small stones which they sometimes steal from neighboring nests, and males present these stones as gifts to potential mates during courtship.",
"With a distinctive white ring around their eyes, Adélie penguins are excellent swimmers that can travel up to 185 km (115 miles) round trip to forage for food and can reach swimming speeds of up to 45 km/h (28 mph)."
]
print('This is turn 2')
print(f"User: {user_msg_2}\n\n")
response_2_bad = client.generate.create(
knowledge=knowledge_2,
messages=messages_2,
model='v1',
)
print(f"Assistant: {response_2_bad.to_dict()['response']}")
```
```
This is turn 2
User: Compare the emperor penguin with the adelie penguin
Assistant: I can provide some basic comparisons between these two penguin species based on the available information:
Both Emperor and Adélie penguins are truly Antarctic species, with Adélie penguins breeding exclusively on the Antarctic continent and nearby islands.
Adélie penguins have distinctive physical characteristics, including a white ring around their eyes.
Regarding their behavior, Adélie penguins are known to:
- Build nests using small stones
- Sometimes steal stones from neighboring nests
- Use stones as gifts during courtship
- Travel up to 185 km (115 miles) for food
- Reach swimming speeds of up to 45 km/h (28 mph)
I don't have specific information about Emperor penguins in the provided documentation to make a more detailed comparison. If you'd like to know more about Emperor penguins specifically, I'd be happy to share that information if you provide it.
```
```
#@title Second Turn (with Extending Knowledge)
extended_knowledge = knowledge_1 + knowledge_2
print(f"User: {user_msg_2}\n\n")
response_2_good = client.generate.create(
knowledge=extended_knowledge,
messages=messages_2,
model='v1',
)
print(f"Assistant: {response_2_good.to_dict()['response']}")
```
```
User: Compare the emperor penguin with the adelie penguin
Assistant: Let me compare these two fascinating penguin species based on the available information:
Emperor penguins are the largest penguin species, reaching heights of up to 122 cm (48 inches) and weighing up to 45 kg (99 pounds).
Both species are well adapted to extreme Antarctic conditions, with Emperor penguins being the only species that breeds during the Antarctic winter, enduring temperatures as low as -60°C (-76°F) and wind speeds up to 200 km/h (124 mph).
Adélie penguins are one of the most southerly distributed birds and, along with Emperor penguins, are truly Antarctic, breeding exclusively on the Antarctic continent and nearby islands.
When it comes to breeding behaviors:
- Emperor penguins have males incubating eggs for 65-75 days while fasting and losing up to 45% of their body weight
- Adélie penguins build nests using small stones, which they sometimes take from neighboring nests
In terms of swimming abilities:
- Emperor penguins can dive to 565 meters (1,850 feet) and stay underwater for up to 22 minutes
- Adélie penguins can travel up to 185 km (115 miles) round trip while foraging and reach swimming speeds of up to 45 km/h (28 mph)
```
## Additional Resources
* [Read the blog post](https://contextual.ai/blog/introducing-grounded-language-model) to learn more about the GLM and the criticality of groundedness in enterprise AI
* [Access the related notebook](https://github.com/ContextualAI/examples/blob/main/03-standalone-api/02-generate/generate.ipynb) that demonstrates how to use the GLM with the Contextual API directly, our Python SDK, and our Langchain package
* [API Reference](/api-reference/generate/generate)
* [Python SDK](https://github.com/ContextualAI/contextual-client-python/blob/main/api.md#generate)
* [Langchain Package](https://pypi.org/project/langchain-contextual/)
* [LlamaIndex Integration](https://github.com/run-llama/llama_index/tree/main/llama-index-integrations/llms/llama-index-llms-contextual)
# LMUnit
Source: https://contextualai-new-home-nav.mintlify.app/how-to-guides/lmunit
Contextual AI How-to Guide
## Overview
Evaluating LLM outputs is critical, but underexplored for generative AI uses cases. Natural language unit tests provide a systematic approach for evaluating LLM response quality. Contextual AI's LMUnit is a specialized model that achieves state-of-the-art performance in creating and applying unit tests to evaluate LLM outputs.
### Why Natural Language Unit Testing?
Traditional LLM evaluation methods often face several challenges:
* Human evaluations are inconsistent and costly, while metrics like ROUGE fail to capture nuanced quality measures.
* General-purpose LLMs may not provide fine-grained feedback
* Simple yes/no evaluations miss important nuances
Natural language unit tests address these challenges by:
* Breaking down evaluation into specific, testable criteria
* Providing granular feedback on different quality aspects
* Enabling systematic improvement of LLM outputs
* Supporting domain-specific quality requirements
For example, financial compliance often requires precise regulatory phrasing, which is hard to assess with a generic style evaluation.
## 1. Set Up Development Environment
Set up your environment to start using LMUnit to evaluate LLM responses. This example uses LMUnit as provided through the Contextual AI python client, so install it first.
```python theme={null}
%pip install contextual-client tqdm
```
You'll need several Python packages for data handling and visualization:
```python theme={null}
import os
import pandas as pd
from contextual import ContextualAI
# polar plots
import numpy as np
import matplotlib.pyplot as plt
from typing import List, Dict, Optional, Union, Tuple
#clustering analysis
from sklearn.cluster import KMeans
from sklearn.preprocessing import StandardScaler
import seaborn as sns
```
| w/ Multi-turn | w/o Multi-turn | |
|---|---|---|
| **Step 1** | **Query:** What is the merger price | **Query:** What is the merger price |
| **Response:** Direct Answer: The merger price is \$11.50 per share in cash. Rationale: This is explicitly stated in Section 2.1(a) of the contract, which defines the "Per Share Merger Consideration" as \$11.50 per share in cash, without interest Caveats: This price applies to all shares except for: (1) shares owned by Parent, Merger Sub, or their wholly owned subsidiaries (referred to as "Cancelled Shares"), (2) shares held in treasury by the Company, and (3) shares held by dissenting shareholders (referred to as "Dissenting Shares") | **Response:** Direct Answer: The merger price is \$11.50 per share in cash. Rationale: This is explicitly stated in Section 2.1(a) of the contract, which defines the "Per Share Merger Consideration" as \$11.50 per share in cash, without interest Caveats: This price applies to all shares except for: (1) shares owned by Parent, Merger Sub, or their wholly owned subsidiaries (referred to as "Cancelled Shares"), (2) shares held in treasury by the Company, and (3) shares held by dissenting shareholders (referred to as "Dissenting Shares") | |
| **Turn 2** | **Query:** And when can this change? | **Query:** And when can this change? |
| **Response:** Direct Answer: The **merger price of \$11.50 per share** in cash can be adjusted only in the event of a reclassification, stock split, combination, stock dividend or distribution, recapitalization, subdivision, merger, issuer tender or exchange offer, or other similar transaction that changes the number of shares outstanding. Rationale: This is specified in Section 2.5 of the contract, which states that if the number of Shares or securities convertible into Shares changes due to certain corporate actions, "the Per Share Merger Consideration" shall be equitably adjusted to provide to Parent and the holders of Shares the same economic effect as contemplated by this Agreement prior to such event. Caveats: The adjustment is specifically limited to maintaining the same economic effect as originally contemplated, and the contract does not provide for adjustments due to other factors such as market conditions or changes in the company's financial performance. | **Response:** Direct Answer: The change can occur after a 4-day notice period and only in response to an Intervening Event or a Superior Proposal, subject to certain conditions and requirements. Rationale: This is based on Section 6.1(e) which outlines the specific conditions under which a Change of Recommendation can occur. It requires a 4-day notice period (the "Notice Period") and must be in response to either an Intervening Event or a Superior Proposal. The Board must also determine that failing to make the change would be inconsistent with their fiduciary duties. Caveats: The change must follow specific procedural requirements including delivery of a written notice (Company Notice) with material details, and the Board must consult with financial advisors and outside legal counsel. |
 ## 4. Output Types
You can set the desired output format(s) of the parsed file using the `output_types` parameter. Valid values are:
* `markdown-document`
* `markdown-per-page`
* `blocks-per-page`
Specify multiple values to receive multiple formats in the response.
**Format descriptions:**
* **`markdown-document`** parses the entire document into one concatenated markdown output.
* **`markdown-per-page`** provides markdown output per page.
* **`blocks-per-page`** provides a structured JSON representation of content blocks on each page, sorted by reading order.
### 4.1 Display Markdown-per-page
```python theme={null}
results = client.parse.job_results(job_id, output_types=['markdown-per-page'])
for page in results.pages:
display(Markdown(page.markdown))
```
### 4.2 Blocks per page
```python theme={null}
results = client.parse.job_results(job_id, output_types=['blocks-per-page'])
for page in results.pages:
for block in page.blocks:
display(Markdown(block.markdown))
```
### 4.3 Markdown-document
This returns the document text into a single field markdown\_document.
```python theme={null}
result = client.parse.job_results(job_id, output_types=['markdown-document'])
display(Markdown(result.markdown_document))
```
## 5. Hierarchy Metadata
### 5.1 Display hierarchy
To easily inspect the document hierarchy, rendered as a markdown table of contents you can run:
```python theme={null}
from IPython.display import display, Markdown
display(Markdown(results.document_metadata.hierarchy.table_of_contents))
```
### 5.2 Add hierarchy context
LLMs work best when they're provided with structured information about the document's hierarchy and organization. That's why we've written the parse api to be context aware, i.e. we can include metadata such as which section the text is from.
To do this we'll set output\_type to blocks-per-page and use the parameter parent\_ids to get the corresponding section headings. The parent\_ids are sorted from root-level to bottom in case of nested sections.
```python theme={null}
results = client.parse.job_results(job_id, output_types=['blocks-per-page'])
hash_table = {}
for page in results.pages:
for block in page.blocks:
hash_table[block.id] = block.markdown
page = results.pages[3] # example
for block in page.blocks:
if block.parent_ids:
parent_content = "\n".join([hash_table[parent_id] for parent_id in block.parent_ids])
print(f"Metadata:\n------\n{parent_content} \n\n Text\n------\n {block.markdown}\n\n")
```
## 6. Table Extraction
If we're interested in extracting large tables, sometimes we need to split up those tables to use them in the LLM but preserve table header information across each chunk. To do that we'll use the enable\_split\_tables and max\_split\_table\_cells parameters like so:
We're using a document with a large table. You can take a look at the [original doc here](https://github.com/ContextualAI/examples/blob/main/03-standalone-api/04-parse/data/omnidocbench-text.pdf).
## 4. Output Types
You can set the desired output format(s) of the parsed file using the `output_types` parameter. Valid values are:
* `markdown-document`
* `markdown-per-page`
* `blocks-per-page`
Specify multiple values to receive multiple formats in the response.
**Format descriptions:**
* **`markdown-document`** parses the entire document into one concatenated markdown output.
* **`markdown-per-page`** provides markdown output per page.
* **`blocks-per-page`** provides a structured JSON representation of content blocks on each page, sorted by reading order.
### 4.1 Display Markdown-per-page
```python theme={null}
results = client.parse.job_results(job_id, output_types=['markdown-per-page'])
for page in results.pages:
display(Markdown(page.markdown))
```
### 4.2 Blocks per page
```python theme={null}
results = client.parse.job_results(job_id, output_types=['blocks-per-page'])
for page in results.pages:
for block in page.blocks:
display(Markdown(block.markdown))
```
### 4.3 Markdown-document
This returns the document text into a single field markdown\_document.
```python theme={null}
result = client.parse.job_results(job_id, output_types=['markdown-document'])
display(Markdown(result.markdown_document))
```
## 5. Hierarchy Metadata
### 5.1 Display hierarchy
To easily inspect the document hierarchy, rendered as a markdown table of contents you can run:
```python theme={null}
from IPython.display import display, Markdown
display(Markdown(results.document_metadata.hierarchy.table_of_contents))
```
### 5.2 Add hierarchy context
LLMs work best when they're provided with structured information about the document's hierarchy and organization. That's why we've written the parse api to be context aware, i.e. we can include metadata such as which section the text is from.
To do this we'll set output\_type to blocks-per-page and use the parameter parent\_ids to get the corresponding section headings. The parent\_ids are sorted from root-level to bottom in case of nested sections.
```python theme={null}
results = client.parse.job_results(job_id, output_types=['blocks-per-page'])
hash_table = {}
for page in results.pages:
for block in page.blocks:
hash_table[block.id] = block.markdown
page = results.pages[3] # example
for block in page.blocks:
if block.parent_ids:
parent_content = "\n".join([hash_table[parent_id] for parent_id in block.parent_ids])
print(f"Metadata:\n------\n{parent_content} \n\n Text\n------\n {block.markdown}\n\n")
```
## 6. Table Extraction
If we're interested in extracting large tables, sometimes we need to split up those tables to use them in the LLM but preserve table header information across each chunk. To do that we'll use the enable\_split\_tables and max\_split\_table\_cells parameters like so:
We're using a document with a large table. You can take a look at the [original doc here](https://github.com/ContextualAI/examples/blob/main/03-standalone-api/04-parse/data/omnidocbench-text.pdf).
 ```python theme={null}
url = 'https://raw.githubusercontent.com/ContextualAI/examples/refs/heads/main/03-standalone-api/04-parse/data/omnidocbench-text.pdf'
# Download doc
file_path = "omnidocbench-text_pdf.pdf"
with open(file_path, "wb") as f:
f.write(requests.get(url).content)
```
```python theme={null}
file_path = 'omnidocbench-text_pdf.pdf'
with open(file_path, "rb") as fp:
response = client.parse.create(
raw_file=fp,
parse_mode="standard",
enable_split_tables=True,
max_split_table_cells=100,
)
job_id = response.job_id
job_id
```
```python theme={null}
# Check on parse job status
while True:
result = client.parse.job_status(job_id)
parse_response = result.status
print(f"Job is {parse_response}")
if parse_response == "completed":
break
sleep(30)
```
```python theme={null}
result = client.parse.job_results(job_id, output_types=['markdown-per-page'])
for page in result.pages:
display(Markdown(page.markdown))
```
# Rerank
Source: https://contextualai-new-home-nav.mintlify.app/how-to-guides/rerank
Contextual AI How-to Guide
## Overview
Contextual AI's reranker is the first with instruction-following capabilities to handle conflicts in retrieval. It is the most accurate reranker in the world per industry-leading benchmarks like BEIR. To learn more about the reranker and its importance in RAG pipelines, please see our blog.
This how-to guide uses the same example to demonstrate how to use the reranker with the Contextual API directly, our Python SDK, and our Langchain package.
The current reranker models include:
* ctxl-rerank-v2-instruct-multilingual
* ctxl-rerank-v2-instruct-multilingual-mini
* ctxl-rerank-v1-instruct
## Global Variables & Examples
First, we will set up the global variables and examples we'll use with each different implementation method.
```python theme={null}
from google.colab import userdata
api_key = userdata.get("API_TOKEN")
base_url = "https://api.contextual.ai/v1"
rerank_api_endpoint = f"{base_url}/rerank"
```
```python theme={null}
query = "What is the current enterprise pricing for the RTX 5090 GPU for bulk orders?"
instruction = "Prioritize internal sales documents over market analysis reports. More recent documents should be weighted higher. Enterprise portal content supersedes distributor communications."
documents = [
"Following detailed cost analysis and market research, we have implemented the following changes: AI training clusters will see a 15% uplift in raw compute performance, enterprise support packages are being restructured, and bulk procurement programs (100+ units) for the RTX 5090 Enterprise series will operate on a $2,899 baseline.",
"Enterprise pricing for the RTX 5090 GPU bulk orders (100+ units) is currently set at $3,100-$3,300 per unit. This pricing for RTX 5090 enterprise bulk orders has been confirmed across all major distribution channels.",
"RTX 5090 Enterprise GPU requires 450W TDP and 20% cooling overhead."
]
metadata = [
"Date: January 15, 2025. Source: NVIDIA Enterprise Sales Portal. Classification: Internal Use Only",
"TechAnalytics Research Group. 11/30/2023.",
"January 25, 2025; NVIDIA Enterprise Sales Portal; Internal Use Only"
]
model = "ctxl-rerank-v2-instruct-multilingual"
```
## REST API implementation
```python theme={null}
import requests
headers = {
"accept": "application/json",
"content-type": "application/json",
"authorization": f"Bearer {api_key}"
}
```
```python theme={null}
payload = {
"query": query,
"instruction": instruction,
"documents": documents,
"metadata": metadata,
"model": model
}
rerank_response = requests.post(rerank_api_endpoint, json=payload, headers=headers)
print(rerank_response.json())
```
## Python SDK
```python theme={null}
try:
from contextual import ContextualAI
except:
%pip install contextual-client
from contextual import ContextualAI
client = ContextualAI (api_key = api_key, base_url = base_url)
```
```python theme={null}
rerank_response = client.rerank.create(
query = query,
instruction = instruction,
documents = documents,
metadata = metadata,
model = model
)
print(rerank_response.to_dict())
```
## Langchain
```python theme={null}
try:
from langchain_contextual import ContextualRerank
except:
%pip install langchain-contextual
from langchain_contextual import ContextualRerank
from langchain_core.documents import Document
```
```python theme={null}
# intialize Contextual reranker via langchain_contextual
compressor = ContextualRerank(
model=model,
api_key=api_key,
)
# Prepare metadata in dictionary format for Langchain Document class
metadata_dict = [
{
"Date": "January 15, 2025",
"Source": "NVIDIA Enterprise Sales Portal",
"Classification": "Internal Use Only"
},
{
"Date": "11/30/2023",
"Source": "TechAnalytics Research Group"
},
{
"Date": "January 25, 2025",
"Source": "NVIDIA Enterprise Sales Portal",
"Classification": "Internal Use Only"
}
]
# prepare documents as langchain Document objects
# metadata stored in document objects will be extracted and used for reranking
langchain_documents = [
Document(page_content=content, metadata=metadata_dict[i])
for i, content in enumerate(documents)
]
# print to validate langchain document
print(langchain_documents[0])
```
```python theme={null}
# use compressor.compress_documents to rerank the documents
reranked_documents = compressor.compress_documents(
query=query,
instruction=instruction,
documents=langchain_documents,
)
print(reranked_documents)
```
## Additional Resources
* [Read the blog post](https://contextual.ai/blog/introducing-instruction-following-reranker) to learn more about the Contextual AI Reranker
* [Access the related notebook](https://github.com/ContextualAI/examples/blob/main/03-standalone-api/03-rerank/rerank.ipynb) that demonstrates how to use the reranker with the Contextual API directly, our Python SDK, and our Langchain package
* [API Reference](/api-reference/rerank/rerank)
* [Python SDK](https://github.com/ContextualAI/contextual-client-python/blob/main/api.md#rerank)
* [Langchain Package](https://pypi.org/project/langchain-contextual/)
# Snowflake Native App
Source: https://contextualai-new-home-nav.mintlify.app/how-to-guides/snowflake
Build secure and grounded Contextual AI agents natively in Snowflake
Contextual AI enables you to create enterprise-grade AI agents grounded in your documents and data. In just a few steps, you can install Contextual AI as a native Snowflake app and create powerful AI agents in the security of your Snowflake environment.
You can access Contextual AI native Snowflake app using the following methods:
* By [installing the app](#installation) via the Snowsight UI
* Via the [Contextual REST API](#using-the-contextual-ai-rest-api)
***
## Installation
Get started by installing Contextual AI from the Snowflake Marketplace and activating it in Snowsight.
### Activating the Contextual AI app in Snowflake
1. Log in to Snowflake and search for **Contextual AI** from the homepage.
```python theme={null}
url = 'https://raw.githubusercontent.com/ContextualAI/examples/refs/heads/main/03-standalone-api/04-parse/data/omnidocbench-text.pdf'
# Download doc
file_path = "omnidocbench-text_pdf.pdf"
with open(file_path, "wb") as f:
f.write(requests.get(url).content)
```
```python theme={null}
file_path = 'omnidocbench-text_pdf.pdf'
with open(file_path, "rb") as fp:
response = client.parse.create(
raw_file=fp,
parse_mode="standard",
enable_split_tables=True,
max_split_table_cells=100,
)
job_id = response.job_id
job_id
```
```python theme={null}
# Check on parse job status
while True:
result = client.parse.job_status(job_id)
parse_response = result.status
print(f"Job is {parse_response}")
if parse_response == "completed":
break
sleep(30)
```
```python theme={null}
result = client.parse.job_results(job_id, output_types=['markdown-per-page'])
for page in result.pages:
display(Markdown(page.markdown))
```
# Rerank
Source: https://contextualai-new-home-nav.mintlify.app/how-to-guides/rerank
Contextual AI How-to Guide
## Overview
Contextual AI's reranker is the first with instruction-following capabilities to handle conflicts in retrieval. It is the most accurate reranker in the world per industry-leading benchmarks like BEIR. To learn more about the reranker and its importance in RAG pipelines, please see our blog.
This how-to guide uses the same example to demonstrate how to use the reranker with the Contextual API directly, our Python SDK, and our Langchain package.
The current reranker models include:
* ctxl-rerank-v2-instruct-multilingual
* ctxl-rerank-v2-instruct-multilingual-mini
* ctxl-rerank-v1-instruct
## Global Variables & Examples
First, we will set up the global variables and examples we'll use with each different implementation method.
```python theme={null}
from google.colab import userdata
api_key = userdata.get("API_TOKEN")
base_url = "https://api.contextual.ai/v1"
rerank_api_endpoint = f"{base_url}/rerank"
```
```python theme={null}
query = "What is the current enterprise pricing for the RTX 5090 GPU for bulk orders?"
instruction = "Prioritize internal sales documents over market analysis reports. More recent documents should be weighted higher. Enterprise portal content supersedes distributor communications."
documents = [
"Following detailed cost analysis and market research, we have implemented the following changes: AI training clusters will see a 15% uplift in raw compute performance, enterprise support packages are being restructured, and bulk procurement programs (100+ units) for the RTX 5090 Enterprise series will operate on a $2,899 baseline.",
"Enterprise pricing for the RTX 5090 GPU bulk orders (100+ units) is currently set at $3,100-$3,300 per unit. This pricing for RTX 5090 enterprise bulk orders has been confirmed across all major distribution channels.",
"RTX 5090 Enterprise GPU requires 450W TDP and 20% cooling overhead."
]
metadata = [
"Date: January 15, 2025. Source: NVIDIA Enterprise Sales Portal. Classification: Internal Use Only",
"TechAnalytics Research Group. 11/30/2023.",
"January 25, 2025; NVIDIA Enterprise Sales Portal; Internal Use Only"
]
model = "ctxl-rerank-v2-instruct-multilingual"
```
## REST API implementation
```python theme={null}
import requests
headers = {
"accept": "application/json",
"content-type": "application/json",
"authorization": f"Bearer {api_key}"
}
```
```python theme={null}
payload = {
"query": query,
"instruction": instruction,
"documents": documents,
"metadata": metadata,
"model": model
}
rerank_response = requests.post(rerank_api_endpoint, json=payload, headers=headers)
print(rerank_response.json())
```
## Python SDK
```python theme={null}
try:
from contextual import ContextualAI
except:
%pip install contextual-client
from contextual import ContextualAI
client = ContextualAI (api_key = api_key, base_url = base_url)
```
```python theme={null}
rerank_response = client.rerank.create(
query = query,
instruction = instruction,
documents = documents,
metadata = metadata,
model = model
)
print(rerank_response.to_dict())
```
## Langchain
```python theme={null}
try:
from langchain_contextual import ContextualRerank
except:
%pip install langchain-contextual
from langchain_contextual import ContextualRerank
from langchain_core.documents import Document
```
```python theme={null}
# intialize Contextual reranker via langchain_contextual
compressor = ContextualRerank(
model=model,
api_key=api_key,
)
# Prepare metadata in dictionary format for Langchain Document class
metadata_dict = [
{
"Date": "January 15, 2025",
"Source": "NVIDIA Enterprise Sales Portal",
"Classification": "Internal Use Only"
},
{
"Date": "11/30/2023",
"Source": "TechAnalytics Research Group"
},
{
"Date": "January 25, 2025",
"Source": "NVIDIA Enterprise Sales Portal",
"Classification": "Internal Use Only"
}
]
# prepare documents as langchain Document objects
# metadata stored in document objects will be extracted and used for reranking
langchain_documents = [
Document(page_content=content, metadata=metadata_dict[i])
for i, content in enumerate(documents)
]
# print to validate langchain document
print(langchain_documents[0])
```
```python theme={null}
# use compressor.compress_documents to rerank the documents
reranked_documents = compressor.compress_documents(
query=query,
instruction=instruction,
documents=langchain_documents,
)
print(reranked_documents)
```
## Additional Resources
* [Read the blog post](https://contextual.ai/blog/introducing-instruction-following-reranker) to learn more about the Contextual AI Reranker
* [Access the related notebook](https://github.com/ContextualAI/examples/blob/main/03-standalone-api/03-rerank/rerank.ipynb) that demonstrates how to use the reranker with the Contextual API directly, our Python SDK, and our Langchain package
* [API Reference](/api-reference/rerank/rerank)
* [Python SDK](https://github.com/ContextualAI/contextual-client-python/blob/main/api.md#rerank)
* [Langchain Package](https://pypi.org/project/langchain-contextual/)
# Snowflake Native App
Source: https://contextualai-new-home-nav.mintlify.app/how-to-guides/snowflake
Build secure and grounded Contextual AI agents natively in Snowflake
Contextual AI enables you to create enterprise-grade AI agents grounded in your documents and data. In just a few steps, you can install Contextual AI as a native Snowflake app and create powerful AI agents in the security of your Snowflake environment.
You can access Contextual AI native Snowflake app using the following methods:
* By [installing the app](#installation) via the Snowsight UI
* Via the [Contextual REST API](#using-the-contextual-ai-rest-api)
***
## Installation
Get started by installing Contextual AI from the Snowflake Marketplace and activating it in Snowsight.
### Activating the Contextual AI app in Snowflake
1. Log in to Snowflake and search for **Contextual AI** from the homepage.
 ### Contextual AI Agent Setup
1. Go to **Catalog -> Apps** to verify that the Contextual AI app has finished installing. The status of the app should display **Installed**.
### Contextual AI Agent Setup
1. Go to **Catalog -> Apps** to verify that the Contextual AI app has finished installing. The status of the app should display **Installed**.
 2. Click on **Contextual AI Platform** to view its app catalog page.
3. Click **Launch App** to run the Contextual AI app and log in with your Snowflake credentials.
2. Click on **Contextual AI Platform** to view its app catalog page.
3. Click **Launch App** to run the Contextual AI app and log in with your Snowflake credentials.
 ### Adding Knowledge to Your Agent's Datastore
You now need to add knowledge to your agent's datastore to make it grounded in real world knowledge for responding to your prompts.
1. Click **Datastores** on the left-hand side and locate your agent's newly created datastore.
2. Click the **Documents** button on the right-hand side of your agent's datastore.
3. Select the **Ingest** tab to upload a document (for example, a Microsoft Word or PDF file).
4. Drag and drop or select a file to upload and click the **Start Uploading** button. The system will automatically begin processing it in the background. This process extracts information from your documents and prepares them for future retrieval by your agents.
### Adding Knowledge to Your Agent's Datastore
You now need to add knowledge to your agent's datastore to make it grounded in real world knowledge for responding to your prompts.
1. Click **Datastores** on the left-hand side and locate your agent's newly created datastore.
2. Click the **Documents** button on the right-hand side of your agent's datastore.
3. Select the **Ingest** tab to upload a document (for example, a Microsoft Word or PDF file).
4. Drag and drop or select a file to upload and click the **Start Uploading** button. The system will automatically begin processing it in the background. This process extracts information from your documents and prepares them for future retrieval by your agents.
 5. Wait until your document has been uploaded and processed. Contextual AI will indicate that your document is done with the **Processed** status indicator.
6. Click the **Agents** button on the left-hand side followed by your agent's tile to start interacting with your agent.
7. Your agent can now access and reference the knowledge from your uploaded documents during conversations. Try asking your agent a question in the prompt window.
5. Wait until your document has been uploaded and processed. Contextual AI will indicate that your document is done with the **Processed** status indicator.
6. Click the **Agents** button on the left-hand side followed by your agent's tile to start interacting with your agent.
7. Your agent can now access and reference the knowledge from your uploaded documents during conversations. Try asking your agent a question in the prompt window.
 ***
## Using the Contextual AI REST API
Contextual AI provides a REST API for programmatic interaction with your agents and datastore. After you have created and configured an agent and its datastore through the UI, you can integrate it into your applications and workflows using API endpoints.
API Access in the Contextual AI Native App requires obtaining the API endpoint of your instance, which can be found by running this Snowflake query in a Snowflake worksheet or via the Snowflake CLI:
```
CALL CONTEXTUAL_NATIVE_APP.CORE.GET_API_ENDPOINT()
```
You will receive a response formatted as a URL: `xxxxx-xxxxx-xxxxx.snowflakecomputing.app`. This URL value is the backend API endpoint for your application.
To create the full API endpoint, you will need to prepend `https://` to the backend API endpoint from your application and then append `/v1` at the end.
An example of how to do this in Python:
```python theme={null}
SF_BASE_URL = 'xxxxx-xxxxx-xxxxx.snowflakecomputing.app' # what you will receive from GET_API_ENDPOINT()
BASE_URL = f'https://{SF_BASE_URL}/v1' # using python3 f-string formatting
```
For authentication, instead of using an API key, the Snowflake Native App version of Contextual AI uses a Snowflake token, which can be retrieved using the following Python code:
```python theme={null}
ctx = snowflake.connector.connect(
user="",# snowflake account user
password='', # snowflake account password
account="organization-account", # format:
***
## Using the Contextual AI REST API
Contextual AI provides a REST API for programmatic interaction with your agents and datastore. After you have created and configured an agent and its datastore through the UI, you can integrate it into your applications and workflows using API endpoints.
API Access in the Contextual AI Native App requires obtaining the API endpoint of your instance, which can be found by running this Snowflake query in a Snowflake worksheet or via the Snowflake CLI:
```
CALL CONTEXTUAL_NATIVE_APP.CORE.GET_API_ENDPOINT()
```
You will receive a response formatted as a URL: `xxxxx-xxxxx-xxxxx.snowflakecomputing.app`. This URL value is the backend API endpoint for your application.
To create the full API endpoint, you will need to prepend `https://` to the backend API endpoint from your application and then append `/v1` at the end.
An example of how to do this in Python:
```python theme={null}
SF_BASE_URL = 'xxxxx-xxxxx-xxxxx.snowflakecomputing.app' # what you will receive from GET_API_ENDPOINT()
BASE_URL = f'https://{SF_BASE_URL}/v1' # using python3 f-string formatting
```
For authentication, instead of using an API key, the Snowflake Native App version of Contextual AI uses a Snowflake token, which can be retrieved using the following Python code:
```python theme={null}
ctx = snowflake.connector.connect(
user="",# snowflake account user
password='', # snowflake account password
account="organization-account", # format: {title}
{desc}
{title}
{desc}
{title}
{desc}
{title}
{desc}
{title}
{desc}
 ***
## Start Exploring Contextual AI
Now that you've signed up and have your API key, explore more of Contextual AI:
* [Platform Quickstart](/quickstarts/platform)
* [API Components](quickstarts/parse)
* [Datasources & Connectors](/connectors/overview)
* [Contextual AI How-to Guides](/how-to-guides/platform)
# LMUnit
Source: https://contextualai-new-home-nav.mintlify.app/quickstarts/lmunit
Contextual AI Component Quickstart
## Overview
Natural language unit tests bring the clarity and rigor of software unit testing to LLM evaluation. By defining simple, testable statements about desired response qualities, teams can assess model outputs with far more precision than traditional metrics or general-purpose judges.
LMUnit is a specialized model built for this paradigm—delivering state-of-the-art fine-grained evaluation, strong human alignment, and clearer, more actionable insights to help teams debug, improve, and safely deploy LLM applications.
## Key Features
* Natural language unit tests for evaluating specific response qualities.
* State-of-the-art accuracy on fine-grained benchmarks (FLASK, BigGBench).
* Superior to frontier models on targeted evaluation tasks.
* High human alignment with 93.5% RewardBench accuracy.
* Actionable feedback with more granular error detection than LM judges.
* Easy integration into CI/CD and existing evaluation workflows.
* Accessible to all stakeholders via readable, test-based criteria.
## Getting Started
See the [LMUnit How-to guide](/how-to-guides/lmunit) for a detailed walkthrough on how to use the LMUnit API.
## Additional Resources
* [Contextual AI LMUnit Blog Post](https://contextual.ai/research/lmunit)
* [Developer Guide: Ensuring Agent and LLM Quality with CircleCI and LMUnit](https://contextual.ai/blog/lmunit-circleci)
* [LMUnit Evaluation Script for RewardBench](https://github.com/ContextualAI/examples/tree/main/09-lmunit-rewardbench)
* [Notebook and Examples](https://github.com/ContextualAI/examples/blob/main/03-standalone-api/01-lmunit/lmunit.ipynb)
# Contextual AI MCP Server
Source: https://contextualai-new-home-nav.mintlify.app/quickstarts/mcp-server
Integrate Contextual MCP server with compatible AI clients
Our AI's Model Context Protocol (MCP) server provides RAG capabilities using Contextual AI. This guide walks through integrating Contextual AI’s MCP Server in both local and remote configurations for:
* [OpenAI GUI](#openai-gui)
* [Cursor IDE](#cursor-ide)
* [Local Installation](#local-mcp-server-installation)
## Overview
The Contextual AI MCP server acts as a bridge between AI interfaces and a specialized Contextual AI agent. It enables:
* **Query Processing**: Direct your domain specific questions to a dedicated Contextual AI agent
* **Intelligent Retrieval**: Searches through comprehensive information in your knowledge base
* **Context-Aware Responses**: Generates answers that are grounded in source documentation and include citations and attributions.
***
## Remote MCP server
The Remote MCP server enables direct access to hosted MCP services, no local installation required. Just provide the following:
* Server URL: `https://mcp.app.contextual.ai/mcp`
* Contextual API key for authentication. You can get your API key [**here**](https://app.contextual.ai/?signup=1).
* Contextual Agent ID. You can create your agent by following the [**Getting Started Guide**](getting-started).
### OpenAI GUI
1. Go to [platform.openai.com/chat](https://platform.openai.com/chat/) and click `+ Create`.
***
## Start Exploring Contextual AI
Now that you've signed up and have your API key, explore more of Contextual AI:
* [Platform Quickstart](/quickstarts/platform)
* [API Components](quickstarts/parse)
* [Datasources & Connectors](/connectors/overview)
* [Contextual AI How-to Guides](/how-to-guides/platform)
# LMUnit
Source: https://contextualai-new-home-nav.mintlify.app/quickstarts/lmunit
Contextual AI Component Quickstart
## Overview
Natural language unit tests bring the clarity and rigor of software unit testing to LLM evaluation. By defining simple, testable statements about desired response qualities, teams can assess model outputs with far more precision than traditional metrics or general-purpose judges.
LMUnit is a specialized model built for this paradigm—delivering state-of-the-art fine-grained evaluation, strong human alignment, and clearer, more actionable insights to help teams debug, improve, and safely deploy LLM applications.
## Key Features
* Natural language unit tests for evaluating specific response qualities.
* State-of-the-art accuracy on fine-grained benchmarks (FLASK, BigGBench).
* Superior to frontier models on targeted evaluation tasks.
* High human alignment with 93.5% RewardBench accuracy.
* Actionable feedback with more granular error detection than LM judges.
* Easy integration into CI/CD and existing evaluation workflows.
* Accessible to all stakeholders via readable, test-based criteria.
## Getting Started
See the [LMUnit How-to guide](/how-to-guides/lmunit) for a detailed walkthrough on how to use the LMUnit API.
## Additional Resources
* [Contextual AI LMUnit Blog Post](https://contextual.ai/research/lmunit)
* [Developer Guide: Ensuring Agent and LLM Quality with CircleCI and LMUnit](https://contextual.ai/blog/lmunit-circleci)
* [LMUnit Evaluation Script for RewardBench](https://github.com/ContextualAI/examples/tree/main/09-lmunit-rewardbench)
* [Notebook and Examples](https://github.com/ContextualAI/examples/blob/main/03-standalone-api/01-lmunit/lmunit.ipynb)
# Contextual AI MCP Server
Source: https://contextualai-new-home-nav.mintlify.app/quickstarts/mcp-server
Integrate Contextual MCP server with compatible AI clients
Our AI's Model Context Protocol (MCP) server provides RAG capabilities using Contextual AI. This guide walks through integrating Contextual AI’s MCP Server in both local and remote configurations for:
* [OpenAI GUI](#openai-gui)
* [Cursor IDE](#cursor-ide)
* [Local Installation](#local-mcp-server-installation)
## Overview
The Contextual AI MCP server acts as a bridge between AI interfaces and a specialized Contextual AI agent. It enables:
* **Query Processing**: Direct your domain specific questions to a dedicated Contextual AI agent
* **Intelligent Retrieval**: Searches through comprehensive information in your knowledge base
* **Context-Aware Responses**: Generates answers that are grounded in source documentation and include citations and attributions.
***
## Remote MCP server
The Remote MCP server enables direct access to hosted MCP services, no local installation required. Just provide the following:
* Server URL: `https://mcp.app.contextual.ai/mcp`
* Contextual API key for authentication. You can get your API key [**here**](https://app.contextual.ai/?signup=1).
* Contextual Agent ID. You can create your agent by following the [**Getting Started Guide**](getting-started).
### OpenAI GUI
1. Go to [platform.openai.com/chat](https://platform.openai.com/chat/) and click `+ Create`.
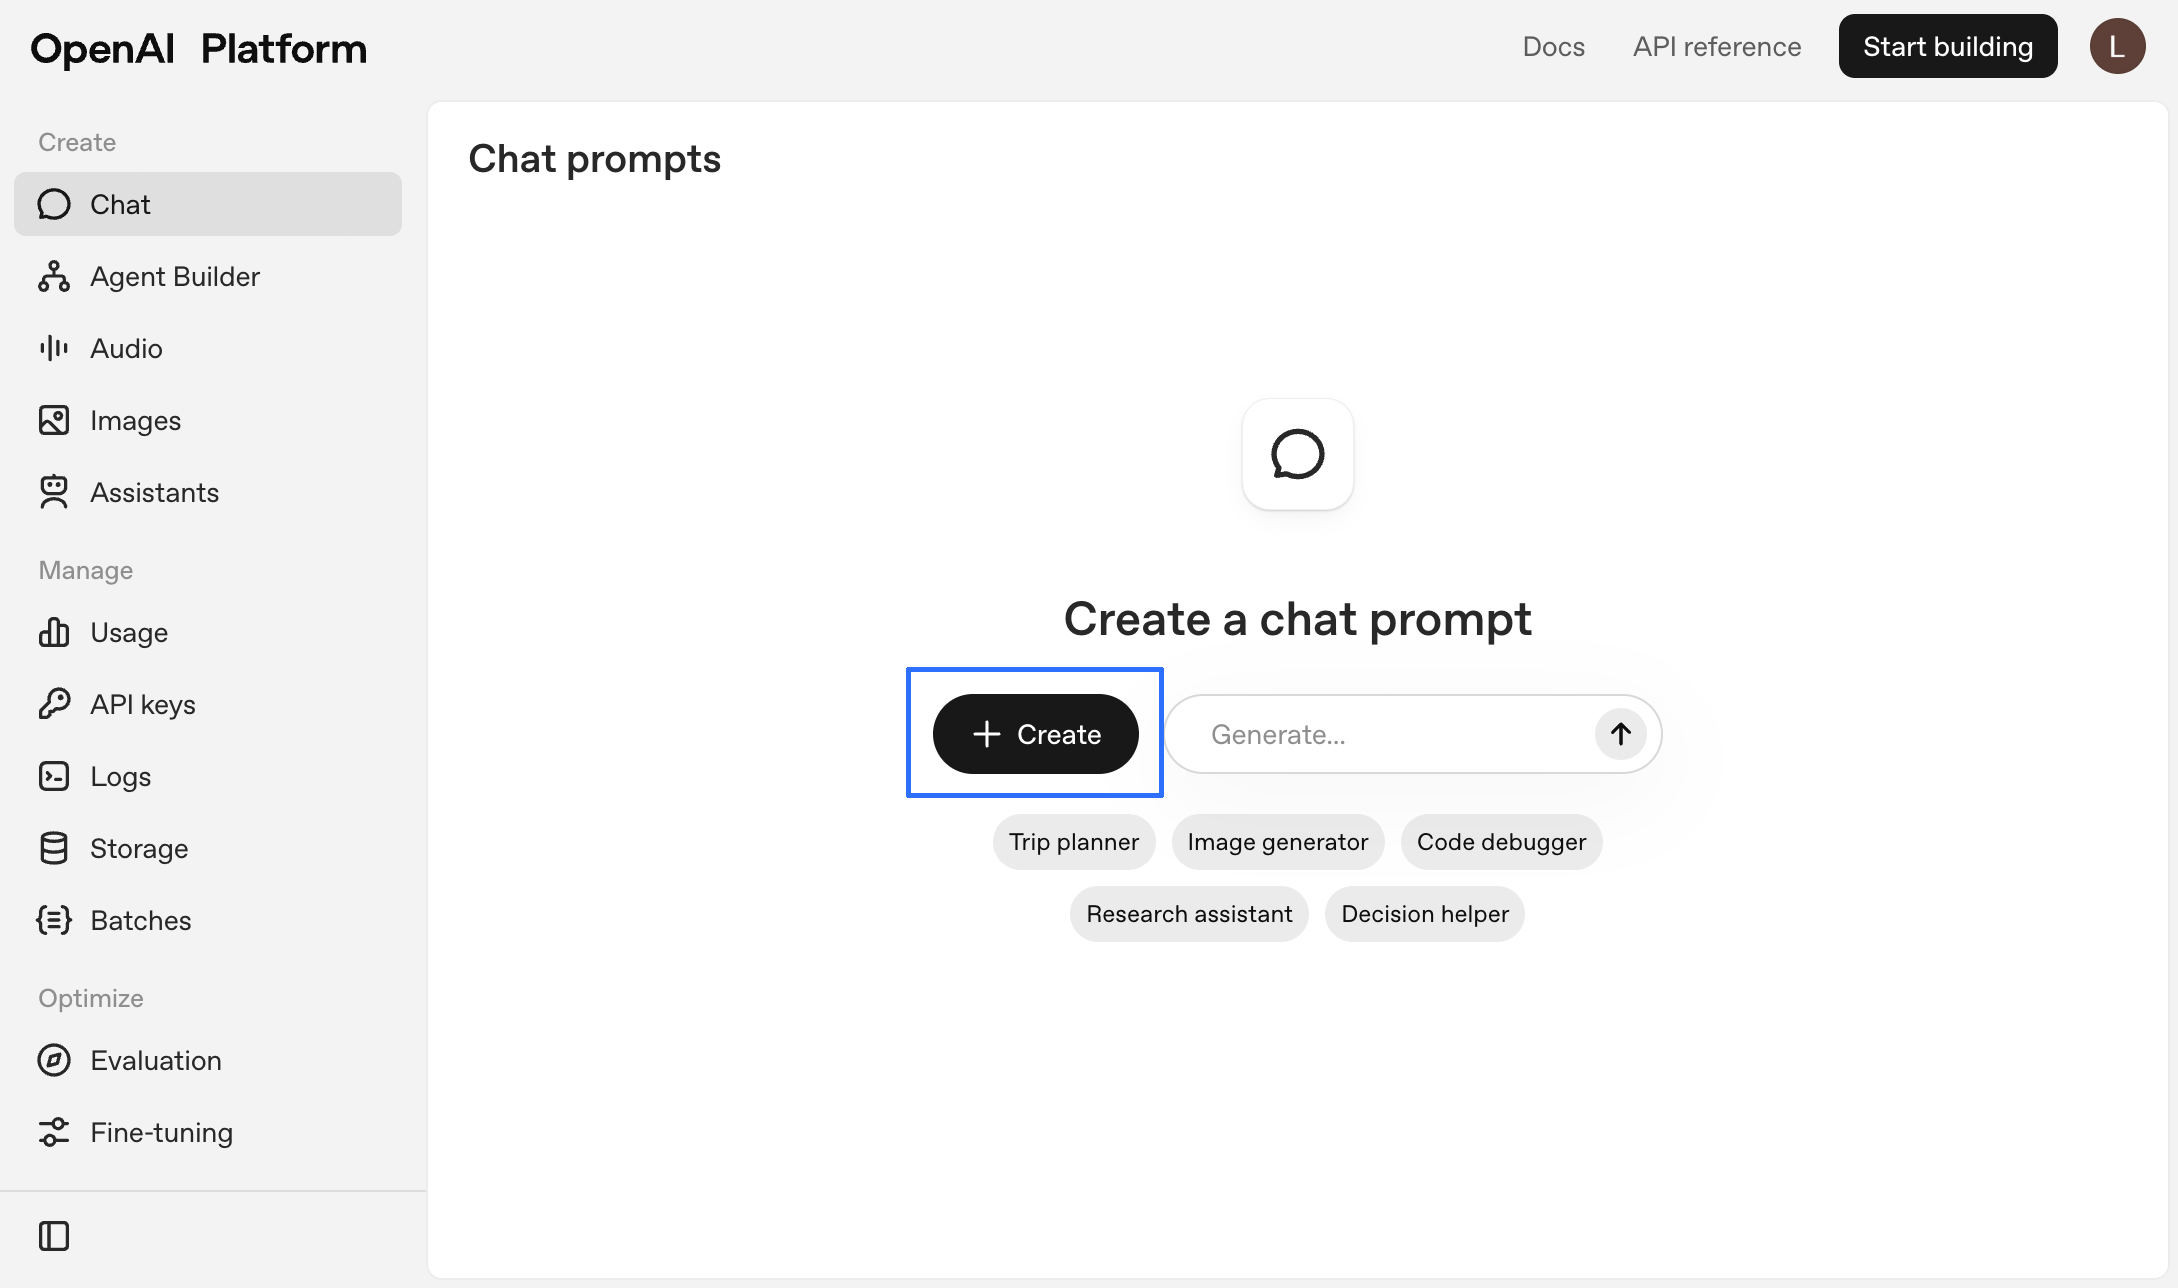 2. Under **Tools**, click `+ Add` followed by `MCP server` in the drop-down menu.
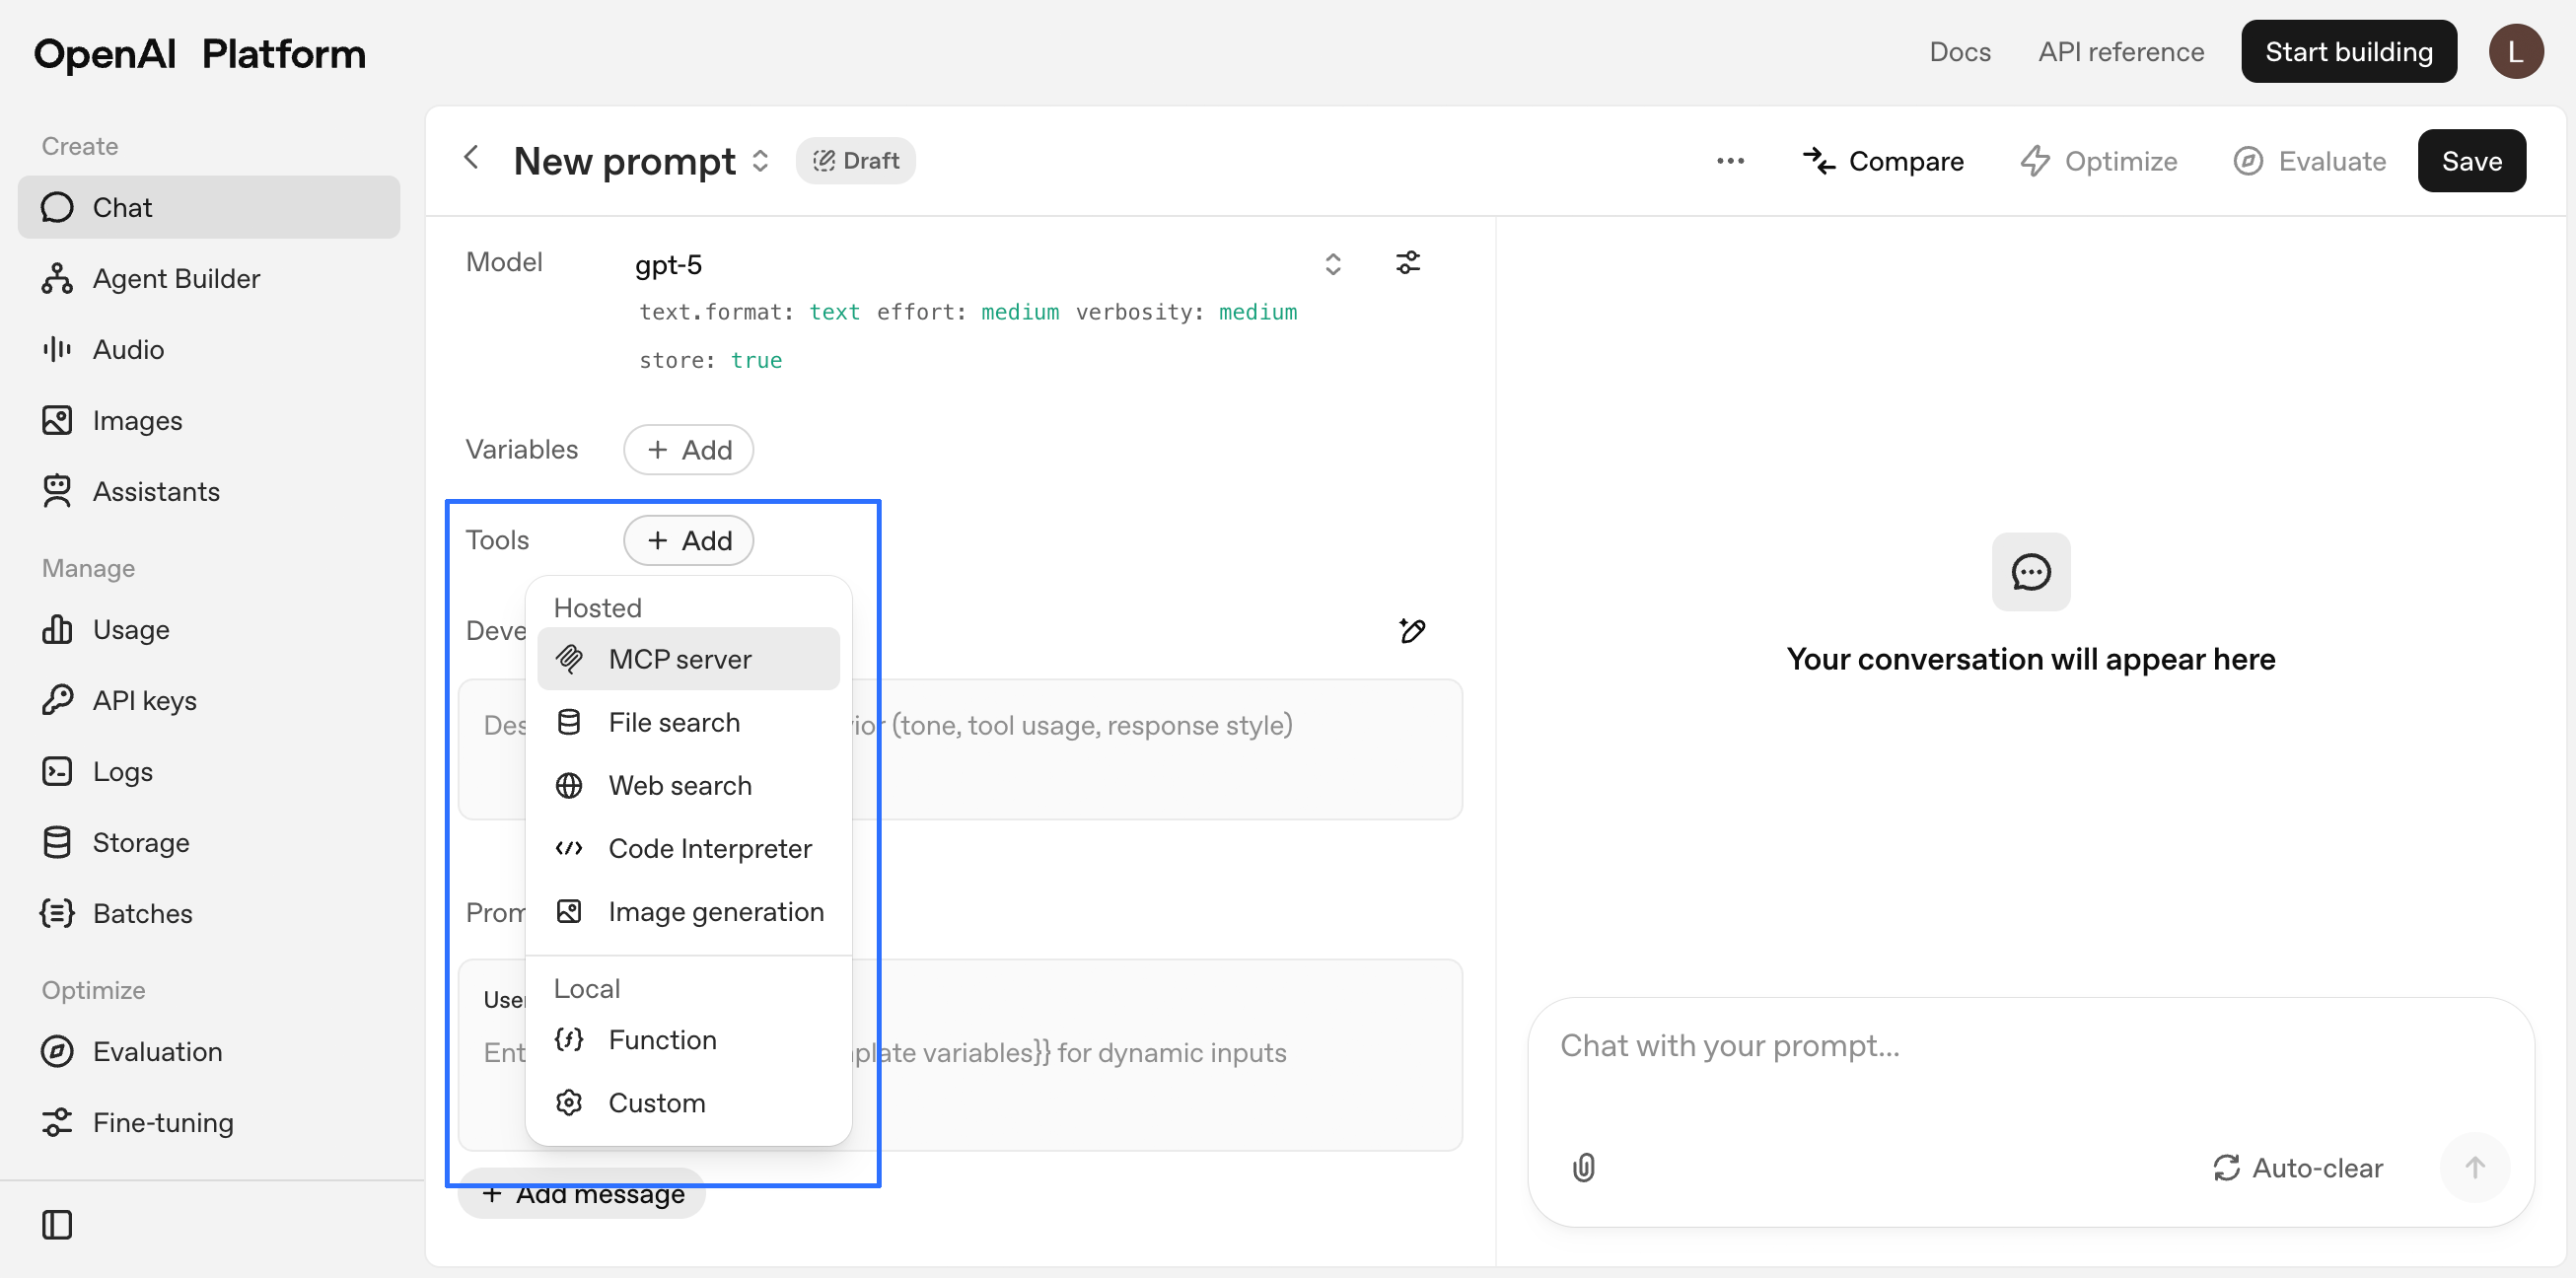 3. Click `+ Server` in the **Add MCP server** window.
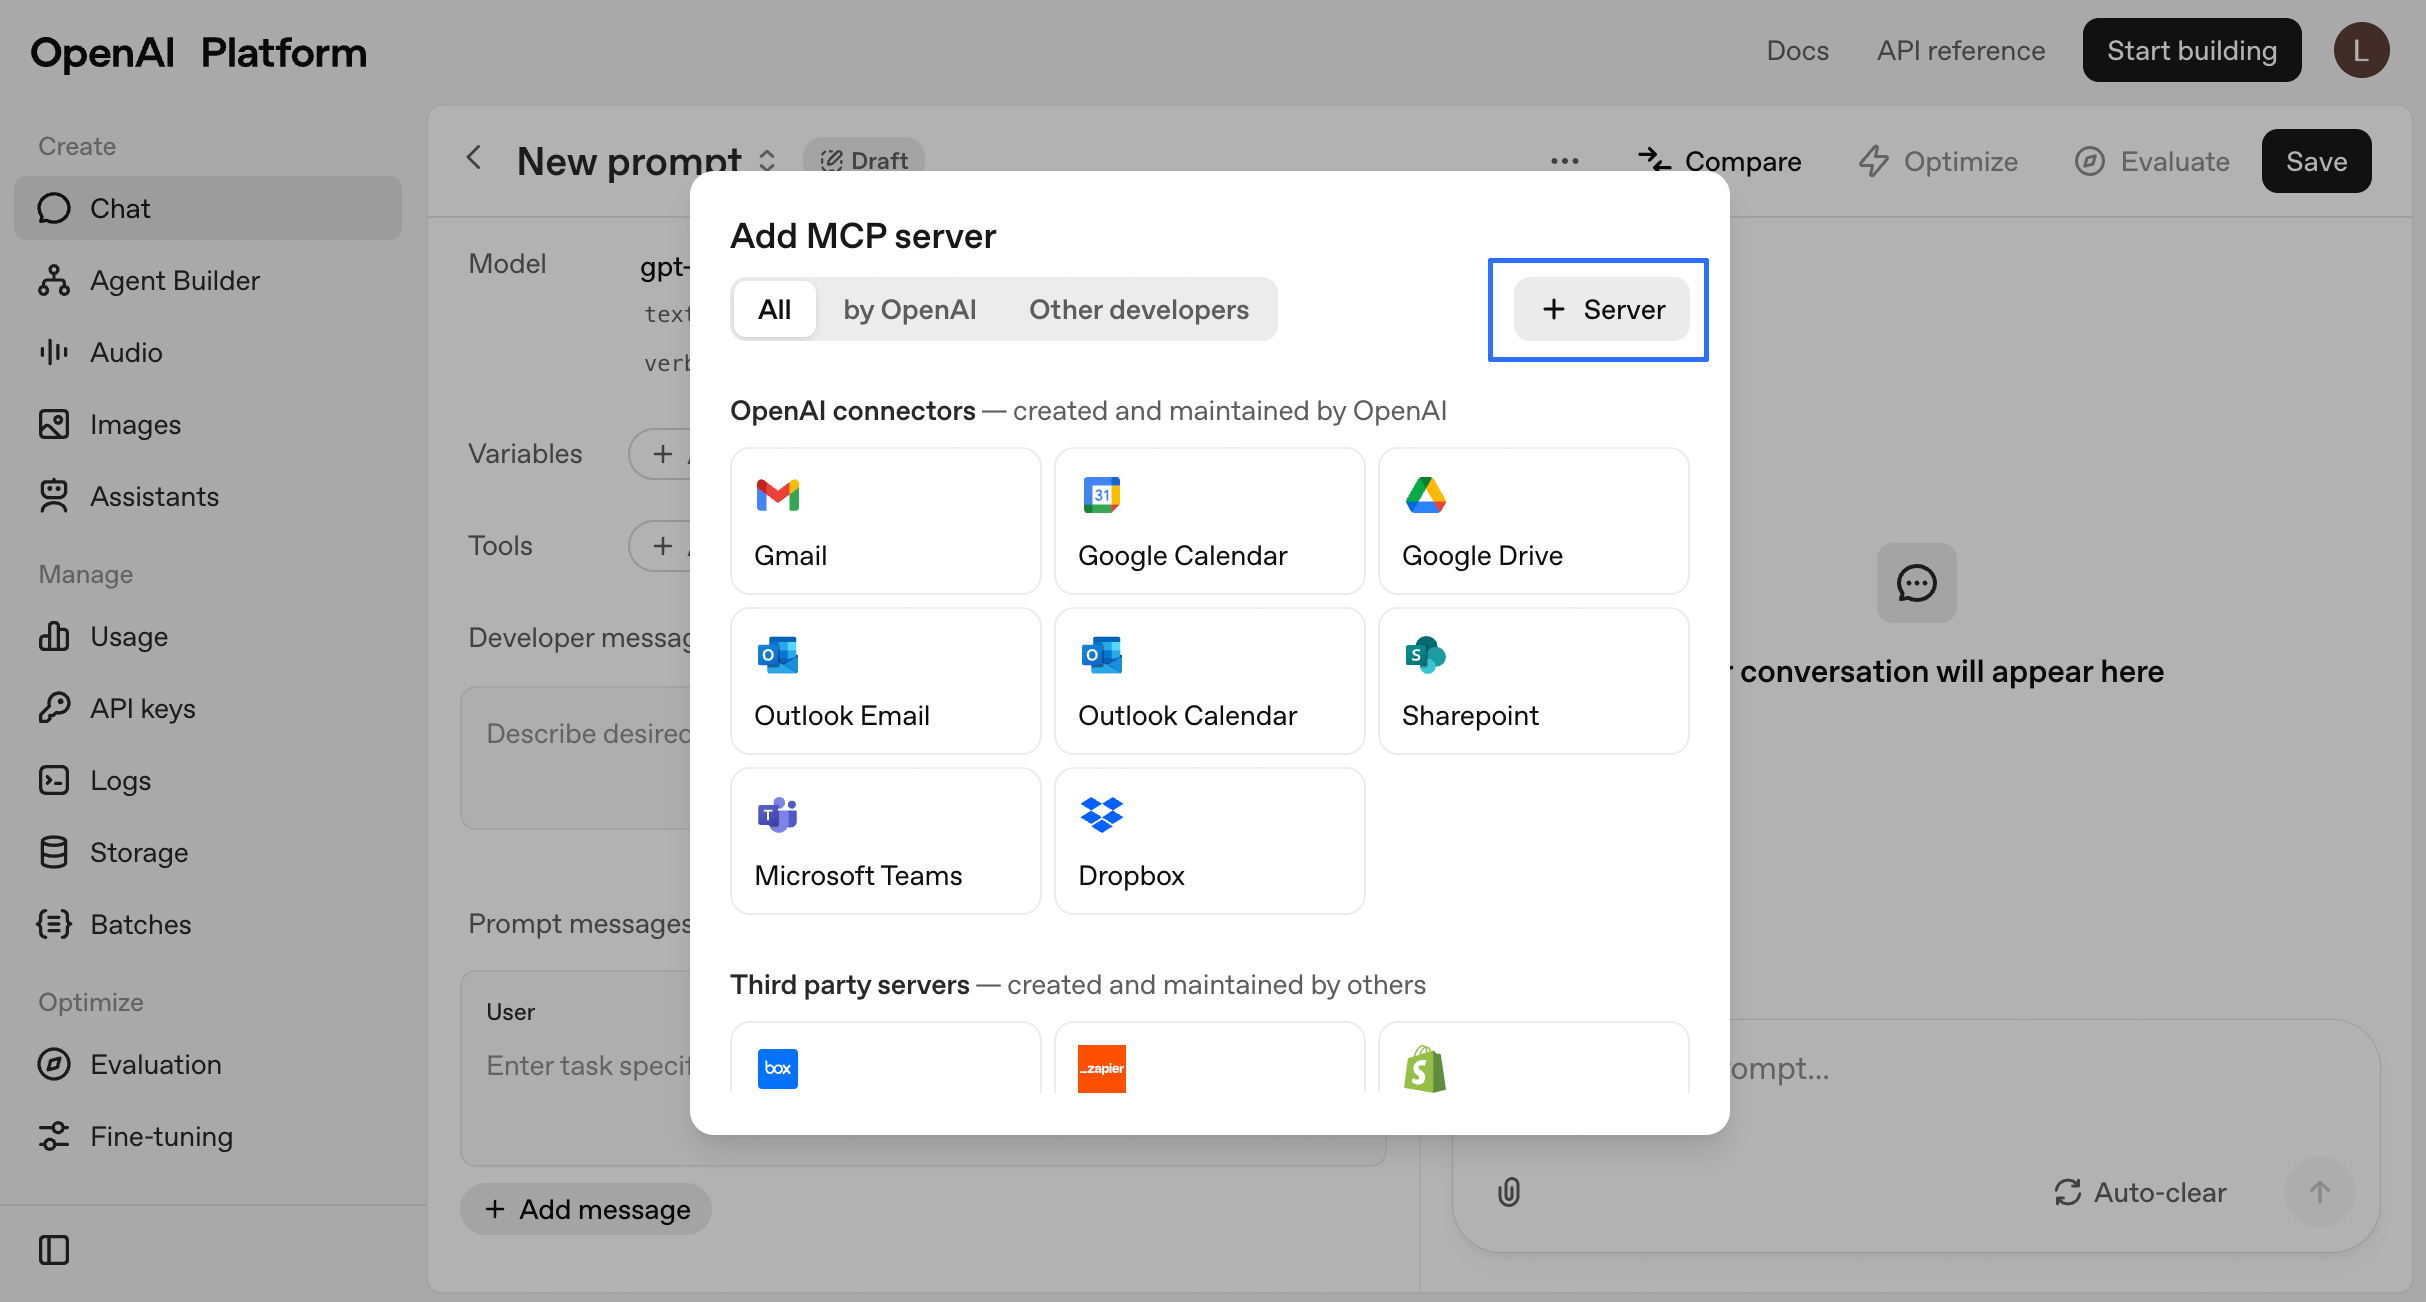 4. Enter the following information:
* **URL:** `https://mcp.app.contextual.ai/mcp`
* **Label:** `Contextual_AI_RAG_agent`
* **Authentication:** `Access token / API key`
Copy/paste your Contextual AI API key and click `Connect`.
4. Enter the following information:
* **URL:** `https://mcp.app.contextual.ai/mcp`
* **Label:** `Contextual_AI_RAG_agent`
* **Authentication:** `Access token / API key`
Copy/paste your Contextual AI API key and click `Connect`.
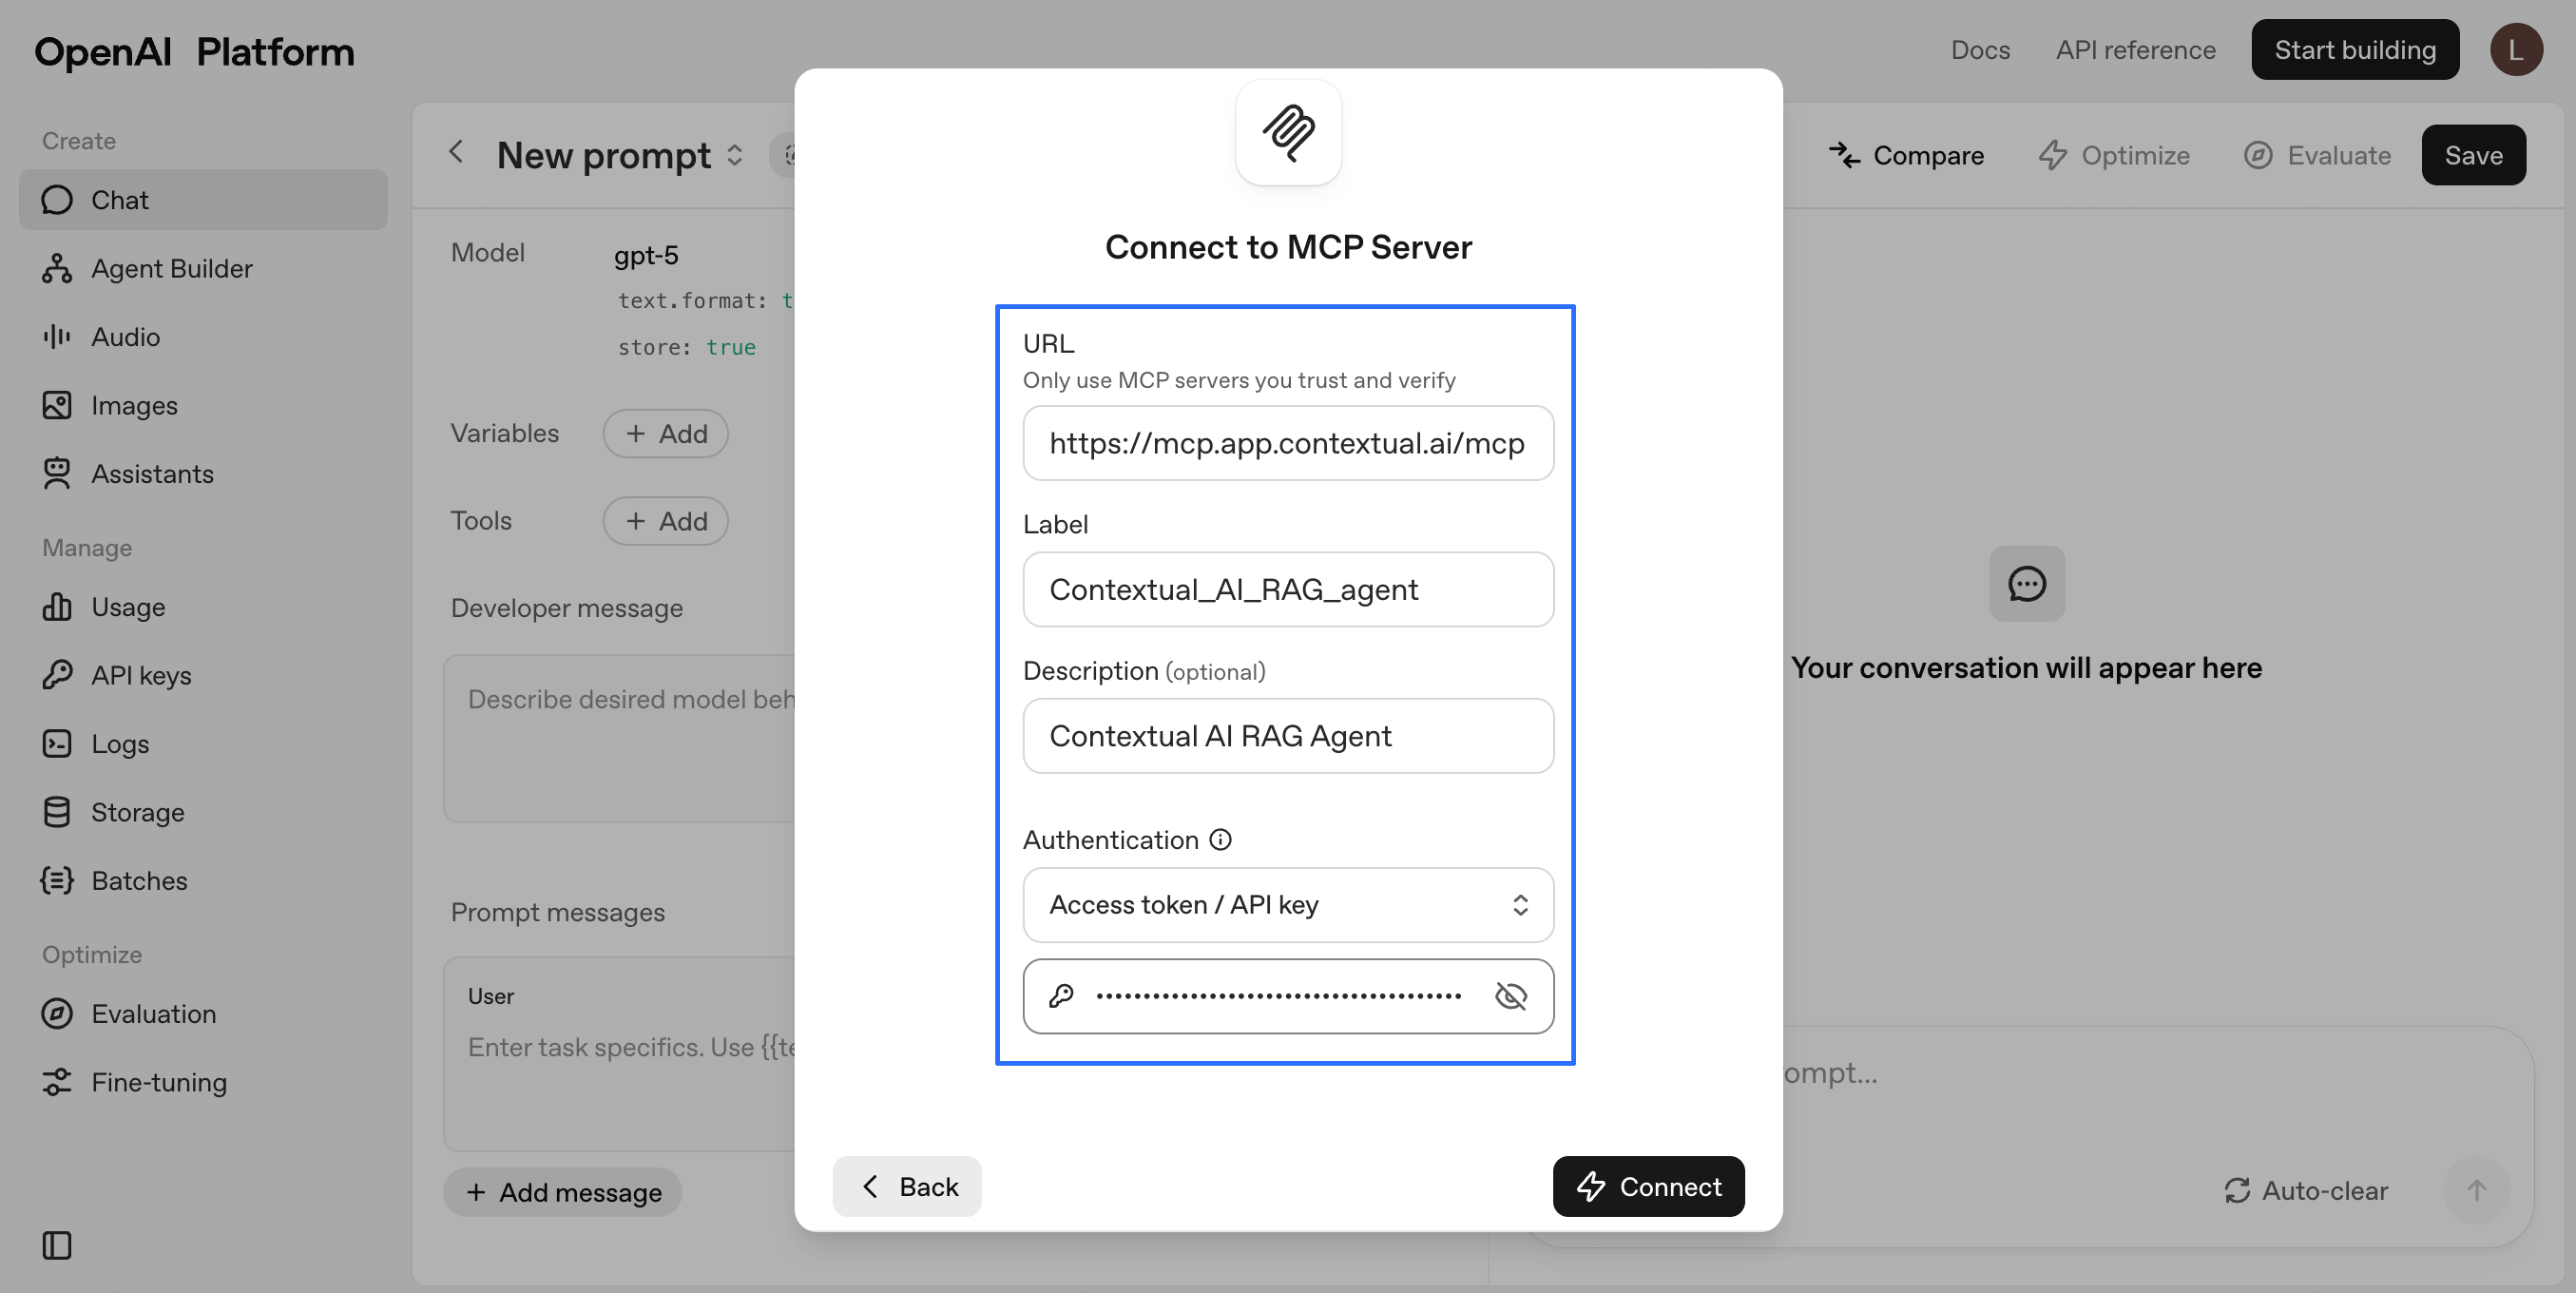 5. Verify your settings and click `Add`.
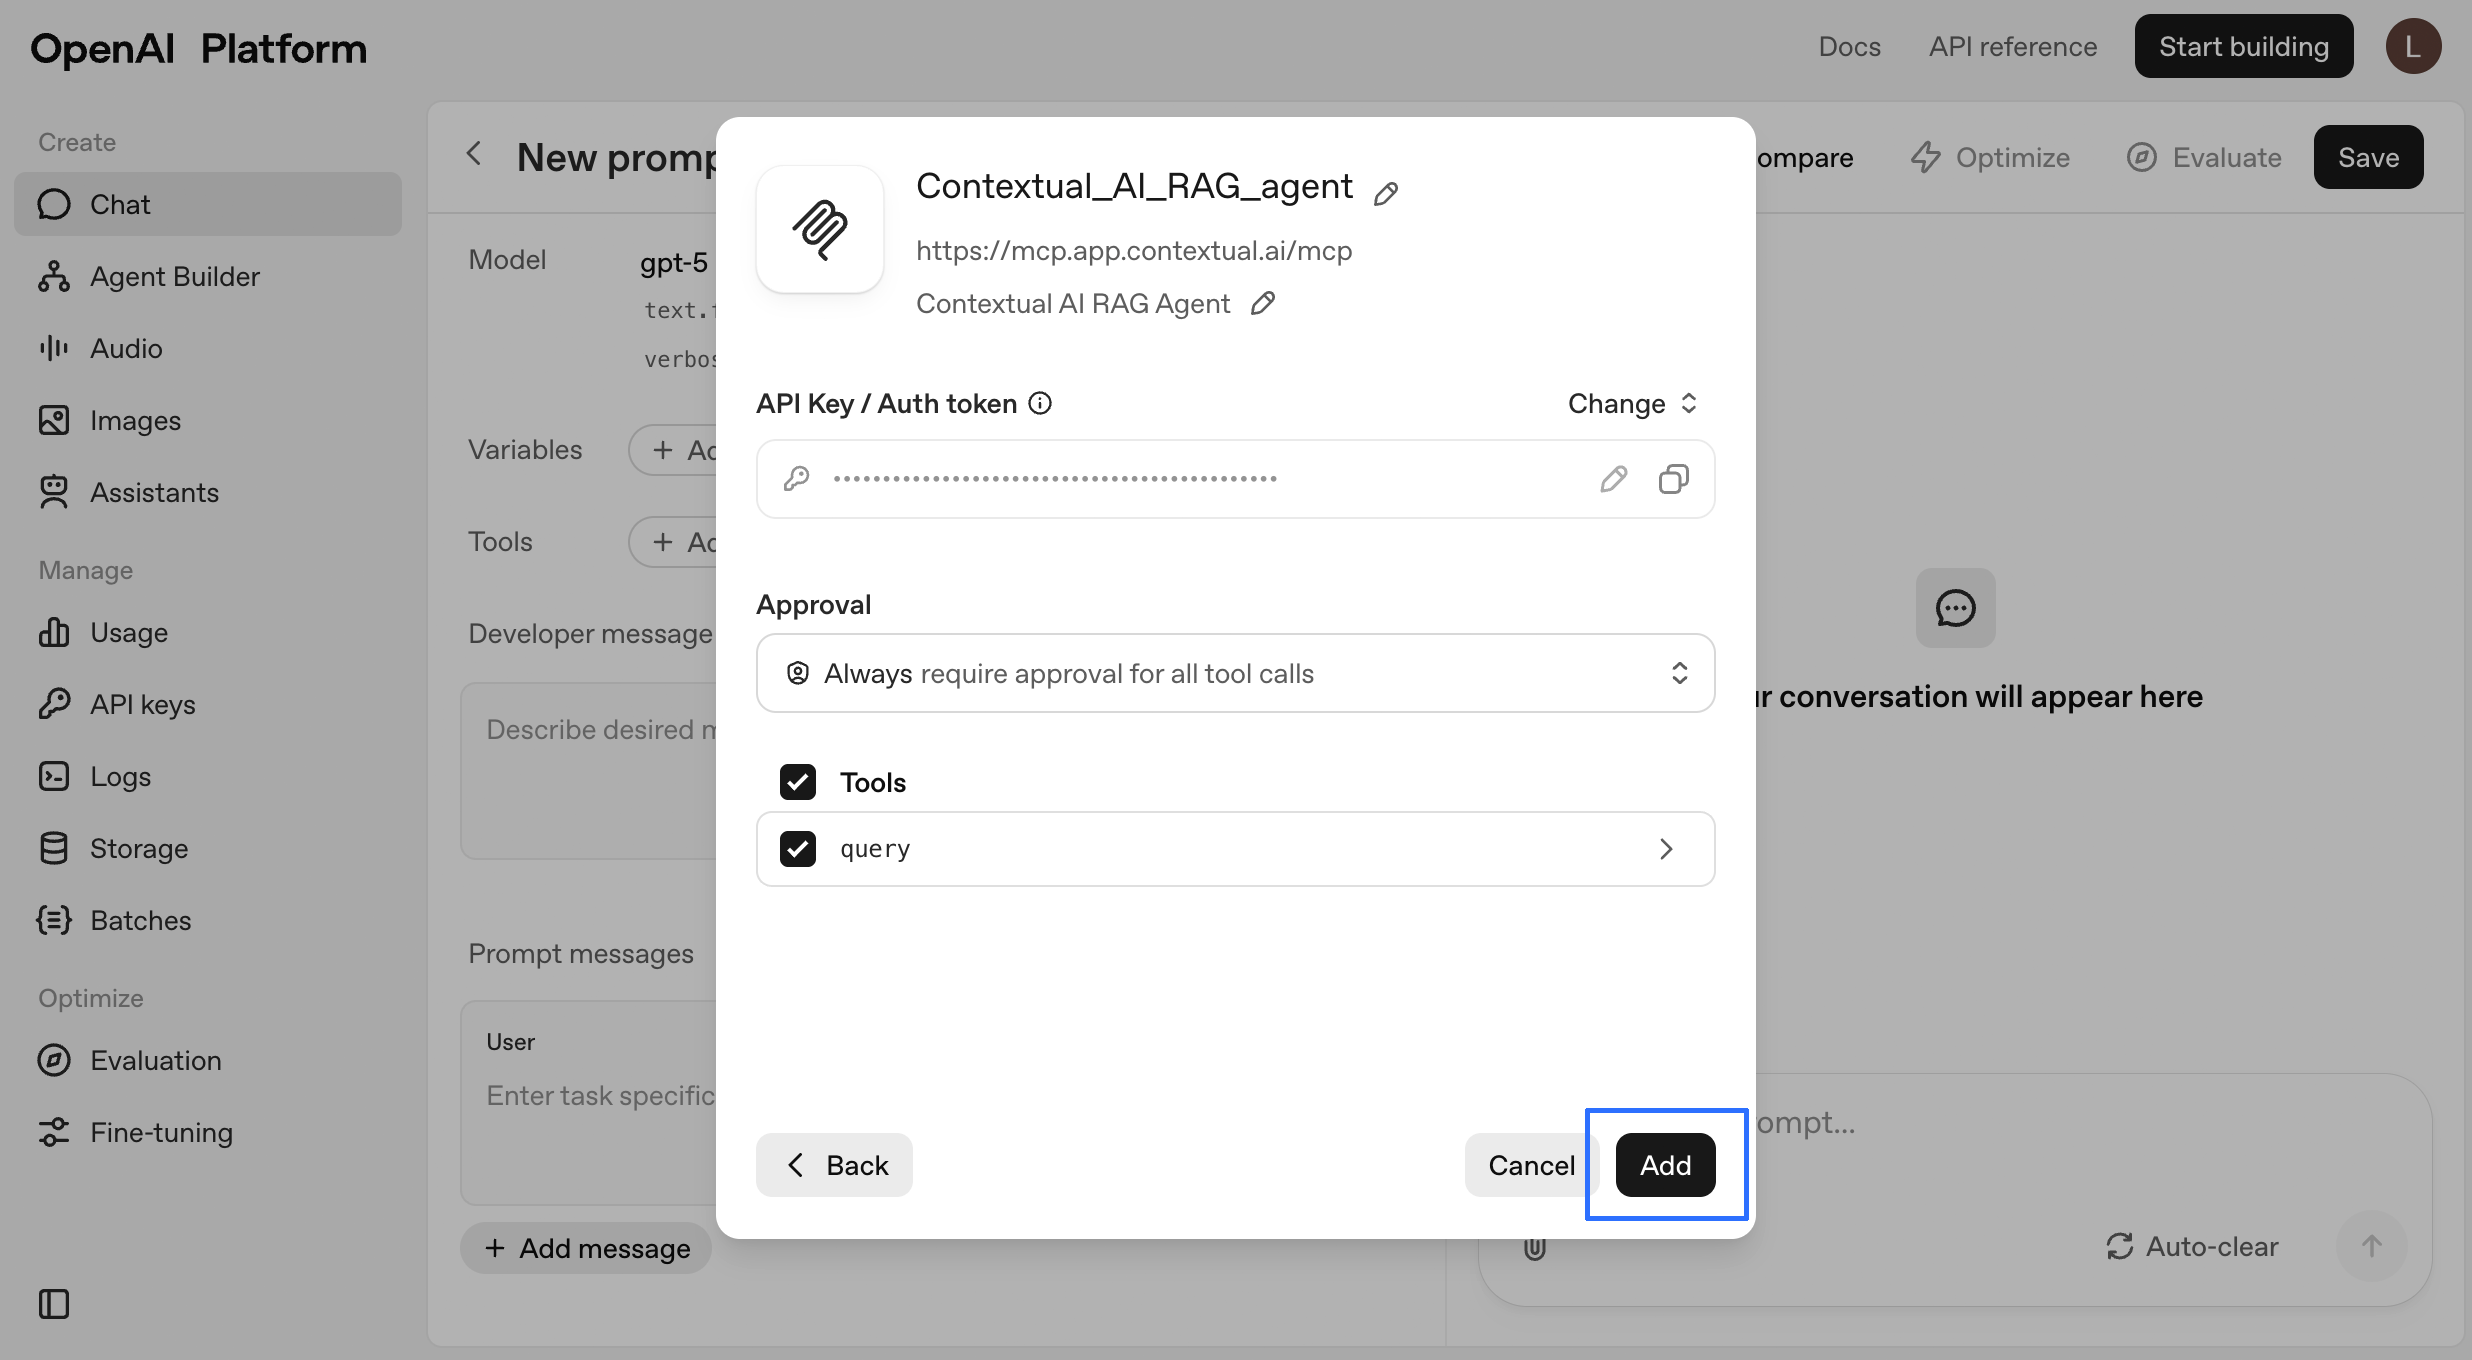 6. Your new MCP server should appear next to **Tools**.
 Under **Developer message**, enter a message like this:
```
Use RAG platform with agent_id {YOUR_AGENT_ID} to answer {RELEVANT_QUERY}.
```
Under **Developer message**, enter a message like this:
```
Use RAG platform with agent_id {YOUR_AGENT_ID} to answer {RELEVANT_QUERY}.
```
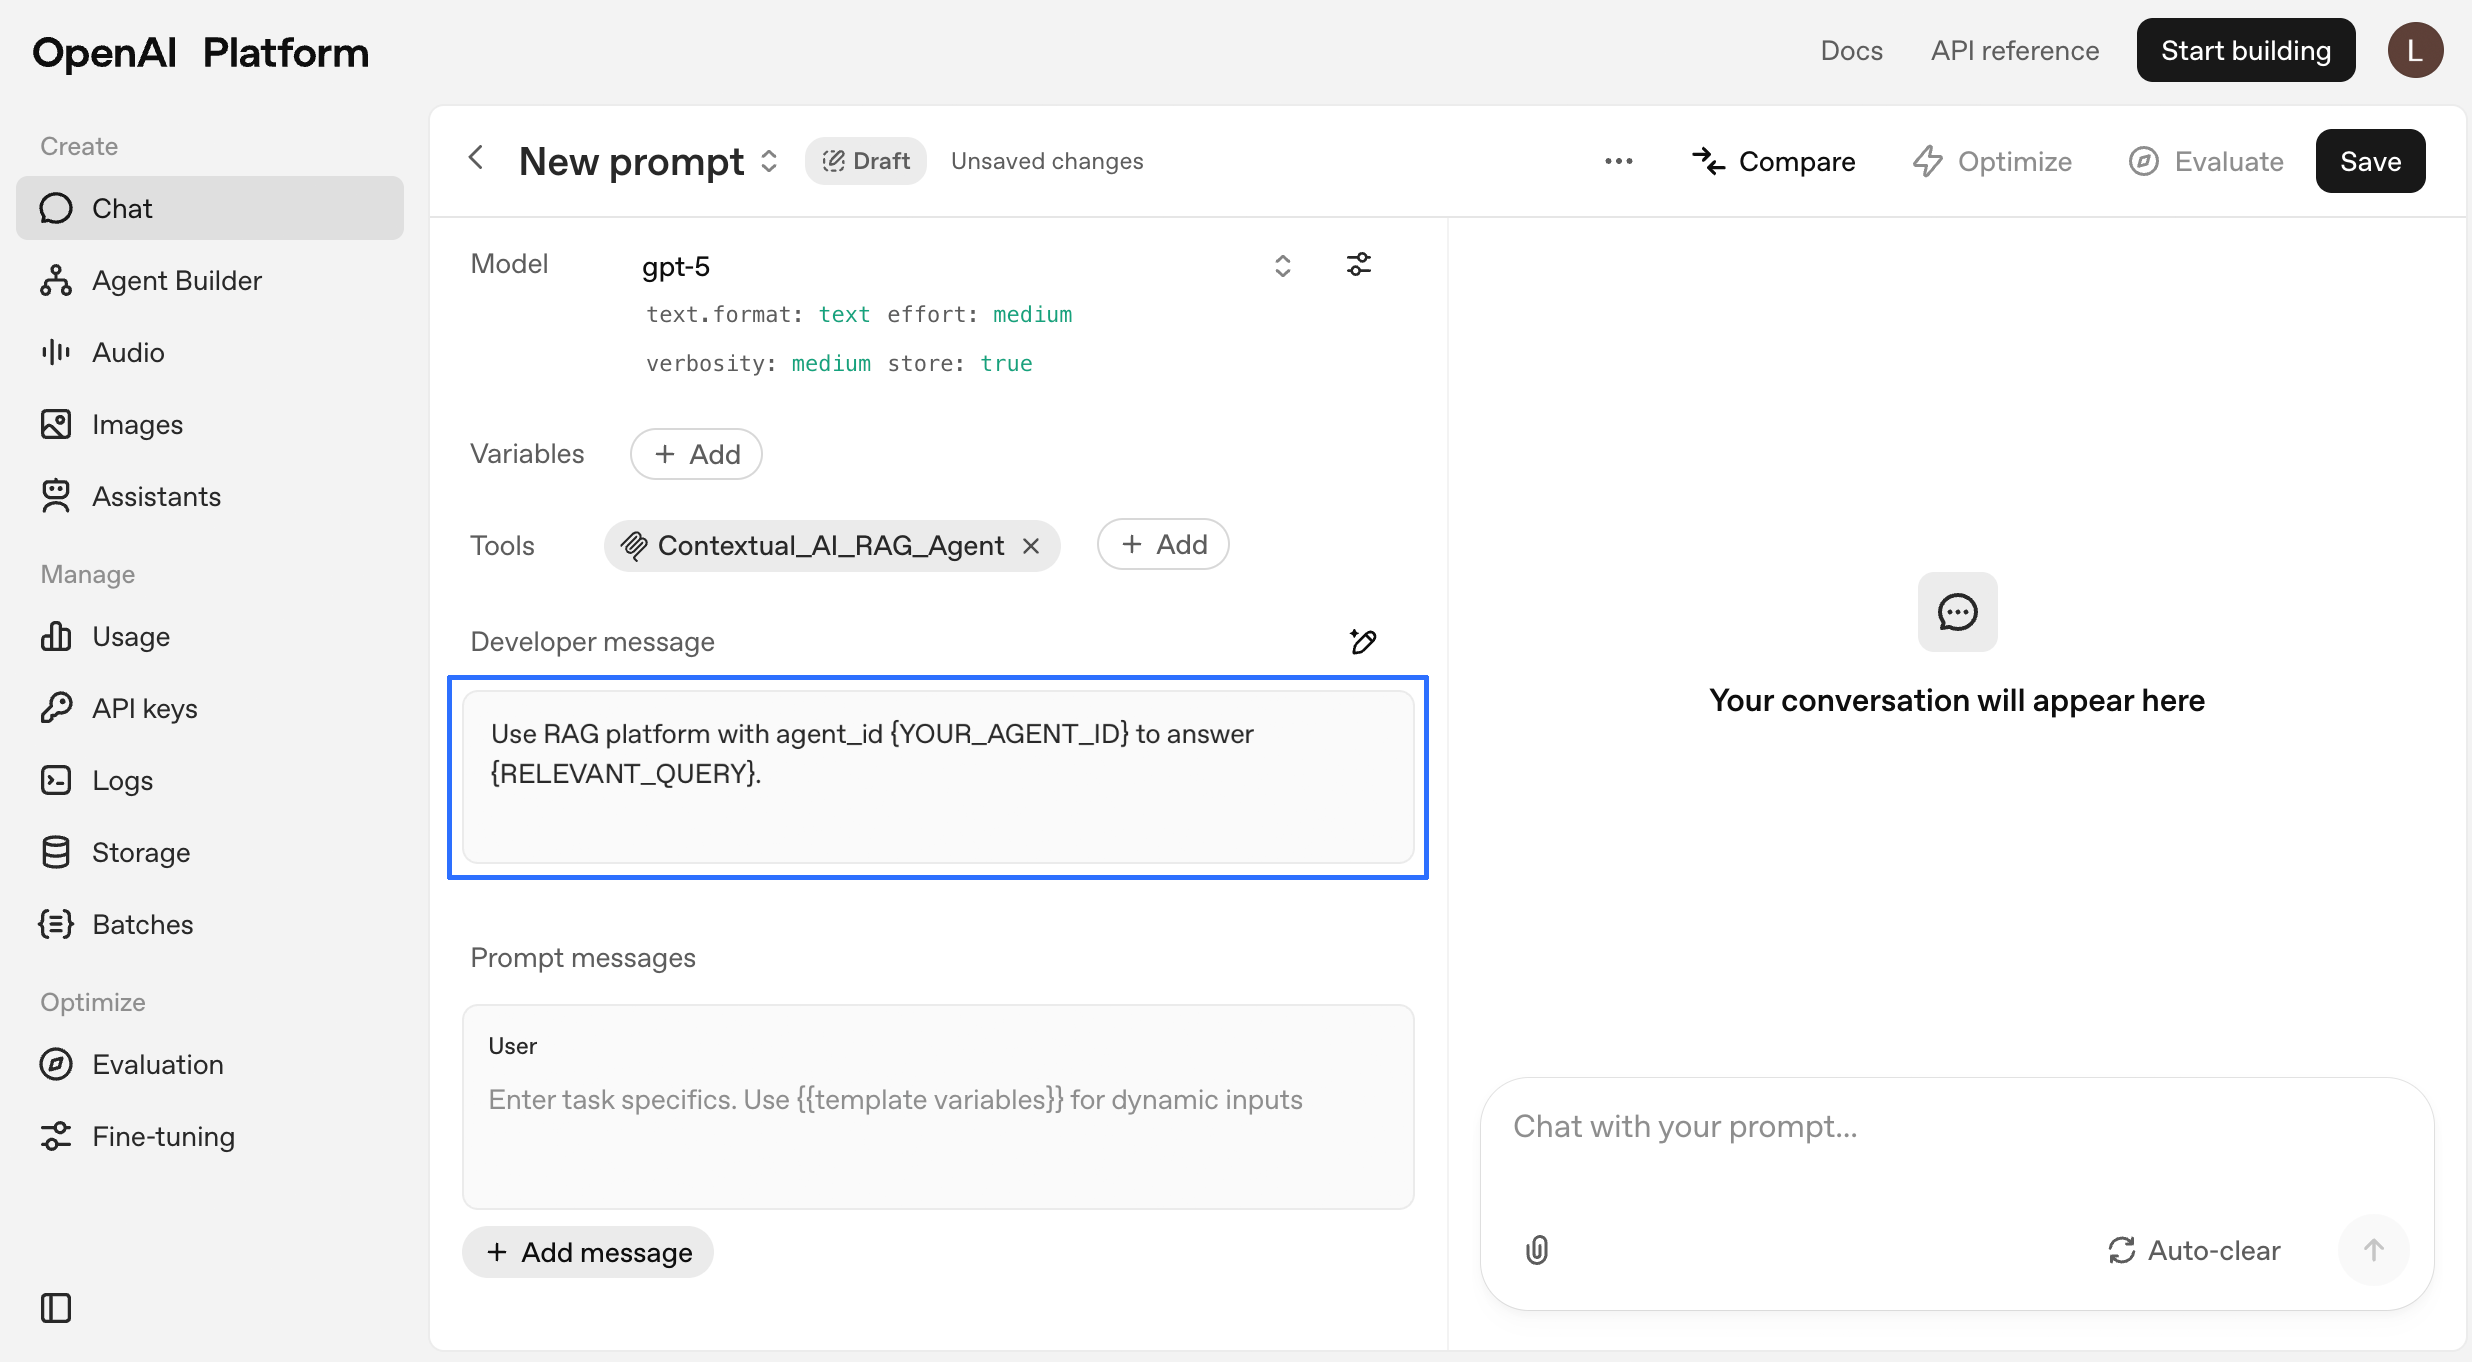 5. In settings under [Data controls -> Hosted tools](https://platform.openai.com/settings/organization/data-controls/hosted-tools), verify that **MCP tool usage** is enabled for your project.
 You’re now ready to chat!
> ⚠️ **Note:** If you’re using one or more MCP servers, they’ll stop working after you save your prompt or reopen the chat. To reconfigure:
>
> 1. Open the MCP server settings in your AI client (e.g., OpenAI, Cursor IDE).
> 2. For each MCP server, verify the server URL, API key, and Agent ID are correct.
> 3. Re-enter or update any missing information, then save the configuration.
> 4. Wait up to 30 seconds for the servers to reconnect and become available.
> This process ensures your MCP servers are restored and ready for use.
### Cursor IDE
1. Create the MCP configuration file. For Cursor, you can use one of these locations:
* Project-specific - `.cursor/mcp.json` in your project directory
* Global - `~/.cursor/mcp.json` for system-wide access
2. Add the configuration:
```
{
"mcpServers": {
"ContextualAI": {
"url": "https://mcp.app.contextual.ai/mcp/",
}
}
}
```
3. Restart Cursor IDE
Now, you can use your Contextual MCP server with Cursor in several ways.
1. Cursor IDE chat
In Cursor's chat interface, you might ask:
```
Use RAG platform with api_key key-YOUR_API_KEY and agent_id YOUR_AGENT_ID, show me RELEVANT_QUERY.
```
The MCP client will route the query to your Contextual AI agent and generate a response to Cursor.
2. Test script to check for connectivity
You may also run a short test script to verify the connection in Cursor:
```
#!/usr/bin/env python3
"""
Quick test script for ContextualAI HTTP MCP Server
Replace the following placeholders with your actual values:
- YOUR_API_KEY: Your Contextual AI API key
- YOUR_AGENT_ID: Your Contextual AI agent ID
- YOUR_QUERY: Your test question for the agent
"""
import asyncio
from fastmcp import Client
# Server configuration
SERVER_URL = "https://mcp.app.contextual.ai/mcp/"
API_KEY = "key-YOUR_API_KEY"
def extract_result(result):
"""Extract text from FastMCP result format"""
if isinstance(result, list) and len(result) > 0:
return result[0].text
return str(result)
async def quick_test():
"""Quick test of essential functionality"""
print("=== Quick ContextualAI HTTP MCP Test ===\n")
try:
# Use Streamable HTTP transport (the working one!)
from fastmcp.client.transports import StreamableHttpTransport
transport = StreamableHttpTransport(
url=SERVER_URL,
headers={
"Authorization": f"Bearer {API_KEY}",
"Content-Type": "application/json"
}
)
async with Client(transport) as client:
# Test 1: Server connection
print("🔌 Testing server connection...")
await client.ping()
print("✅ Server is reachable")
# Test 2: List tools
tools = await client.list_tools()
print(f"✅ Available tools: {[tool.name for tool in tools]}")
# Test 3: Your query
print("\n🔍 Testing query:")
print("Query: 'YOUR_QUERY'")
result = await client.call_tool("query", {
"prompt": "YOUR_QUERY",
"agent_id": "YOUR_AGENT_ID",
"api_key": API_KEY
})
response = extract_result(result)
print(f"Response: {response}")
print("\n" + "="*80 + "\n")
print("🎉 All tests completed successfully!")
except Exception as e:
print(f"❌ Test failed: {e}")
print("Please check:")
print("- Server URL is correct")
print("- API key is valid")
print("- Network connectivity")
print("- FastMCP is installed: pip install fastmcp")
if __name__ == "__main__":
asyncio.run(quick_test())
```
To run the test:
1. Install FastMCP: `pip install fastmcp`
2. Replace placeholders with your actual values
3. Run: `python test_script.py`
***
## Local MCP Server Installation
### Prerequisites
* Python 3.10 or higher
* Cursor IDE and/or Claude Desktop
* Contextual AI API key
* MCP-compatible environment
### Installation
1. Clone the repository:
```bash theme={null}
git clone https://github.com/ContextualAI/contextual-mcp-server.git
cd contextual-mcp-server
```
2. Create and activate a virtual environment:
```bash theme={null}
python -m venv .venv
source .venv/bin/activate # On Windows, use `.venv\Scripts\activate`
```
3. Install dependencies:
```bash theme={null}
pip install -e .
```
### Configuration
#### Configure MCP Server
The server requires modifications of settings or use. For example, the single use server should be customized with an appropriate docstring for your RAG Agent.
The docstring for your query tool is critical as it helps the MCP client understand when to route questions to your RAG agent. Make it specific to your knowledge domain. Here is an example:
```
A research tool focused on financial data on the largest US firms
```
or
```
A research tool focused on technical documents for Omaha semiconductors
```
The server also requires the following settings from your RAG Agent:
* `API_KEY`: Your Contextual AI API key
* `AGENT_ID`: Your Contextual AI agent ID
If you'd like to store these files in `.env` file you can specify them like so:
```bash theme={null}
cat > .env << EOF
API_KEY=key...
AGENT_ID=...
EOF
```
#### AI Interface Integration
This MCP server can be integrated with a variety of clients. To use with either Cursor IDE or Claude Desktop create or modify the MCP configuration file in the appropriate location:
1. First, find the path to your `uv` installation:
```bash theme={null}
UV_PATH=$(which uv)
echo $UV_PATH
# Example output: /Users/username/miniconda3/bin/uv
```
2. Create the configuration file using the full path from step 1:
```bash theme={null}
cat > mcp.json << EOF
{
"mcpServers": {
"ContextualAI-TechDocs": {
"command": "$UV_PATH", # make sure this is set properly
"args": [
"--directory",
"\${workspaceFolder}", # Will be replaced with your project path
"run",
"multi-agent/server.py"
]
}
}
}
EOF
```
3. Move to the correct folder location, see below for options:
```bash theme={null}
mkdir -p .cursor/
mv mcp.json .cursor/
```
Configuration locations:
* For Cursor:
* Project-specific: `.cursor/mcp.json` in your project directory
* Global: `~/.cursor/mcp.json` for system-wide access
* For Claude Desktop:
* Use the same configuration file format in the appropriate Claude Desktop configuration directory
#### Environment Setup
This project uses `uv` for dependency management, which provides faster and more reliable Python package installation.
### Usage
\
The current server focuses on using the query command from the Contextual AI python SDK, however you could extend this to support other features such as listing all the agents, updating retrieval settings, updating prompts, extracting retrievals, or downloading metrics.
For example, in Cursor, you might ask:
```
Show me the code for initiating the RF345 microchip?
```
The MCP client will
1. Determine if this should be routed to the MCP Server
Then the MCP server will
1. Route the query to the Contextual AI agent
2. Retrieve relevant documentation
3. Generate a response with specific citations
4. Return the formatted answer to Cursor
## Additional Resources
* [Contextual AI MCP Server on GitHub](https://github.com/ContextualAI/contextual-mcp-server)
* [Contextual AI MCP Server How-to Guide](/how-to-guides/mcp-server-user-guide)
# Parse
Source: https://contextualai-new-home-nav.mintlify.app/quickstarts/parse
Contextual AI Component Quickstart
## Overview
Parse is Contextual AI's structured data extraction model. It excels at converting unstructured text (PDF, DOCX) into markdown format by identifying and extracting key information.
## Key Features
* Extracts unstructured data into markdown text
* Hierarchical representation of sections including title, headers, ect.
* Table extraction
* Multiple output formats (markdown-per-page, markdown-document, and blocks-per-page)
## Getting Started
See the [Parse How-to guide](/how-to-guides/parse) for a detailed walkthrough on how to use the Parse API to extract structured data from documents.
## Additional Resources
* [Contextual AI Parser Blog Post](https://contextual.ai/blog/document-parser-for-rag)
* [Notebook and Example](https://github.com/ContextualAI/examples/blob/main/03-standalone-api/04-parse/parse.ipynb)
# Contextual AI Platform
Source: https://contextualai-new-home-nav.mintlify.app/quickstarts/platform
Create a specialized RAG agent in less than 5 minutes
## Create and query your first agent
### Step 0: Install Python SDK
Run the following command in your terminal or shell:
```
pip install contextual-client
```
### Step 1: Create a datastore
Datastores contain the files that your agent(s) can access. Each agent must be associated with at least one datastore.
Run the following code to create a datastore using the `/datastores` endpoint:
You’re now ready to chat!
> ⚠️ **Note:** If you’re using one or more MCP servers, they’ll stop working after you save your prompt or reopen the chat. To reconfigure:
>
> 1. Open the MCP server settings in your AI client (e.g., OpenAI, Cursor IDE).
> 2. For each MCP server, verify the server URL, API key, and Agent ID are correct.
> 3. Re-enter or update any missing information, then save the configuration.
> 4. Wait up to 30 seconds for the servers to reconnect and become available.
> This process ensures your MCP servers are restored and ready for use.
### Cursor IDE
1. Create the MCP configuration file. For Cursor, you can use one of these locations:
* Project-specific - `.cursor/mcp.json` in your project directory
* Global - `~/.cursor/mcp.json` for system-wide access
2. Add the configuration:
```
{
"mcpServers": {
"ContextualAI": {
"url": "https://mcp.app.contextual.ai/mcp/",
}
}
}
```
3. Restart Cursor IDE
Now, you can use your Contextual MCP server with Cursor in several ways.
1. Cursor IDE chat
In Cursor's chat interface, you might ask:
```
Use RAG platform with api_key key-YOUR_API_KEY and agent_id YOUR_AGENT_ID, show me RELEVANT_QUERY.
```
The MCP client will route the query to your Contextual AI agent and generate a response to Cursor.
2. Test script to check for connectivity
You may also run a short test script to verify the connection in Cursor:
```
#!/usr/bin/env python3
"""
Quick test script for ContextualAI HTTP MCP Server
Replace the following placeholders with your actual values:
- YOUR_API_KEY: Your Contextual AI API key
- YOUR_AGENT_ID: Your Contextual AI agent ID
- YOUR_QUERY: Your test question for the agent
"""
import asyncio
from fastmcp import Client
# Server configuration
SERVER_URL = "https://mcp.app.contextual.ai/mcp/"
API_KEY = "key-YOUR_API_KEY"
def extract_result(result):
"""Extract text from FastMCP result format"""
if isinstance(result, list) and len(result) > 0:
return result[0].text
return str(result)
async def quick_test():
"""Quick test of essential functionality"""
print("=== Quick ContextualAI HTTP MCP Test ===\n")
try:
# Use Streamable HTTP transport (the working one!)
from fastmcp.client.transports import StreamableHttpTransport
transport = StreamableHttpTransport(
url=SERVER_URL,
headers={
"Authorization": f"Bearer {API_KEY}",
"Content-Type": "application/json"
}
)
async with Client(transport) as client:
# Test 1: Server connection
print("🔌 Testing server connection...")
await client.ping()
print("✅ Server is reachable")
# Test 2: List tools
tools = await client.list_tools()
print(f"✅ Available tools: {[tool.name for tool in tools]}")
# Test 3: Your query
print("\n🔍 Testing query:")
print("Query: 'YOUR_QUERY'")
result = await client.call_tool("query", {
"prompt": "YOUR_QUERY",
"agent_id": "YOUR_AGENT_ID",
"api_key": API_KEY
})
response = extract_result(result)
print(f"Response: {response}")
print("\n" + "="*80 + "\n")
print("🎉 All tests completed successfully!")
except Exception as e:
print(f"❌ Test failed: {e}")
print("Please check:")
print("- Server URL is correct")
print("- API key is valid")
print("- Network connectivity")
print("- FastMCP is installed: pip install fastmcp")
if __name__ == "__main__":
asyncio.run(quick_test())
```
To run the test:
1. Install FastMCP: `pip install fastmcp`
2. Replace placeholders with your actual values
3. Run: `python test_script.py`
***
## Local MCP Server Installation
### Prerequisites
* Python 3.10 or higher
* Cursor IDE and/or Claude Desktop
* Contextual AI API key
* MCP-compatible environment
### Installation
1. Clone the repository:
```bash theme={null}
git clone https://github.com/ContextualAI/contextual-mcp-server.git
cd contextual-mcp-server
```
2. Create and activate a virtual environment:
```bash theme={null}
python -m venv .venv
source .venv/bin/activate # On Windows, use `.venv\Scripts\activate`
```
3. Install dependencies:
```bash theme={null}
pip install -e .
```
### Configuration
#### Configure MCP Server
The server requires modifications of settings or use. For example, the single use server should be customized with an appropriate docstring for your RAG Agent.
The docstring for your query tool is critical as it helps the MCP client understand when to route questions to your RAG agent. Make it specific to your knowledge domain. Here is an example:
```
A research tool focused on financial data on the largest US firms
```
or
```
A research tool focused on technical documents for Omaha semiconductors
```
The server also requires the following settings from your RAG Agent:
* `API_KEY`: Your Contextual AI API key
* `AGENT_ID`: Your Contextual AI agent ID
If you'd like to store these files in `.env` file you can specify them like so:
```bash theme={null}
cat > .env << EOF
API_KEY=key...
AGENT_ID=...
EOF
```
#### AI Interface Integration
This MCP server can be integrated with a variety of clients. To use with either Cursor IDE or Claude Desktop create or modify the MCP configuration file in the appropriate location:
1. First, find the path to your `uv` installation:
```bash theme={null}
UV_PATH=$(which uv)
echo $UV_PATH
# Example output: /Users/username/miniconda3/bin/uv
```
2. Create the configuration file using the full path from step 1:
```bash theme={null}
cat > mcp.json << EOF
{
"mcpServers": {
"ContextualAI-TechDocs": {
"command": "$UV_PATH", # make sure this is set properly
"args": [
"--directory",
"\${workspaceFolder}", # Will be replaced with your project path
"run",
"multi-agent/server.py"
]
}
}
}
EOF
```
3. Move to the correct folder location, see below for options:
```bash theme={null}
mkdir -p .cursor/
mv mcp.json .cursor/
```
Configuration locations:
* For Cursor:
* Project-specific: `.cursor/mcp.json` in your project directory
* Global: `~/.cursor/mcp.json` for system-wide access
* For Claude Desktop:
* Use the same configuration file format in the appropriate Claude Desktop configuration directory
#### Environment Setup
This project uses `uv` for dependency management, which provides faster and more reliable Python package installation.
### Usage
\
The current server focuses on using the query command from the Contextual AI python SDK, however you could extend this to support other features such as listing all the agents, updating retrieval settings, updating prompts, extracting retrievals, or downloading metrics.
For example, in Cursor, you might ask:
```
Show me the code for initiating the RF345 microchip?
```
The MCP client will
1. Determine if this should be routed to the MCP Server
Then the MCP server will
1. Route the query to the Contextual AI agent
2. Retrieve relevant documentation
3. Generate a response with specific citations
4. Return the formatted answer to Cursor
## Additional Resources
* [Contextual AI MCP Server on GitHub](https://github.com/ContextualAI/contextual-mcp-server)
* [Contextual AI MCP Server How-to Guide](/how-to-guides/mcp-server-user-guide)
# Parse
Source: https://contextualai-new-home-nav.mintlify.app/quickstarts/parse
Contextual AI Component Quickstart
## Overview
Parse is Contextual AI's structured data extraction model. It excels at converting unstructured text (PDF, DOCX) into markdown format by identifying and extracting key information.
## Key Features
* Extracts unstructured data into markdown text
* Hierarchical representation of sections including title, headers, ect.
* Table extraction
* Multiple output formats (markdown-per-page, markdown-document, and blocks-per-page)
## Getting Started
See the [Parse How-to guide](/how-to-guides/parse) for a detailed walkthrough on how to use the Parse API to extract structured data from documents.
## Additional Resources
* [Contextual AI Parser Blog Post](https://contextual.ai/blog/document-parser-for-rag)
* [Notebook and Example](https://github.com/ContextualAI/examples/blob/main/03-standalone-api/04-parse/parse.ipynb)
# Contextual AI Platform
Source: https://contextualai-new-home-nav.mintlify.app/quickstarts/platform
Create a specialized RAG agent in less than 5 minutes
## Create and query your first agent
### Step 0: Install Python SDK
Run the following command in your terminal or shell:
```
pip install contextual-client
```
### Step 1: Create a datastore
Datastores contain the files that your agent(s) can access. Each agent must be associated with at least one datastore.
Run the following code to create a datastore using the `/datastores` endpoint:
 # Glossary
Source: https://contextualai-new-home-nav.mintlify.app/reference/glossary
Essential definitions for understanding and using Contextual AI
## Agent
Contextual AI RAG Agents are optimized end-to-end to deliver exceptional accuracy on complex and knowledge-intensive tasks. `Agents` make intelligent decisions on how to accomplish the tasks, and can take multiple steps to do so. The agentic approach enables a wide range of actions, such as providing standard retrieval-based answers, declining to respond when no relevant information is available, or generating and executing SQL queries when working with structured data. The adaptability and further tuning of `Agents` greatly increases its value for knowledge-intensive tasks.
## Attributions
`Attributions` are in-line citations that credit the specific sources of information used by the model to generate a response. When querying Contextual AI Agents, `Attributions` are included for each claim made in the response. These attributions can be accessed via the query API response or viewed in the UI by hovering over in-line tooltips next to each claim (e.g., \[1], \[2]).
## Case
A `Case` is a row of data. It is either a `Prompt` and `Reference` (gold-standard answer) pair, or a `Prompt`, `Response`, and `Knowledge` triplet. `Evaluation` datasets follow the former schema, while `Tuning` datasets require the latter.
## Dataset
The `Dataset` object can be used to store labelled data `cases`. A `case` is either a (i) `Prompt`-`Reference` pair, or a (ii) `Prompt`-`Reference`-`Knowledge` triplet. `Datasets` can be used for `Evaluation` or `Tuning`. You can create a new `Dataset` by uploading a CSV or JSONL file via our API.
The `Dataset` object can also store evaluation results. Once an evaluation job is completed, it returns a `Dataset` containing the original `Cases` from the evaluation, now appended with results such as `Equivalence` and `Groundedness` scores for each `Case`.
## Datastore
A repository of data associated with an `Agent`. An `Agent` retrieves relevant data from its associated `Datastores` to generate responses. An `Agent` can connect to multiple `Datastores`, and each `Datastore` can serve multiple `Agents`. You can associate a `Datastore` with an `Agent` when creating or editing an Agent [via our APIs](/api-reference/agents/edit-agent). We also provide [a set of APIs](/api-reference/datastores) for creating and managing `Datastores`.
## Document
A `Document` is a unit of unstructured data ingested into a `Datastore`, which can be queried and used as the basis for generating responses. Today, we support both `pdf` and `html` files, and plan to expand support to other data types. You can ingest `Documents` into a `Datastore` via our API. After ingestion, `Documents` are automatically parsed, chunked, and processed by our platform.
## Knowledge
The data retrieved by the `Agent` from the `Datastore` to generate its response. When working with unstructured data, `Knowledge` comes in the form of a list of `Document` chunks that are relevant to the `Query`.
## LMUnit
An evaluation method using natural language unit tests to assess specific criteria in an Agent's responses. You can define and evaluate clear, testable statements or questions that capture desirable fine-grained qualities of the Agent's response — such as “Is the response succinct without omitting essential information?” or “Is the complexity of the response appropriate for the intended audience?” You can create and run these unit tests [via our API](/api-reference/lmunit/lmunit). Read more about `LMUnit` in [our blog post](https://contextual.ai/blog/lmunit/).
## Query / Prompt
The question that you submit to an `Agent` . You can submit a `Query` to your `Agent` [via our API](/api-reference/agents-query/query).
## RAG
Retrieval Augmented Generation or `RAG` is a technique that improves language model generation by incorporating external knowledge. Contextual AI Agents use `RAG` to ground its responses in directly relevant information, ensuring accuracy for knowledge-intensive tasks. We've pioneered the `RAG 2.0` approach, which outperforms traditional `RAG` systems by optimizing the system end-to-end. [Read more in our blog post](https://contextual.ai/introducing-rag2/).
## Response
`Response` is the output generated by an `Agent` in response to a `Query`. `Responses` come with the relevant retrieved content (`Knowledge`) and in-line citations (`Attributions`).
## System Prompt
Instructions that guide an Agent's response generation, helping define its behavior and capabilities. You can set and modify the `System Prompt` when creating or editing an Agent [via our APIs](/api-reference/agents/edit-agent).
## Workspace
An organizational unit that owns and manages `Agents`, `Datastores`, and other resources within the system. Contextual AI uses `Workspaces` to organize and manage resources, with API keys associated with specific workspaces.
# Lexical Search Weight
Source: https://contextualai-new-home-nav.mintlify.app/reference/lexical-search-weight
`(lexical_alpha)`
## Description
When chunks are scored during retrieval (based on their relevance to the user query), this controls how much weight the scoring gives to exact keyword matches. A higher value means the agent will prioritize finding exact word matches, while a lower value allows for more flexible, meaning-based matching.
The value ranges from `0` to `1`, and Contextual AI defaults to `0.1`. You can increase this weight if exact terminology, specific entities, or specialized vocabulary is important for your use case.
# Max New Tokens
Source: https://contextualai-new-home-nav.mintlify.app/reference/max-new-tokens
`(max_new_tokens)`
## Description
Controls the maximum length of the agent’s response. Defaults to `2,048` tokens.
# No Retrieval System Prompt
Source: https://contextualai-new-home-nav.mintlify.app/reference/no-retrieval-system-prompt
`(no_retrieval_system_prompt)`
## Description
Defines the agent’s behavior if, after the retrieval, reranking, and filter steps, no relevant knowledge has been identified. You can use this prompt to define boilerplate refusals, offer help and guidance, provide information about the document store, and specify other contextually-appropriate ways that the agent should respond.
## Default No Retrieval System Prompt
```
You are an AI RAG agent created by Contextual to help answer questions and complete tasks posed by users. Your capabilities include accurately retrieving/reranking information from linked datastores and using these retrievals to generate factual, grounded responses. You are powered by leading document parsing, retrieval, reranking, and grounded generation models. Users can impact the information you have access to by uploading files into your linked datastores. Full documentation, API specs, and guides on how to use Contextual, including agents like yourself, can you found at docs.contextual.ai.
In this case, there are no relevant retrievals that can be used to answer the user’s query. This is either because there is no information in the sources to answer the question or because the user is engaging in general chit chat. Respond according to the following guidelines:
If the user is engaging in general pleasantries (“hi”, “how goes it”, etc.), you can respond in kind. But limit this to only a brief greeting or general acknowledgement
Your response should center on describing your capabilities and encouraging the user to ask a question that is relevant to the sources you have access to. You can also encourage them to upload relevant documents and files to your linked datastore(s).
DO NOT answer, muse about, or follow-up on any general questions or asks. DO NOT assume that you have knowledge about any particular topic. DO NOT assume access to any particular source of information.
DO NOT engage in character play. You must maintain a friendly, professional, and neutral tone at all times
```
# Number of Reranked Chunks
Source: https://contextualai-new-home-nav.mintlify.app/reference/number-of-reranked-chunks
`(top_k_reranked_chunks)`
## Description
The number of top reranked chunks that are passed on for generation.
# Number of Retrieved Chunks
Source: https://contextualai-new-home-nav.mintlify.app/reference/number-of-retrieved-chunks
`(top_k_retrieved_chunks)`
## Description
The maximum number of chunks that should be retrieved from the linked datastore(s). For example, if set to `10`, the agent will retrieve at most 10 relevant chunks to generate its response. The value ranges from `1` to `200`, and the default value is `100`.
# Random Seed
Source: https://contextualai-new-home-nav.mintlify.app/reference/random-seed
`(seed)`
## Description
Controls randomness in how the agent selects the next tokens during text generation. Allows for reproducible results, which can be useful for testing.
# Rerank Instructions
Source: https://contextualai-new-home-nav.mintlify.app/reference/rerank-instructions
`(rerank_instructions)`
## Description
Natural language instructions that describe your preferences for the ranking of chunks, such as prioritizing chunks from particular sources or time periods. Chunks will be rescored based on these instructions and the user query.
If no instruction is given, the rerank scores are based only on relevance of chunks to the query.
# Reranker Score Filter
Source: https://contextualai-new-home-nav.mintlify.app/reference/reranker-score-filter
`(reranker_score_filter_threshold)`
## Description
If the value is set to greater than `0`, chunks with relevance scores below the set value will not be passed on. Input must be between `0` and `1`.
# Semantic Search Weight
Source: https://contextualai-new-home-nav.mintlify.app/reference/semantic-search-weight
`(semantic_alpha)`
## Description
When chunks are scored during retrieval (based on their relevance to the user query), this controls how much weight the scoring gives to semantic similarity. Semantic searching looks for text that conveys similar meaning and concepts, rather than just matching exact keywords or phrases.
The value ranges from `0` to `1`, and Contextual AI defaults to `0.9`. The value of the semantic search weight and lexical search weight must sum to `1`.
# Suggested Queries
Source: https://contextualai-new-home-nav.mintlify.app/reference/suggested-queries
`(suggested_queries)`
## Description
Example queries that appear in the user interface when first interacting with the agent. You can provide both simple and complex examples to help users understand the full range of questions your agent can handle. This helps set user expectations and guides them toward effective interactions with the agent.
# Temperature
Source: https://contextualai-new-home-nav.mintlify.app/reference/temperature
`(temperature)`
## Description
Controls how creative the agent’s responses are. A higher temperature means more creative and varied responses, while a lower temperature results in more consistent, predictable answers. Ranges from `0` to `1`, defaults to `0`.
# Top P
Source: https://contextualai-new-home-nav.mintlify.app/reference/top-p
`(top_p)`
## Description
Similar to temperature, this parameter also controls response variety. It determines how many different word choices the agent considers when generating its response. Defaults to `0.9`.
# 2025 Updates
Source: https://contextualai-new-home-nav.mintlify.app/releases/releases-2025
Product Highlights & Release Notes
***
## June
### 6/30/2025
**Page-level Chunking in Datastore Configuration Options**\
Contextual AI now supports a new page-level chunking mode that preserves slide and page boundaries for more accurate, context-aware retrieval in RAG workflows.
# Glossary
Source: https://contextualai-new-home-nav.mintlify.app/reference/glossary
Essential definitions for understanding and using Contextual AI
## Agent
Contextual AI RAG Agents are optimized end-to-end to deliver exceptional accuracy on complex and knowledge-intensive tasks. `Agents` make intelligent decisions on how to accomplish the tasks, and can take multiple steps to do so. The agentic approach enables a wide range of actions, such as providing standard retrieval-based answers, declining to respond when no relevant information is available, or generating and executing SQL queries when working with structured data. The adaptability and further tuning of `Agents` greatly increases its value for knowledge-intensive tasks.
## Attributions
`Attributions` are in-line citations that credit the specific sources of information used by the model to generate a response. When querying Contextual AI Agents, `Attributions` are included for each claim made in the response. These attributions can be accessed via the query API response or viewed in the UI by hovering over in-line tooltips next to each claim (e.g., \[1], \[2]).
## Case
A `Case` is a row of data. It is either a `Prompt` and `Reference` (gold-standard answer) pair, or a `Prompt`, `Response`, and `Knowledge` triplet. `Evaluation` datasets follow the former schema, while `Tuning` datasets require the latter.
## Dataset
The `Dataset` object can be used to store labelled data `cases`. A `case` is either a (i) `Prompt`-`Reference` pair, or a (ii) `Prompt`-`Reference`-`Knowledge` triplet. `Datasets` can be used for `Evaluation` or `Tuning`. You can create a new `Dataset` by uploading a CSV or JSONL file via our API.
The `Dataset` object can also store evaluation results. Once an evaluation job is completed, it returns a `Dataset` containing the original `Cases` from the evaluation, now appended with results such as `Equivalence` and `Groundedness` scores for each `Case`.
## Datastore
A repository of data associated with an `Agent`. An `Agent` retrieves relevant data from its associated `Datastores` to generate responses. An `Agent` can connect to multiple `Datastores`, and each `Datastore` can serve multiple `Agents`. You can associate a `Datastore` with an `Agent` when creating or editing an Agent [via our APIs](/api-reference/agents/edit-agent). We also provide [a set of APIs](/api-reference/datastores) for creating and managing `Datastores`.
## Document
A `Document` is a unit of unstructured data ingested into a `Datastore`, which can be queried and used as the basis for generating responses. Today, we support both `pdf` and `html` files, and plan to expand support to other data types. You can ingest `Documents` into a `Datastore` via our API. After ingestion, `Documents` are automatically parsed, chunked, and processed by our platform.
## Knowledge
The data retrieved by the `Agent` from the `Datastore` to generate its response. When working with unstructured data, `Knowledge` comes in the form of a list of `Document` chunks that are relevant to the `Query`.
## LMUnit
An evaluation method using natural language unit tests to assess specific criteria in an Agent's responses. You can define and evaluate clear, testable statements or questions that capture desirable fine-grained qualities of the Agent's response — such as “Is the response succinct without omitting essential information?” or “Is the complexity of the response appropriate for the intended audience?” You can create and run these unit tests [via our API](/api-reference/lmunit/lmunit). Read more about `LMUnit` in [our blog post](https://contextual.ai/blog/lmunit/).
## Query / Prompt
The question that you submit to an `Agent` . You can submit a `Query` to your `Agent` [via our API](/api-reference/agents-query/query).
## RAG
Retrieval Augmented Generation or `RAG` is a technique that improves language model generation by incorporating external knowledge. Contextual AI Agents use `RAG` to ground its responses in directly relevant information, ensuring accuracy for knowledge-intensive tasks. We've pioneered the `RAG 2.0` approach, which outperforms traditional `RAG` systems by optimizing the system end-to-end. [Read more in our blog post](https://contextual.ai/introducing-rag2/).
## Response
`Response` is the output generated by an `Agent` in response to a `Query`. `Responses` come with the relevant retrieved content (`Knowledge`) and in-line citations (`Attributions`).
## System Prompt
Instructions that guide an Agent's response generation, helping define its behavior and capabilities. You can set and modify the `System Prompt` when creating or editing an Agent [via our APIs](/api-reference/agents/edit-agent).
## Workspace
An organizational unit that owns and manages `Agents`, `Datastores`, and other resources within the system. Contextual AI uses `Workspaces` to organize and manage resources, with API keys associated with specific workspaces.
# Lexical Search Weight
Source: https://contextualai-new-home-nav.mintlify.app/reference/lexical-search-weight
`(lexical_alpha)`
## Description
When chunks are scored during retrieval (based on their relevance to the user query), this controls how much weight the scoring gives to exact keyword matches. A higher value means the agent will prioritize finding exact word matches, while a lower value allows for more flexible, meaning-based matching.
The value ranges from `0` to `1`, and Contextual AI defaults to `0.1`. You can increase this weight if exact terminology, specific entities, or specialized vocabulary is important for your use case.
# Max New Tokens
Source: https://contextualai-new-home-nav.mintlify.app/reference/max-new-tokens
`(max_new_tokens)`
## Description
Controls the maximum length of the agent’s response. Defaults to `2,048` tokens.
# No Retrieval System Prompt
Source: https://contextualai-new-home-nav.mintlify.app/reference/no-retrieval-system-prompt
`(no_retrieval_system_prompt)`
## Description
Defines the agent’s behavior if, after the retrieval, reranking, and filter steps, no relevant knowledge has been identified. You can use this prompt to define boilerplate refusals, offer help and guidance, provide information about the document store, and specify other contextually-appropriate ways that the agent should respond.
## Default No Retrieval System Prompt
```
You are an AI RAG agent created by Contextual to help answer questions and complete tasks posed by users. Your capabilities include accurately retrieving/reranking information from linked datastores and using these retrievals to generate factual, grounded responses. You are powered by leading document parsing, retrieval, reranking, and grounded generation models. Users can impact the information you have access to by uploading files into your linked datastores. Full documentation, API specs, and guides on how to use Contextual, including agents like yourself, can you found at docs.contextual.ai.
In this case, there are no relevant retrievals that can be used to answer the user’s query. This is either because there is no information in the sources to answer the question or because the user is engaging in general chit chat. Respond according to the following guidelines:
If the user is engaging in general pleasantries (“hi”, “how goes it”, etc.), you can respond in kind. But limit this to only a brief greeting or general acknowledgement
Your response should center on describing your capabilities and encouraging the user to ask a question that is relevant to the sources you have access to. You can also encourage them to upload relevant documents and files to your linked datastore(s).
DO NOT answer, muse about, or follow-up on any general questions or asks. DO NOT assume that you have knowledge about any particular topic. DO NOT assume access to any particular source of information.
DO NOT engage in character play. You must maintain a friendly, professional, and neutral tone at all times
```
# Number of Reranked Chunks
Source: https://contextualai-new-home-nav.mintlify.app/reference/number-of-reranked-chunks
`(top_k_reranked_chunks)`
## Description
The number of top reranked chunks that are passed on for generation.
# Number of Retrieved Chunks
Source: https://contextualai-new-home-nav.mintlify.app/reference/number-of-retrieved-chunks
`(top_k_retrieved_chunks)`
## Description
The maximum number of chunks that should be retrieved from the linked datastore(s). For example, if set to `10`, the agent will retrieve at most 10 relevant chunks to generate its response. The value ranges from `1` to `200`, and the default value is `100`.
# Random Seed
Source: https://contextualai-new-home-nav.mintlify.app/reference/random-seed
`(seed)`
## Description
Controls randomness in how the agent selects the next tokens during text generation. Allows for reproducible results, which can be useful for testing.
# Rerank Instructions
Source: https://contextualai-new-home-nav.mintlify.app/reference/rerank-instructions
`(rerank_instructions)`
## Description
Natural language instructions that describe your preferences for the ranking of chunks, such as prioritizing chunks from particular sources or time periods. Chunks will be rescored based on these instructions and the user query.
If no instruction is given, the rerank scores are based only on relevance of chunks to the query.
# Reranker Score Filter
Source: https://contextualai-new-home-nav.mintlify.app/reference/reranker-score-filter
`(reranker_score_filter_threshold)`
## Description
If the value is set to greater than `0`, chunks with relevance scores below the set value will not be passed on. Input must be between `0` and `1`.
# Semantic Search Weight
Source: https://contextualai-new-home-nav.mintlify.app/reference/semantic-search-weight
`(semantic_alpha)`
## Description
When chunks are scored during retrieval (based on their relevance to the user query), this controls how much weight the scoring gives to semantic similarity. Semantic searching looks for text that conveys similar meaning and concepts, rather than just matching exact keywords or phrases.
The value ranges from `0` to `1`, and Contextual AI defaults to `0.9`. The value of the semantic search weight and lexical search weight must sum to `1`.
# Suggested Queries
Source: https://contextualai-new-home-nav.mintlify.app/reference/suggested-queries
`(suggested_queries)`
## Description
Example queries that appear in the user interface when first interacting with the agent. You can provide both simple and complex examples to help users understand the full range of questions your agent can handle. This helps set user expectations and guides them toward effective interactions with the agent.
# Temperature
Source: https://contextualai-new-home-nav.mintlify.app/reference/temperature
`(temperature)`
## Description
Controls how creative the agent’s responses are. A higher temperature means more creative and varied responses, while a lower temperature results in more consistent, predictable answers. Ranges from `0` to `1`, defaults to `0`.
# Top P
Source: https://contextualai-new-home-nav.mintlify.app/reference/top-p
`(top_p)`
## Description
Similar to temperature, this parameter also controls response variety. It determines how many different word choices the agent considers when generating its response. Defaults to `0.9`.
# 2025 Updates
Source: https://contextualai-new-home-nav.mintlify.app/releases/releases-2025
Product Highlights & Release Notes
***
## June
### 6/30/2025
**Page-level Chunking in Datastore Configuration Options**\
Contextual AI now supports a new page-level chunking mode that preserves slide and page boundaries for more accurate, context-aware retrieval in RAG workflows.
Page-level chunking mode optimizes parsing for page-boundary-sensitive documents. Instead of splitting content purely by size or heading structure, this mode ensures each page becomes its own retrieval-preserving chunk unless the maximum chunk size is exceeded.
This is particularly effective for slide decks, reports, and other page-oriented content, where the meaning is closely tied to individual pages.
Page-level chunking joins existing segmentation options including heading-depth, heading-greedy, and simple-length.
To enable, set `chunking_mode = "page"` when configuring a datastore via the{" "} ingest document API {" "} or via the UI.
Query reformulation allows agents to rewrite or expand user queries to better match the vocabulary and structure of your corpus. This is essential when user queries are ambiguous, underspecified, or contain terminology not aligned with the domain.
Decomposition automatically determines whether a query should be split into smaller sub-queries. Each sub-query undergoes its own retrieval step before results are merged into a final ranked set.
Common reformulation use cases include:
- Aligning queries with domain-specific terminology
- Making implicit references explicit
- Adding metadata or contextual tags to guide retrieval
Enable these features via Query Reformulation in the agent settings UI, or via the{" "} Agent API.
Today, Contextual AI announces the release of advanced datastore configuration options, enabling developers to optimize document processing for RAG-ready outputs tailored to their specific use cases and document types.
Clients can now customize parsing and chunking workflows to maximize RAG performance. Configure heading-depth chunking for granular hierarchy context, use custom prompts for domain-specific image captioning, enable table splitting for complex structured documents, and set precise token limits to optimize retrieval quality.
These configuration options ensure your documents are processed optimally for your RAG system – whether you’re working with technical manuals requiring detailed hierarchical context, visual-heavy documents needing specialized image descriptions, or structured reports with complex tables.
To get started, simply use our updated {" "} Agent API and datastore UI with the new configuration parameters to customize parsing and chunking behavior for your specific documents and use cases.
Today, Contextual AI announces the release of the Chunk Inspector, a visual debugging tool that allows developers to examine and validate document parsing and chunking results.
Clients can now inspect how their documents are processed through our extraction pipeline, viewing rendered metadata, extracted text, tables or image captioning results for each chunk. This transparency enables developers to diagnose extraction issues, optimize chunking configurations, and ensure their documents are properly RAG-ready before deployment.
The Chunk Inspector provides immediate visibility into how your datastore configuration affects document processing, making it easier to fine-tune parsing and chunking settings for optimal retrieval performance.
To get started, simply navigate to the Chunk Inspector in your datastore UI after ingesting a document to review the extraction and chunking results.
Today, Contextual AI announces the Document Parser for RAG with our separate /parse component API, enabling enterprise AI agents to navigate and understand large and complex documents with superior accuracy and context awareness.
The document parser excels at handling enterprise documents through three key innovations: document-level understanding that captures section hierarchies across hundreds of pages, minimized hallucinations with confidence levels for table extraction, and superior handling of complex modalities such as technical diagrams, charts, and large tables. In testing with SEC filings, including document hierarchy metadata in chunks increased the equivalence score from 69.2% to 84.0%, demonstrating significant improvements in end-to-end RAG performance.
Get started today for free by creating a Contextual AI account. Visit the Components tab to use the Parse UI playground, or get an API key and call the API directly. We provide credits for the first 500+ pages in Standard mode (for complex documents that require VLMs and OCR), and you can buy additional credits as your needs grow. To request custom rate limits and pricing, please contact us. If you have any feedback or need support, please email [parse-feedback@contextual.ai](mailto:parse-feedback@contextual.ai).
Today, Contextual AI launched groundedness scoring for model responses.
Ensuring that agent responses are supported by retrieved knowledge is essential for RAG applications. While Contextual’s Grounded Language Models already produce highly grounded responses, groundedness scoring adds an extra layer of defense against hallucinations and factual errors.
When users query an agent with groundedness scores enabled, a specialized model automatically evaluates how well claims made in the response are supported by the knowledge. Scores are reported for individual text spans allowing for precise detection of unsupported claims. In the platform interface, the score for each text span is viewable upon hover and ungrounded claims are visually distinguished from grounded ones. Scores are also returned in the API, enabling developers to build powerful functionality with ease, like hiding ungrounded claims or adding caveats to specific sections of a response.
To get started, simply toggle “Enable Groundedness Scores” for an agent in the “Generation” section of the agent configuration page, or through the agent creation or edit API. Groundedness scores will automatically be generated and displayed in the UI, and returned as part of responses to /agent/{agent_id}/query requests.
Today, Contextual AI announces the release of document metadata ingestion and allows for metadata-based filtering during queries.
Clients can now narrow search results using document properties like author, date, department, or any custom metadata fields, delivering more precise and contextually relevant responses.
To get started, simply use our ingest document and update document metadata APIs to add metadata to documents. Once done, use our document filter in the query API to filter down results.
Today, Contextual AI announces the release of the support of DOC(X) and PPT(X) files for ingestion into datastore.
This enables clients to leverage Microsoft Office documents directly in their RAG agents, expanding the range of content they can seamlessly incorporate.
To get started, use our document API or our user interface to ingest new files.
Today, Contextual AI announces support for filtering retrieved chunks based on the relevance score assigned by the reranker.
The ability to filter chunks based on relevance score gives users more precision and control in ensuring that only the most relevant chunks are considered during response generation. It is an effective alternative or complement to using the filter\_prompt for a separate filtering LLM.
To get started, use the `reranker_score_filter_threshold parameter` in the Create/Edit Agent APIs and in the UI.
The instruction-following reranker ranks chunks based not only on the query but also on system-level prompts and intent signals, improving retrieval precision.
GLM provides retrieval-anchored generation designed specifically for enterprise RAG applications, improving factuality and stability.
You can now configure decoding parameters such as semantic temperature, reasoning style, and groundedness sensitivity for more predictable output behavior.
Organizations can now restrict access to specific agents, define who can edit or query them, and enforce role-aligned usage boundaries.
Provides programmatic user management, including permissions, access control, and identity lifecycle integration.
Exposes programmatic analytics including usage metrics, latency profiles, groundedness trends, and retrieval performance data.
Multi-turn context enables more natural dialog patterns, reference resolution, and ongoing conversational workflows.
This reduces ingestion duplication, enables cross-domain retrieval, and supports cleaner information architecture.
Early preview includes basic image parsing, multimodal embeddings, and multimodal retrieval pipelines.
Early support includes ingestion of tables, schema-defined objects, and CSV datasets, enabling hybrid retrieval across structured and unstructured sources.